
使用最先进的 YOLOv3 对象检测在 Python 中使用 OpenCV 和 PyTorch 进行实时对象检测、识别和定位。
OpenCV和PyTorch实现YOLO对象检测简介 - 对象检测是计算机视觉和图像处理中的一项任务,用于检测图像或视频中的对象。它用于各种现实世界的应用,包括视频监控、自动驾驶汽车、物体跟踪等。
YOLO对象检测示例:例如,要使汽车真正实现自动驾驶,它必须识别并跟踪周围的物体(例如汽车、行人和交通灯),主要的信息来源之一是使用物体检测的摄像头。最重要的是,检测应该是实时的,这需要相对较快的方式,以便汽车可以安全地在街道上行驶。
Python如何实现YOLO对象检测?在本教程中,你将学习如何使用最先进的技术YOLOv3和 OpenCV 或 Python 中的PyTorch执行对象检测。
YOLO(You Only Look Once)是一个实时对象检测算法,该算法是将输入图像转换为一组网格单元的一个单一的深卷积神经网络,所以不像图像分类或面部检测,每个网格单元在 YOLO 算法的输出中会有一个相关的向量告诉我们:
- 如果该网格单元格中存在对象。
- 该对象的类(即标签)。
- 该对象(位置)的预测边界框。
还有其他方法,例如Fast R-CNN、Faster R-CNN,它在图像上使用窗口滑动,这使得它需要对单个图像(在每个窗口上)进行数千次预测,正如你可能猜到的,这使 YOLOv3 比它快 1000 倍R-CNN比 Fast R-CNN 快 100 倍。
YOLO 版本 3 是 YOLO 的最新版本,它使用很少的技巧来改进训练和提高性能,查看YOLOv3 论文中的完整细节。
入门
在我们深入代码之前,让我们安装本教程所需的库(如果你想使用 PyTorch 代码,请前往此页面进行安装):
pip3 install opencv-python numpy matplotlib这是相当具有挑战性的建立YOLOv3整个系统(模型和使用的技术)从无到有,开放源码库,如暗网或OpenCV的已建成,对于你,甚至普通百姓构建的第三方项目YOLOv3(检查这对于TensorFlow 2 实现)
导入所需模块:
import cv2
import numpy as np

import time
import sys
import os
让我们定义一些我们需要的变量和参数:
CONFIDENCE = 0.5
SCORE_THRESHOLD = 0.5
IOU_THRESHOLD = 0.5

# the neural network configuration
config_path = "cfg/yolov3.cfg"
# the YOLO net weights file
weights_path = "weights/yolov3.weights"
# weights_path = "weights/yolov3-tiny.weights"

# loading all the class labels (objects)
labels = open("data/coco.names").read().strip().split("\n")
# generating colors for each object for later plotting
colors = np.random.randint(0, 255, size=(len(LABELS), 3), dtype="uint8")
我们初始化了参数,后面会讲到,config_path和weights_path 分别代表模型配置(即 yolov3)和对应的预训练模型权重。标签是要检测的不同对象的所有类标签的列表,我们将用唯一的颜色绘制每个对象类,这就是我们生成随机颜色的原因。
需要的文件请参考这个存储库,由于权重文件太大(大约240MB),它不在存储库中,请在这里下载。
下面的代码加载模型:
# load the YOLO network
net = cv2.dnn.readNetFromDarknet(config_path, weights_path)
准备图像
OpenCV和PyTorch实现YOLO对象检测:让我们加载一个示例图像(图像在存储库中):
path_name = "images/street.jpg"
image = cv2.imread(path_name)
file_name = os.path.basename(path_name)
filename, ext = file_name.split(".")
接下来,我们需要对该图像进行归一化、缩放和重塑,使其适合作为神经网络的输入:
h, w = image.shape[:2]
# create 4D blob
blob = cv2.dnn.blobFromImage(image, 1/255.0, (416, 416), swapRB=True, crop=False)
这会将像素值归一化为0到1 的范围,将图像大小调整为(416, 416),并对其进行整形,让我们看看:
print("image.shape:", image.shape)
print("blob.shape:", blob.shape)
输出:
image.shape: (1200, 1800, 3)
blob.shape: (1, 3, 416, 416)
做出预测
YOLO对象检测示例 - 现在让我们将此图像输入神经网络以获得输出预测:
# sets the blob as the input of the network
net.setInput(blob)
# get all the layer names
ln = net.getLayerNames()
ln = [ln[i[0] - 1] for i in net.getUnconnectedOutLayers()]
# feed forward (inference) and get the network output
# measure how much it took in seconds
start = time.perf_counter()
layer_outputs = net.forward(ln)
time_took = time.perf_counter() - start
print(f"Time took: {time_took:.2f}s")
这将提取神经网络输出并打印推理所需的总时间:
Time took: 1.54s现在你可能想知道,为什么它没有那么快?1.5秒很慢?好吧,我们仅将 CPU 用于推理,这对于实际问题并不理想,这就是我们将在本教程后面跳入 PyTorch 的原因。另一方面,与 R-CNN 等其他技术相比,1.5秒相对较好。
你也可以使用 YOLOv3 的微型版本,它更快但准确度较低,你可以在此处下载。
现在我们需要迭代神经网络输出并丢弃任何置信度低于我们之前指定的CONFIDENCE参数(即0.5或50%)的对象。
font_scale = 1
thickness = 1
boxes, confidences, class_ids = [], [], []
# loop over each of the layer outputs
for output in layer_outputs:
    # loop over each of the object detections
    for detection in output:
        # extract the class id (label) and confidence (as a probability) of
        # the current object detection
        scores = detection[5:]
        class_id = np.argmax(scores)
        confidence = scores[class_id]
        # discard out weak predictions by ensuring the detected
        # probability is greater than the minimum probability
        if confidence > CONFIDENCE:
            # scale the bounding box coordinates back relative to the
            # size of the image, keeping in mind that YOLO actually
            # returns the center (x, y)-coordinates of the bounding
            # box followed by the boxes' width and height
            box = detection[:4] * np.array([w, h, w, h])
            (centerX, centerY, width, height) = box.astype("int")
            # use the center (x, y)-coordinates to derive the top and
            # and left corner of the bounding box
            x = int(centerX - (width / 2))
            y = int(centerY - (height / 2))
            # update our list of bounding box coordinates, confidences,
            # and class IDs
            boxes.append([x, y, int(width), int(height)])
            confidences.append(float(confidence))
            class_ids.append(class_id)
复制这将遍历所有预测并仅保存具有高置信度的对象,让我们看看检测向量代表什么:
print(detection.shape)输出:
(85,)Python如何实现YOLO对象检测?在每个对象预测上,有一个85的向量。前4 个值表示对象的位置,(x, y)坐标为中心点以及边界框的宽度和高度,其余数字对应于对象标签,因为这是COCO 数据集,它有80类标签。
例如,如果检测到的对象是人,则80长度向量中的第一个值应为1,其余所有值应为0,自行车的第二个数字,汽车的第三个数字,一直到第 80 个对象。这就是我们使用np.argmax()函数来获取类 id 的原因,因为它返回80长度向量中最大值的索引。
绘制检测到的对象
现在我们有了我们需要的一切,让我们绘制对象矩形和标签并查看结果:
# loop over the indexes we are keeping
for i in range(len(boxes)):
    # extract the bounding box coordinates
    x, y = boxes[i][0], boxes[i][1]
    w, h = boxes[i][2], boxes[i][3]
    # draw a bounding box rectangle and label on the image
    color = [int(c) for c in colors[class_ids[i]]]
    cv2.rectangle(image, (x, y), (x + w, y + h), color=color, thickness=thickness)
    text = f"{labels[class_ids[i]]}: {confidences[i]:.2f}"
    # calculate text width & height to draw the transparent boxes as background of the text
    (text_width, text_height) = cv2.getTextSize(text, cv2.FONT_HERSHEY_SIMPLEX, fontScale=font_scale, thickness=thickness)[0]
    text_offset_x = x
    text_offset_y = y - 5
    box_coords = ((text_offset_x, text_offset_y), (text_offset_x + text_width + 2, text_offset_y - text_height))
    overlay = image.copy()
    cv2.rectangle(overlay, box_coords[0], box_coords[1], color=color, thickness=cv2.FILLED)
    # add opacity (transparency to the box)
    image = cv2.addWeighted(overlay, 0.6, image, 0.4, 0)
    # now put the text (label: confidence %)
    cv2.putText(image, text, (x, y - 5), cv2.FONT_HERSHEY_SIMPLEX,
        fontScale=font_scale, color=(0, 0, 0), thickness=thickness)
让我们写下图像:
cv2.imwrite(filename + "_yolo3." + ext, image)当前目录中将出现一个新图像,对每个检测到的对象进行标记。但是,请查看图像的这一部分:
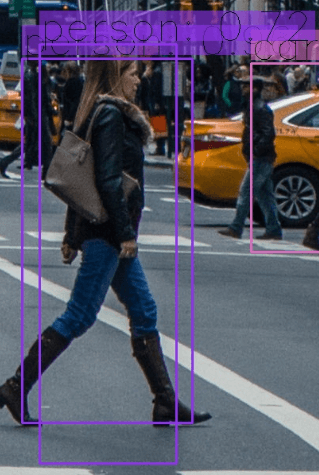
OpenCV和PyTorch实现YOLO对象检测:你猜对了,一个物体的两个边界框,这是一个问题,不是吗?好吧,YOLO 的创造者使用一种称为非最大抑制的技术来消除这种情况。
非最大抑制
非最大抑制是一种抑制重叠边界框的技术,这些边界框没有最大概率进行对象检测。主要分两个阶段实现:
- 它选择获得最高置信度(即概率)的边界框。
- 然后它将所有其他边界框与这个选定的边界框进行比较,并消除那些具有高IoU 的边界框。
什么是 IoU
IoU(Intersection over Union)是一种在非最大抑制中使用的技术,用于比较两个不同边界框的接近程度。下图简单演示:
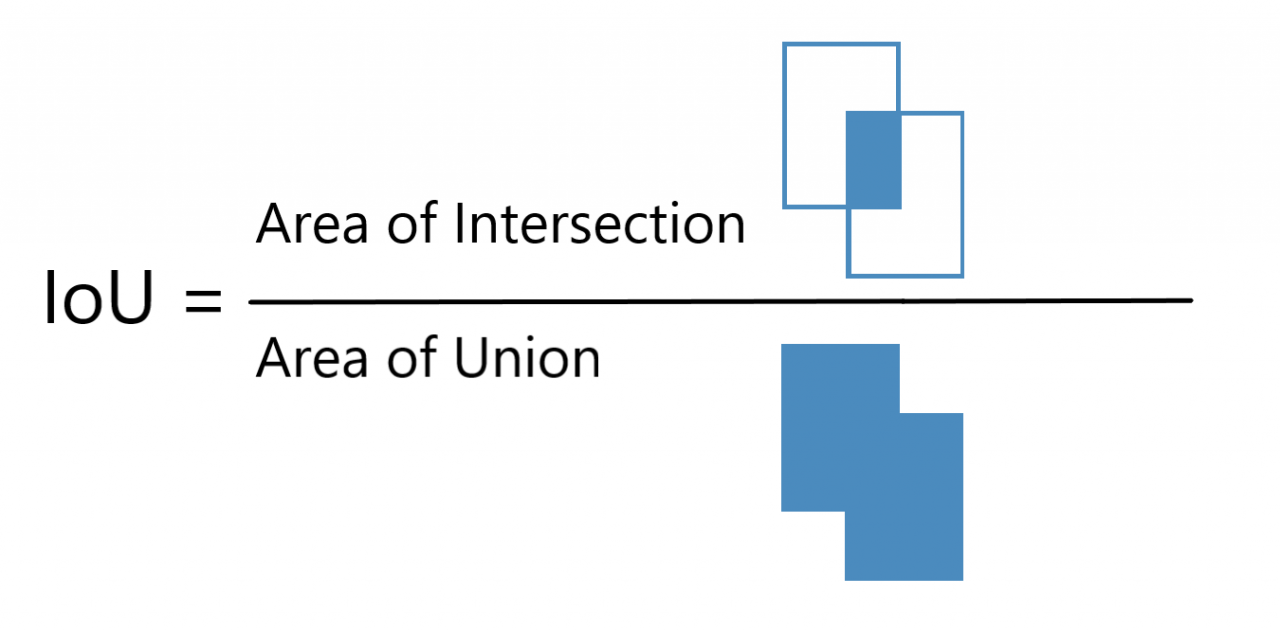
IoU 越高,边界框越近。IoU 为1意味着两个边界框是相同的,而 IoU 为0意味着它们甚至没有相交。
因此,我们将使用0.5 的 IoU 阈值(我们在本教程开头初始化),这意味着与最大概率边界框相比,我们消除了低于此值的任何边界框。
YOLO对象检测示例 - 该SCORE_THRESHOLD将消除低于该值的信心任何边界框:
# perform the non maximum suppression given the scores defined before
idxs = cv2.dnn.NMSBoxes(boxes, confidences, SCORE_THRESHOLD, IOU_THRESHOLD)
现在让我们再次绘制框:
# ensure at least one detection exists
if len(idxs) > 0:
    # loop over the indexes we are keeping
    for i in idxs.flatten():
        # extract the bounding box coordinates
        x, y = boxes[i][0], boxes[i][1]
        w, h = boxes[i][2], boxes[i][3]
        # draw a bounding box rectangle and label on the image
        color = [int(c) for c in colors[class_ids[i]]]
        cv2.rectangle(image, (x, y), (x + w, y + h), color=color, thickness=thickness)
        text = f"{labels[class_ids[i]]}: {confidences[i]:.2f}"
        # calculate text width & height to draw the transparent boxes as background of the text
        (text_width, text_height) = cv2.getTextSize(text, cv2.FONT_HERSHEY_SIMPLEX, fontScale=font_scale, thickness=thickness)[0]
        text_offset_x = x
        text_offset_y = y - 5
        box_coords = ((text_offset_x, text_offset_y), (text_offset_x + text_width + 2, text_offset_y - text_height))
        overlay = image.copy()
        cv2.rectangle(overlay, box_coords[0], box_coords[1], color=color, thickness=cv2.FILLED)
        # add opacity (transparency to the box)
        image = cv2.addWeighted(overlay, 0.6, image, 0.4, 0)
        # now put the text (label: confidence %)
        cv2.putText(image, text, (x, y - 5), cv2.FONT_HERSHEY_SIMPLEX,
            fontScale=font_scale, color=(0, 0, 0), thickness=thickness)
你可以使用cv2.imshow("image", image)来显示图像,但我们只是将其保存到磁盘:
cv2.imwrite(filename + "_yolo3." + ext, image)复制看一下这个:
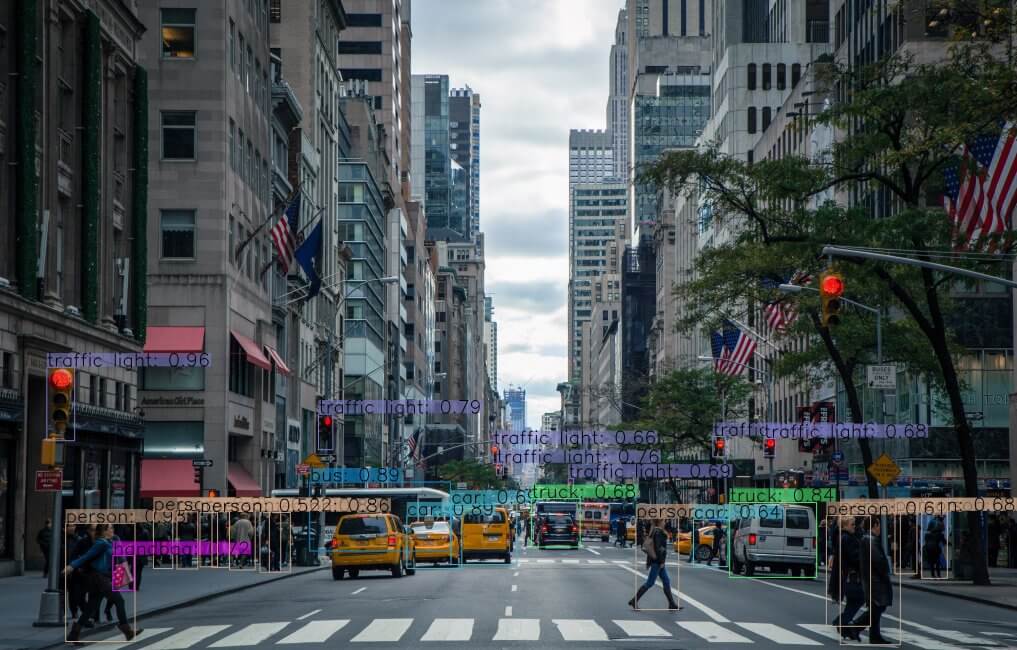 这是另一个示例图像:
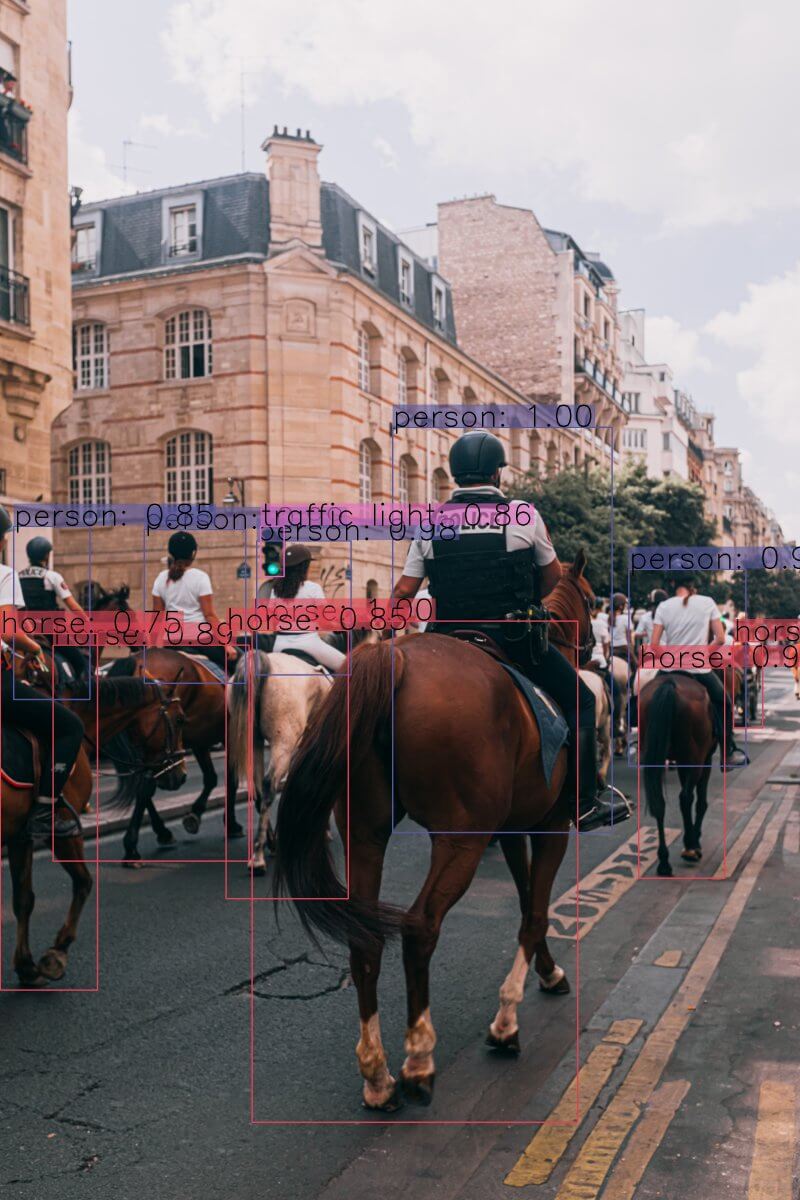
或这个:
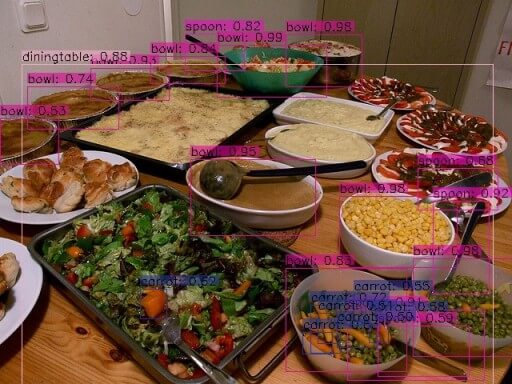
惊人的!使用你自己的图像并调整这些参数,看看哪个效果最好!
此外,如果图像获得高分辨率,请确保增加font_scale参数,以便你可以看到边界框及其相应的标签。
PyTorch 代码
Python如何实现YOLO对象检测?正如前面提到的,如果你想使用GPU(这是速度远远超过一个CPU)的推论,那么你可以使用支持PyTorch库CUDA运算,这里是该代码(GET darknet.py和utils.py从该存储库),YOLO对象检测示例代码:
import cv2
import matplotlib.pyplot as plt
from utils import *
from darknet import Darknet

# Set the NMS Threshold
nms_threshold = 0.6
# Set the IoU threshold
iou_threshold = 0.4
cfg_file = "cfg/yolov3.cfg"
weight_file = "weights/yolov3.weights"
namesfile = "data/coco.names"
m = Darknet(cfg_file)
m.load_weights(weight_file)
class_names = load_class_names(namesfile)
# m.print_network()
original_image = cv2.imread("images/city_scene.jpg")
original_image = cv2.cvtColor(original_image, cv2.COLOR_BGR2RGB)
img = cv2.resize(original_image, (m.width, m.height))
# detect the objects
boxes = detect_objects(m, img, iou_threshold, nms_threshold)
# plot the image with the bounding boxes and corresponding object class labels
plot_boxes(original_image, boxes, class_names, plot_labels=True)注意:以上代码需要当前目录下有darknet.py和utils.py文件。此外,必须安装 PyTorch(建议使用 GPU 加速)。
OpenCV和PyTorch实现YOLO对象检测总结
我已经准备了一个代码供你使用实时摄像头进行实时物体检测,请在此处查看。此外,如果你想读取视频文件并对其进行对象检测,此代码可以帮助你,这是一个示例输出:
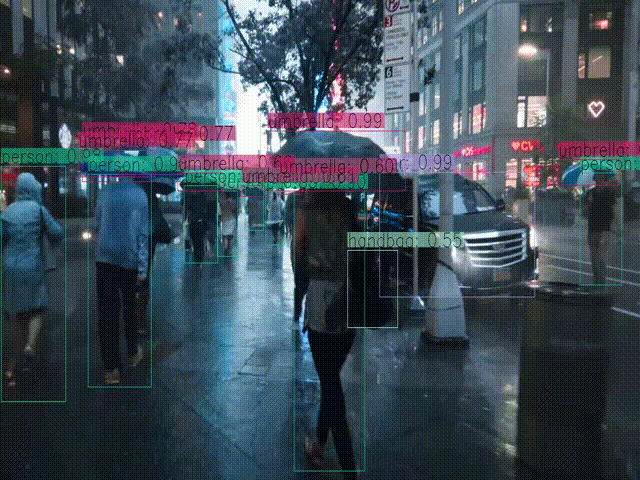
请注意,YOLO 对象检测器存在一些缺点,一个主要缺点是 YOLO 难以检测组合在一起的对象,尤其是对于较小的对象。也有SSD,它通常可以在速度和准确性方面进行权衡。
本教程的代码取决于以下来源:
如果你想改用 TensorFlow 2,有一些由人们构建的项目和存储库,我建议你检查这个。
在此处查看官方 YOLO 教程。

