
了解如何使用 Python 中的 OpenCV 库对图像中检测到的人脸执行性别检测。
OpenCV性别检测:由于其在各种面部分析问题中的广泛应用,从面部图像中自动预测性别最近引起了很多关注。然而,由于人脸图像的巨大变化(例如光照、比例和遮挡的变化),现有模型仍然落后于在实际应用中利用这些模型所必需的所需精度水平。
本OpenCV检测性别示例教程的目标是开发一个基于命令行的轻量级实用程序,通过基于 Python 的模块自动检测静态图像中的人脸,并使用基于深度学习的性别检测模型预测被发现人员的性别。
OpenCV如何检测性别请注意,如果你想在同一代码中同时检测性别和年龄,请查看本教程。
先决条件
以下组件发挥作用:
- OpenCV:是一个用于计算机视觉、机器学习和图像处理的开源库。OpenCV 支持 Python、C++、Java 等多种编程语言,可用于各种图像和视频分析,如面部检测和识别、照片编辑、光学字符识别等等。使用 OpenCV 有很多好处,其中包括:
- OpenCV 是一个开源库,它是免费的。
- OpenCV 速度很快,因为它是用 C/C++ 编写的。
- OpenCV 支持大多数操作系统,例如 Windows、Linux 和 macOS。
- filetype:是一个小型且无依赖的 Python 包,用于推断文件和 MIME 类型。
出于本文的目的,我们将使用预训练的 Caffe 模型,一个来自人脸检测教程的人脸检测模型,另一个用于年龄检测的模型。以下是包含在我们的项目目录中的必要文件列表:
gender_net.caffemodel:它是用于性别检测的预训练模型权重。你可以在这里下载。deploy_gender.prototxt: 是性别检测模型的模型架构(一个带有类似 JSON 结构的纯文本文件,包含所有神经网络层的定义)。从这里获取。res10_300x300_ssd_iter_140000_fp16.caffemodel:用于人脸检测的预训练模型权重,请在此处下载。deploy.prototxt.txt:这是人脸检测模型的模型架构,在这里下载。
下载 4 个必要文件后,将它们放在 weights 文件夹中:
 OpenCV性别检测 - 首先,让我们安装 OpenCV 和 NumPy:
$ pip install opencv-python numpyOpenCV检测性别示例:打开一个新的 Python 文件并继续。首先,让我们导入必要的模块并初始化所需的变量:
# Import Libraries
import cv2
import numpy as np

# The gender model architecture
# https://drive.google.com/open?id=1W_moLzMlGiELyPxWiYQJ9KFaXroQ_NFQ
GENDER_MODEL = 'weights/deploy_gender.prototxt'
# The gender model pre-trained weights
# https://drive.google.com/open?id=1AW3WduLk1haTVAxHOkVS_BEzel1WXQHP
GENDER_PROTO = 'weights/gender_net.caffemodel'
# Each Caffe Model impose the shape of the input image also image preprocessing is required like mean
# substraction to eliminate the effect of illunination changes
MODEL_MEAN_VALUES = (78.4263377603, 87.7689143744, 114.895847746)
# Represent the gender classes
GENDER_LIST = ['Male', 'Female']
# https://raw.githubusercontent.com/opencv/opencv/master/samples/dnn/face_detector/deploy.prototxt
FACE_PROTO = "weights/deploy.prototxt.txt"
# https://raw.githubusercontent.com/opencv/opencv_3rdparty/dnn_samples_face_detector_20180205_fp16/res10_300x300_ssd_iter_140000_fp16.caffemodel
FACE_MODEL = "weights/res10_300x300_ssd_iter_140000_fp16.caffemodel"
接下来,让我们加载我们的模型:
# load face Caffe model
face_net = cv2.dnn.readNetFromCaffe(FACE_PROTO, FACE_MODEL)
# Load gender prediction model
gender_net = cv2.dnn.readNetFromCaffe(GENDER_MODEL, GENDER_PROTO)
与年龄检测教程一样,在开始检测性别之前,我们需要一种检测人脸的方法,以下功能主要取自人脸检测教程:
def get_faces(frame, confidence_threshold=0.5):
    # convert the frame into a blob to be ready for NN input
    blob = cv2.dnn.blobFromImage(frame, 1.0, (300, 300), (104, 177.0, 123.0))
    # set the image as input to the NN
    face_net.setInput(blob)
    # perform inference and get predictions
    output = np.squeeze(face_net.forward())
    # initialize the result list
    faces = []
    # Loop over the faces detected
    for i in range(output.shape[0]):
        confidence = output[i, 2]
        if confidence > confidence_threshold:
            box = output[i, 3:7] * \
                np.array([frame.shape[1], frame.shape[0],
                         frame.shape[1], frame.shape[0]])
            # convert to integers
            start_x, start_y, end_x, end_y = box.astype(np.int)
            # widen the box a little
            start_x, start_y, end_x, end_y = start_x - \
                10, start_y - 10, end_x + 10, end_y + 10
            start_x = 0 if start_x < 0 else start_x
            start_y = 0 if start_y < 0 else start_y
            end_x = 0 if end_x < 0 else end_x
            end_y = 0 if end_y < 0 else end_y
            # append to our list
            faces.append((start_x, start_y, end_x, end_y))
    return faces
接下来,创建一个实用函数来显示图像:
def display_img(title, img):
    """Displays an image on screen and maintains the output until the user presses a key"""
    # Display Image on screen
    cv2.imshow(title, img)
    # Mantain output until user presses a key
    cv2.waitKey(0)
    # Destroy windows when user presses a key
cv2.destroyAllWindows()OpenCV如何检测性别?接下来,让我们创建两个实用函数,一个用于找到合适的字体大小以写入图像,另一个用于正确调整图像大小:
def get_optimal_font_scale(text, width):
    """Determine the optimal font scale based on the hosting frame width"""
    for scale in reversed(range(0, 60, 1)):
        textSize = cv2.getTextSize(text, fontFace=cv2.FONT_HERSHEY_DUPLEX, fontScale=scale/10, thickness=1)
        new_width = textSize[0][0]
        if (new_width <= width):
            return scale/10
    return 1

# from: https://stackoverflow.com/questions/44650888/resize-an-image-without-distortion-opencv
def image_resize(image, width = None, height = None, inter = cv2.INTER_AREA):
    # initialize the dimensions of the image to be resized and
    # grab the image size
    dim = None
    (h, w) = image.shape[:2]
    # if both the width and height are None, then return the
    # original image
    if width is None and height is None:
        return image
    # check to see if the width is None
    if width is None:
        # calculate the ratio of the height and construct the
        # dimensions
        r = height / float(h)
        dim = (int(w * r), height)
    # otherwise, the height is None
    else:
        # calculate the ratio of the width and construct the
        # dimensions
        r = width / float(w)
        dim = (width, int(h * r))
    # resize the image
    return cv2.resize(image, dim, interpolation = inter)
OpenCV检测性别示例:现在我们知道了如何检测人脸,让我们让我们的核心功能来预测检测到的每个人脸的性别:
def predict_gender(input_path: str):
    """Predict the gender of the faces showing in the image"""
    # Read Input Image
    img = cv2.imread(input_path)
    # resize the image, uncomment if you want to resize the image
    # img = cv2.resize(img, (frame_width, frame_height))
    # Take a copy of the initial image and resize it
    frame = img.copy()
    if frame.shape[1] > frame_width:
        frame = image_resize(frame, width=frame_width)
    # predict the faces
    faces = get_faces(frame)
    # Loop over the faces detected
    # for idx, face in enumerate(faces):
    for i, (start_x, start_y, end_x, end_y) in enumerate(faces):
        face_img = frame[start_y: end_y, start_x: end_x]
        # image --> Input image to preprocess before passing it through our dnn for classification.
        # scale factor = After performing mean substraction we can optionally scale the image by some factor. (if 1 -> no scaling)
        # size = The spatial size that the CNN expects. Options are = (224*224, 227*227 or 299*299)
        # mean = mean substraction values to be substracted from every channel of the image.
        # swapRB=OpenCV assumes images in BGR whereas the mean is supplied in RGB. To resolve this we set swapRB to True.
        blob = cv2.dnn.blobFromImage(image=face_img, scalefactor=1.0, size=(
            227, 227), mean=MODEL_MEAN_VALUES, swapRB=False, crop=False)
        # Predict Gender
        gender_net.setInput(blob)
        gender_preds = gender_net.forward()
        i = gender_preds[0].argmax()
        gender = GENDER_LIST[i]
        gender_confidence_score = gender_preds[0][i]
        # Draw the box
        label = "{}-{:.2f}%".format(gender, gender_confidence_score*100)
        print(label)
        yPos = start_y - 15
        while yPos < 15:
            yPos += 15
        # get the font scale for this image size
        optimal_font_scale = get_optimal_font_scale(label,((end_x-start_x)+25))
        box_color = (255, 0, 0) if gender == "Male" else (147, 20, 255)
        cv2.rectangle(frame, (start_x, start_y), (end_x, end_y), box_color, 2)
        # Label processed image
        cv2.putText(frame, label, (start_x, yPos),
                    cv2.FONT_HERSHEY_SIMPLEX, optimal_font_scale, box_color, 2)

        # Display processed image
    display_img("Gender Estimator", frame)
    # uncomment if you want to save the image
    # cv2.imwrite("output.jpg", frame)
    # Cleanup
    cv2.destroyAllWindows()
OpenCV性别检测 - 复制下面是predict_gender()函数的过程:
- 我们使用该
cv2.imread()函数读取输入图像。 - 如果它在
frame_width变量之上,我们会调整图像的大小,请随时根据你的需要进行编辑。 - 我们使用我们之前定义的
get_faces()函数来检测图像中的人脸。 - 我们迭代每张脸,在它周围画一个矩形,并将其传递给性别检测模型以对性别进行推断。
- 最后,我们在控制台和图像中打印性别。之后,我们只需显示图像并将其保存到磁盘(如果需要)。
好的,让我们现在调用我们的函数:
if __name__ == '__main__':
    # Parsing command line arguments entered by user
    import sys
    predict_gender(sys.argv[1])
我们简单地使用 sys 模块从命令行获取图像路径。让我们测试一下,我正在测试这张库存图片:
$ python predict_gender.py images\\pexels-karolina-grabowska-8526635.jpg这是控制台中的输出:
Female-97.36%
Female-98.34%
以及由此产生的图像:
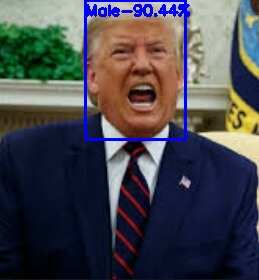
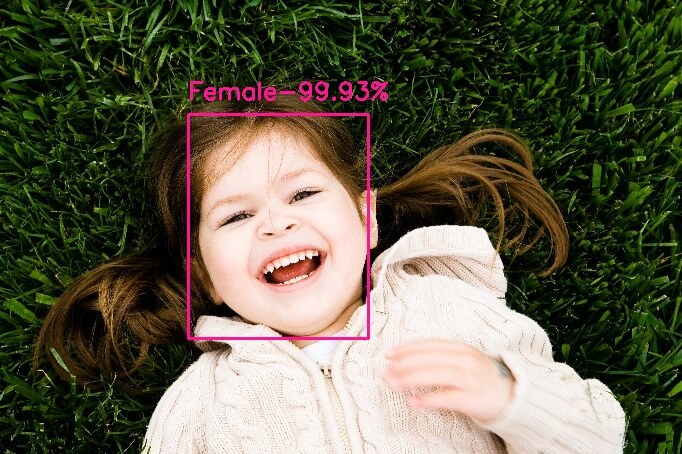
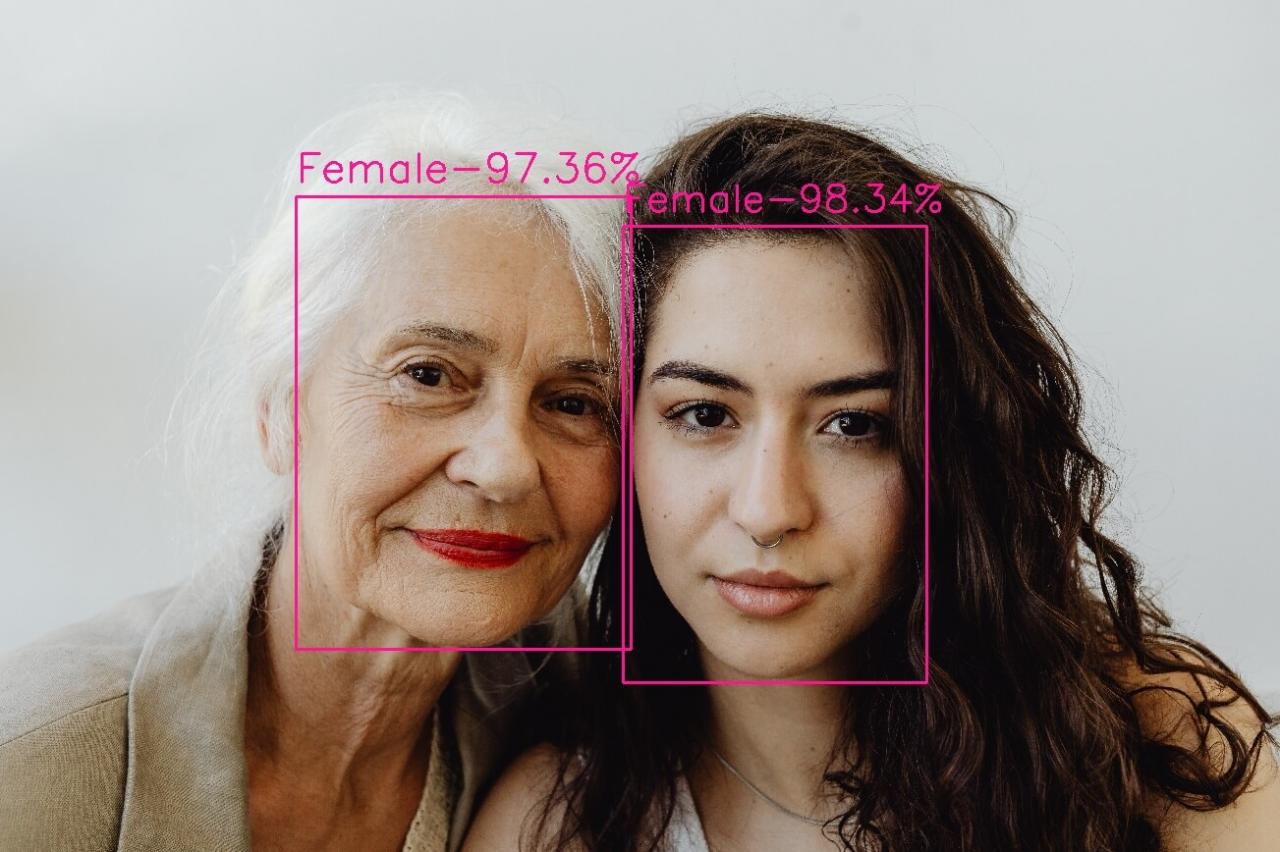 这是另一个OpenCV检测性别示例:
 OpenCV性别检测总结
OpenCV如何检测性别?好了,现在你有了一个 Python 代码,可以使用 OpenCV 库检测任何图像上的性别。性别模型似乎是准确的。
如果你想使用网络摄像头检测性别,请查看此代码。
在此处查看完整代码。

