
了解如何使用带有相机或图像输入的 Python 中的 OpenCV 库执行年龄和性别检测。
在本OpenCV年龄和性别检测教程中,我们将结合性别检测和年龄检测教程来编写一个代码来检测两者。
OpenCV如何检测年龄和性别?如果你还没有安装 OpenCV,请确保这样做:
$ pip install opencv-python numpy打开一个新文件。导入库:
# Import Libraries
import cv2
import numpy as np
接下来,定义人脸、年龄和性别检测模型的权重和架构变量:
# https://raw.githubusercontent.com/opencv/opencv/master/samples/dnn/face_detector/deploy.prototxt
FACE_PROTO = "weights/deploy.prototxt.txt"
# https://raw.githubusercontent.com/opencv/opencv_3rdparty/dnn_samples_face_detector_20180205_fp16/res10_300x300_ssd_iter_140000_fp16.caffemodel
FACE_MODEL = "weights/res10_300x300_ssd_iter_140000_fp16.caffemodel"
# The gender model architecture
# https://drive.google.com/open?id=1W_moLzMlGiELyPxWiYQJ9KFaXroQ_NFQ
GENDER_MODEL = 'weights/deploy_gender.prototxt'
# The gender model pre-trained weights
# https://drive.google.com/open?id=1AW3WduLk1haTVAxHOkVS_BEzel1WXQHP
GENDER_PROTO = 'weights/gender_net.caffemodel'
# Each Caffe Model impose the shape of the input image also image preprocessing is required like mean
# substraction to eliminate the effect of illunination changes
MODEL_MEAN_VALUES = (78.4263377603, 87.7689143744, 114.895847746)
# Represent the gender classes
GENDER_LIST = ['Male', 'Female']
# The model architecture
# download from: https://drive.google.com/open?id=1kiusFljZc9QfcIYdU2s7xrtWHTraHwmW
AGE_MODEL = 'weights/deploy_age.prototxt'
# The model pre-trained weights
# download from: https://drive.google.com/open?id=1kWv0AjxGSN0g31OeJa02eBGM0R_jcjIl
AGE_PROTO = 'weights/age_net.caffemodel'
# Represent the 8 age classes of this CNN probability layer
AGE_INTERVALS = ['(0, 2)', '(4, 6)', '(8, 12)', '(15, 20)',
                 '(25, 32)', '(38, 43)', '(48, 53)', '(60, 100)']
OpenCV年龄和性别检测 - 以下是要包含在项目目录中的必要文件:
gender_net.caffemodel:它是用于性别检测的预训练模型权重。你可以在这里下载。deploy_gender.prototxt: 是性别检测模型的模型架构(一个带有类似 JSON 结构的纯文本文件,包含所有神经网络层的定义)。从这里获取。age_net.caffemodel:这是用于年龄检测的预训练模型权重。你可以在这里下载。deploy_age.prototxt: 是年龄检测模型的模型架构(一个带有类似 JSON 结构的纯文本文件,包含所有神经网络层的定义)。从这里获取。res10_300x300_ssd_iter_140000_fp16.caffemodel:用于人脸检测的预训练模型权重,请在此处下载。deploy.prototxt.txt:这是人脸检测模型的模型架构,在这里下载。
接下来,加载模型:
# Initialize frame size
frame_width = 1280
frame_height = 720
# load face Caffe model
face_net = cv2.dnn.readNetFromCaffe(FACE_PROTO, FACE_MODEL)
# Load age prediction model
age_net = cv2.dnn.readNetFromCaffe(AGE_MODEL, AGE_PROTO)
# Load gender prediction model
gender_net = cv2.dnn.readNetFromCaffe(GENDER_MODEL, GENDER_PROTO)OpenCV检测年龄和性别示例:在尝试检测年龄和性别之前,我们首先需要一个检测人脸的函数:
def get_faces(frame, confidence_threshold=0.5):
    # convert the frame into a blob to be ready for NN input
    blob = cv2.dnn.blobFromImage(frame, 1.0, (300, 300), (104, 177.0, 123.0))
    # set the image as input to the NN
    face_net.setInput(blob)
    # perform inference and get predictions
    output = np.squeeze(face_net.forward())
    # initialize the result list
    faces = []
    # Loop over the faces detected
    for i in range(output.shape[0]):
        confidence = output[i, 2]
        if confidence > confidence_threshold:
            box = output[i, 3:7] * \
                np.array([frame.shape[1], frame.shape[0],
                         frame.shape[1], frame.shape[0]])
            # convert to integers
            start_x, start_y, end_x, end_y = box.astype(np.int)
            # widen the box a little
            start_x, start_y, end_x, end_y = start_x - \
                10, start_y - 10, end_x + 10, end_y + 10
            start_x = 0 if start_x < 0 else start_x
            start_y = 0 if start_y < 0 else start_y
            end_x = 0 if end_x < 0 else end_x
            end_y = 0 if end_y < 0 else end_y
            # append to our list
            faces.append((start_x, start_y, end_x, end_y))
return faces该get_faces()功能是从人脸检测教程中抓取的,如果你需要更多信息,请查看它。
下面是一个简单显示图像的函数:
def display_img(title, img):
    """Displays an image on screen and maintains the output until the user presses a key"""
    # Display Image on screen
    cv2.imshow(title, img)
    # Mantain output until user presses a key
    cv2.waitKey(0)
    # Destroy windows when user presses a key
    cv2.destroyAllWindows()
OpenCV年龄和性别检测:下面是一个动态调整图像大小的函数,当超过一定宽度时,我们将需要它来调整输入图像的大小:
# from: https://stackoverflow.com/questions/44650888/resize-an-image-without-distortion-opencv
def image_resize(image, width = None, height = None, inter = cv2.INTER_AREA):
    # initialize the dimensions of the image to be resized and
    # grab the image size
    dim = None
    (h, w) = image.shape[:2]
    # if both the width and height are None, then return the
    # original image
    if width is None and height is None:
        return image
    # check to see if the width is None
    if width is None:
        # calculate the ratio of the height and construct the
        # dimensions
        r = height / float(h)
        dim = (int(w * r), height)
    # otherwise, the height is None
    else:
        # calculate the ratio of the width and construct the
        # dimensions
        r = width / float(w)
        dim = (width, int(h * r))
    # resize the image
    return cv2.resize(image, dim, interpolation = inter)
现在一切准备就绪,让我们定义年龄和性别检测的两个函数:
def get_gender_predictions(face_img):
    blob = cv2.dnn.blobFromImage(
        image=face_img, scalefactor=1.0, size=(227, 227),
        mean=MODEL_MEAN_VALUES, swapRB=False, crop=False
    )
    gender_net.setInput(blob)
    return gender_net.forward()


def get_age_predictions(face_img):
    blob = cv2.dnn.blobFromImage(
        image=face_img, scalefactor=1.0, size=(227, 227),
        mean=MODEL_MEAN_VALUES, swapRB=False
    )
    age_net.setInput(blob)
return age_net.forward()get_gender_predictions()和get_age_predictions()在执行预测gender_net和age_net模型分别推断出输入图像的性别和年龄。
OpenCV检测年龄和性别示例:最后,我们编写我们的主函数:
def predict_age_and_gender(input_path: str):
    """Predict the gender of the faces showing in the image"""
    # Initialize frame size
    # frame_width = 1280
    # frame_height = 720
    # Read Input Image
    img = cv2.imread(input_path)
    # resize the image, uncomment if you want to resize the image
    # img = cv2.resize(img, (frame_width, frame_height))
    # Take a copy of the initial image and resize it
    frame = img.copy()
    if frame.shape[1] > frame_width:
        frame = image_resize(frame, width=frame_width)
    # predict the faces
    faces = get_faces(frame)
    # Loop over the faces detected
    # for idx, face in enumerate(faces):
    for i, (start_x, start_y, end_x, end_y) in enumerate(faces):
        face_img = frame[start_y: end_y, start_x: end_x]
        age_preds = get_age_predictions(face_img)
        gender_preds = get_gender_predictions(face_img)
        i = gender_preds[0].argmax()
        gender = GENDER_LIST[i]
        gender_confidence_score = gender_preds[0][i]
        i = age_preds[0].argmax()
        age = AGE_INTERVALS[i]
        age_confidence_score = age_preds[0][i]
        # Draw the box
        label = f"{gender}-{gender_confidence_score*100:.1f}%, {age}-{age_confidence_score*100:.1f}%"
        # label = "{}-{:.2f}%".format(gender, gender_confidence_score*100)
        print(label)
        yPos = start_y - 15
        while yPos < 15:
            yPos += 15
        box_color = (255, 0, 0) if gender == "Male" else (147, 20, 255)
        cv2.rectangle(frame, (start_x, start_y), (end_x, end_y), box_color, 2)
        # Label processed image
        font_scale = 0.54
        cv2.putText(frame, label, (start_x, yPos),
                    cv2.FONT_HERSHEY_SIMPLEX, font_scale, box_color, 2)

        # Display processed image
    display_img("Gender Estimator", frame)
    # uncomment if you want to save the image
    cv2.imwrite("output.jpg", frame)
    # Cleanup
cv2.destroyAllWindows()OpenCV如何检测年龄和性别?主要功能执行以下操作:
- 首先,它使用该
cv2.imread()方法读取图像。 - 将图像调整为合适的大小后,我们使用我们的
get_faces()函数从图像中获取所有检测到的人脸。 - 我们迭代每个检测到的人脸图像并调用我们的
get_age_predictions()和get_gender_predictions()以获得预测。 - 我们打印年龄和性别。
- 我们在脸部周围绘制一个矩形,并在图像上放置包含年龄和性别文本以及置信度的标签。
- 最后,我们显示图像。
让我们称之为:
if __name__ == "__main__":
    import sys
    input_path = sys.argv[1]
    predict_age_and_gender(input_path)
完成,让我们现在运行脚本(在此图像上测试):
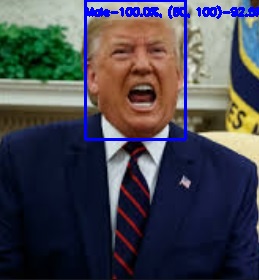
$ python age_and_gender_detection.py images/girl.jpg控制台输出:
Male-99.1%, (4, 6)-71.9%
Female-96.0%, (4, 6)-70.9%
结果图像:
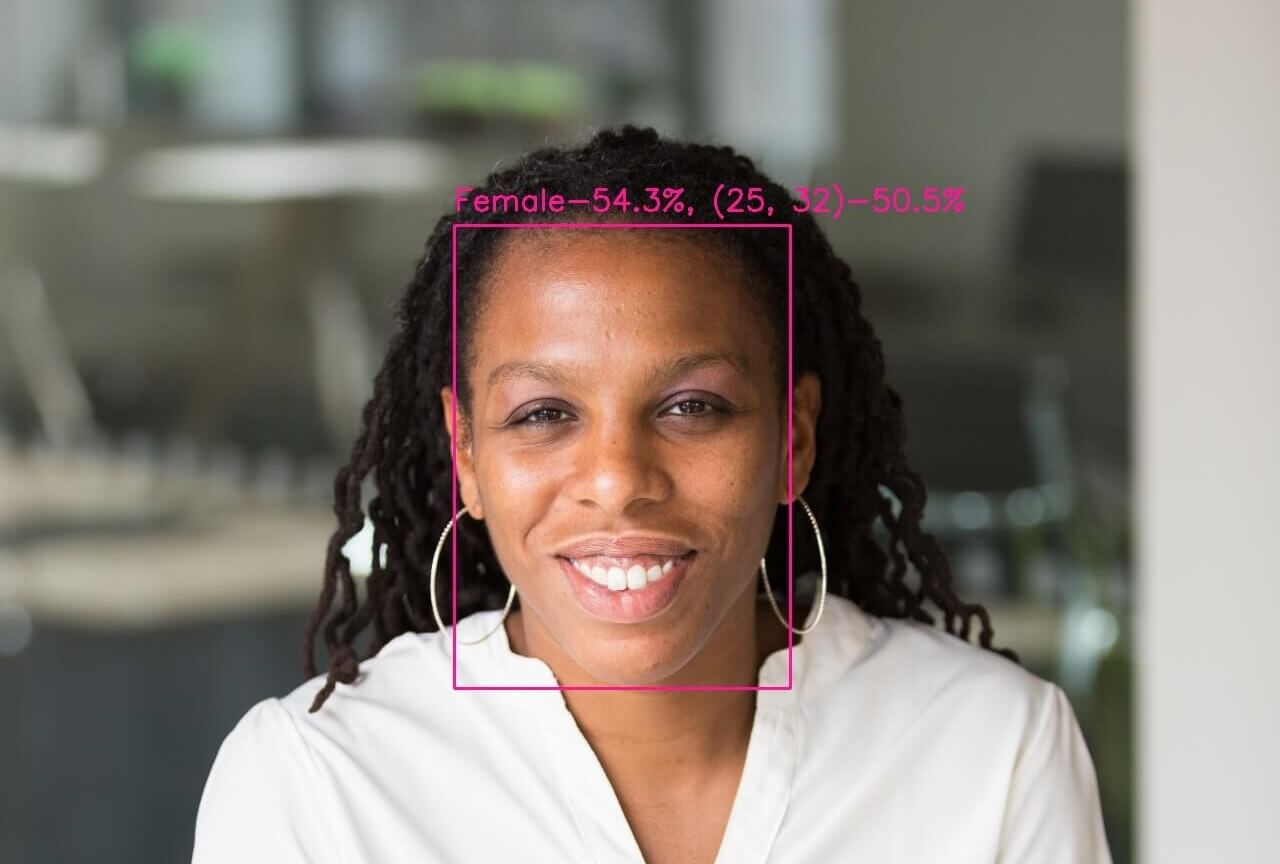 这是另一个OpenCV年龄和性别检测例子:
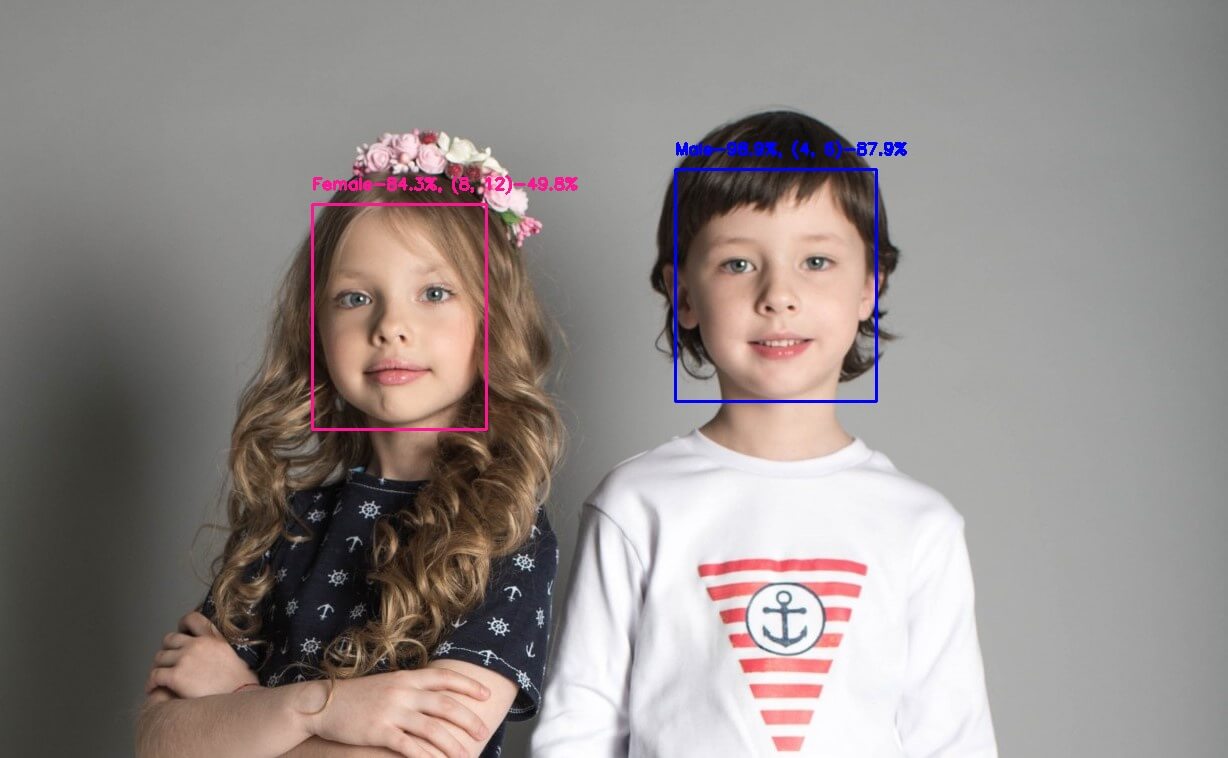
 或这个:
或这个:
font_scale在predict_age_and_gender()函数中调整图像上的浮点变量。
有关性别和年龄预测如何工作的更多详细信息,我建议你查看各个教程:
如果你想使用你的相机,我制作了一个 Python 脚本来从你的网络摄像头读取图像并实时执行推理。
在此处查看完整代码。

