
Kivy是Python中与平台无关的GUI工具。由于可以在Android, IOS, Linux和Windows等操作系统上运行, 因此Kivy为你提供了编写代码一次并在不同平台上运行的功能。它基本上用于开发Android应用程序, 但并不意味着它不能在桌面应用程序上使用。
现在, 在本文中, 我们将学习如何在kivy中使用Box布局小部件, .kv文件以及如何向其中添加颜色, 大小等功能。
👉🏽Kivy教程–通过示例学习Kivy。
Kivy提供了几种布局, 可将小部件保留在应用程序中所需的位置。 BoxLayout是一个简单但功能强大的布局, 通常以嵌套方式或简单普通方式使用。 BoxLayout可以以一种在另一种之上的垂直方式或一种在另一种之上的水平方式排列小部件。如果你不提供任何大小提示, 则子窗口小部件会均等或相应地划分其父窗口小部件的大小。
创建按钮时要遵循的基本方法:1)导入kivy 2)导入kivyApp 3)导入BoxLayout 4)设置最低版本(可选)5)扩展类6)设置.kv文件(名称与Appclass相同)7)返回布局8)运行类的实例
main.py
BoxLayout的文件–
# base Class of your App inherits from the App class.
# app:always refers to the instance of your application
from kivy.app import App

# BoxLayout arranges children in a vertical or horizontal box.
# or help to put the childrens at the desired location.
from kivy.uix.boxlayout import BoxLayout

###############################################

# creating the root widget used in .kv file
class KVBL(BoxLayout):
     '''
         no need to do anything here as
         we are building things in .kv file
     '''
     pass

#################################################
# class in which name .kv file must be named KVBoxLayout.kv.
class KVBoxLayoutApp(App):

     def build( self ):
         # returning the instance of KVBL class
         return KVBL()

##################################################

# creating the object root for BoxLayoutApp() class
root = KVBoxLayoutApp()

# run function runs the whole program
# i.e run() method which calls the
# target function passed to the constructor.
root.run()
KVBoxLayout.kv的档案main.py文件
<KVBL>:
# you can change it to BoxLayout but have
# to change everywhere including .py
########################################################
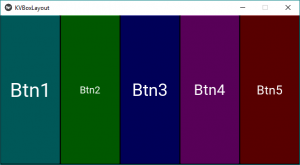
# To position widgets next to each other, # use a horizontal BoxLayout.
# To position widgets above/below each other, # use a vertical BoxLayout.
# orientation: 'horizontal'
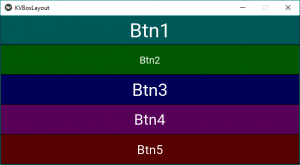
orientation: 'vertical'
#########################################################
# defining the buttons in the box layout format
# and adding colour, size etc to it.
# you can use accordingly
Button:
text: "Btn1"
background_color: 0 , 1 , 1 , 1
font_size: 40
Button:
text: "Btn2"
background_color: 0 , 1 , 0 , 1
font_size: 20
Button:
text: "Btn3"
background_color: 0 , 0 , 1 , 1
font_size: 35
Button:
text: "Btn4"
background_color: 1 , 0 , 1 , 1
font_size: 30
Button:
text: "Btn5"
background_color: 1 , 0 , 0 , 1
font_size: 25输出如下:
1)方向设定为垂直时
2)方向设定为水平时
参考:
https://kivy.org/doc/stable/api-kivy.uix.boxlayout.html
首先, 你的面试准备可通过以下方式增强你的数据结构概念:Python DS课程。

