
Kivy是Python中与平台无关的GUI工具。由于它可以在Android, IOS, Linux和Windows等操作系统上运行。它基本上是用于开发Android应用程序, 但这并不意味着它不能在桌面应用程序上使用。
在本文中, 我们将讨论如何在基本上是多个布局的布局中使用布局, 这是最基本的示例。
大多数时候, 我们能够使用一种布局, 但是很难使用多种布局。
👉🏽Kivy教程–通过示例学习Kivy。
在kivy中, 布局类型很多:
- AnchorLayout:窗口小部件可以固定在"顶部", "底部", "左侧", "右侧"或"中央"。
- BoxLayout:窗口小部件以"垂直"或"水平"方向顺序排列。
- FloatLayout:小部件基本上不受限制。
- RelativeLayout:子窗口小部件相对于布局放置。
- 网格布局:小部件排列在由row和cols属性定义的网格中。
- 页面布局:用于创建简单的多页布局, 以允许使用边框轻松地从一页翻页到另一页的方式。
- ScatterLayout:小部件的位置类似于RelativeLayout, 但可以平移, 旋转和缩放。
- StackLayout:小部件以lr-tb(从左到右, 然后从上到下)或tb-lr的顺序堆叠。
注意:你可以在一个文件中使用尽可能多的文件。
在一个文件中创建多个布局的基本方法:
1) import kivy
2) import kivyApp
3) import BoxLayout
4) import
4) set minimum version(optional)
5) Extend the container class
6) set up .kv file :
7) create App class
8) return container class or layout
9) Run an instance of the class
实施方法–
main.py文件
注意:
如果你使用.kv文件制作多个布局, 则无需导入Gridlayout, Boxlayout, AnchorLayout, FloatLayout, StackLayout, PageLayout, Button等。由于.kv文件已经支持了所有这些, 因此已经导入了所有这些。但是, 如果没有.kv文件, 则必须导入这些文件。
## Sample Python application demonstrating the
## Program of How to use Multiple Layouts in Single file

########################################################################

# import kivy module
import kivy

# base Class of your App inherits from the App class.
# app:always refers to the instance of your application
from kivy.app import App

# this restrict the kivy version i.e
# below this kivy version you cannot
# use the app or software
kivy.require( '1.9.0' )

# creates the button in kivy
# if not imported shows the error
from kivy.uix.button import Button

# BoxLayout arranges children in a vertical or horizontal box.
# or help to put the childrens at the desired location.
from kivy.uix.boxlayout import BoxLayout

# The GridLayout arranges children in a matrix.
# It takes the available space and
# divides it into columns and rows, # then adds widgets to the resulting "cells".
from kivy.uix.gridlayout import GridLayout

# The PageLayout class is used to create
# a simple multi-page layout, # in a way that allows easy flipping from
# one page to another using borders.
from kivy.uix.pagelayout import PageLayout


########################################################################

# creating the root widget used in .kv file
class MultipleLayout(PageLayout):
     pass

########################################################################

# creating the App class in which name
#.kv file is to be named PageLayout.kv
class Multiple_LayoutApp(App):
     # defining build()
     def build( self ):
         # returning the instance of root class
         return MultipleLayout()

########################################################################

# creating object of Multiple_LayoutApp() class
MlApp = Multiple_LayoutApp()

# run the class
MlApp.run()
在此文件中, 我们正在创建/使用所有布局, 因为在.kv文件中更容易构建/使用所有这些布局
.kv文件
代码的
# Program of How to use Multiple Layouts in Single .kv file
########################################################################
# creating page Layout
<PageLayout>:
#########################################################################
# Creating Page 1
# Using BoxLayout inside PageLayout
BoxLayout:
# creating Canvas
canvas:
Color:
rgba: 216 / 255. , 195 / 255. , 88 / 255. , 1
Rectangle:
pos: self .pos
size: self .size
# Providing orentation to the BoxLayout
orientation: 'vertical'
# Adding Lable to Page 1
Label:
size_hint_y: None
height: 1.5 * self .texture_size[ 1 ]
text: 'page 1'
# Creating Button
Button:
text: 'GFG :)'
# Adding On_press funcion
# i.e binding function to press / touch
on_press: print ( "This Is The First Page" )
#########################################################################
# Creating Page 2
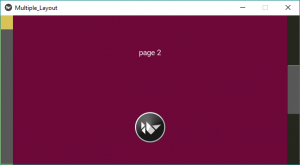
BoxLayout:
orientation: 'vertical'
canvas:
Color:
rgba: 109 / 255. , 8 / 255. , 57 / 255. , 1
Rectangle:
pos: self .pos
size: self .size
Label:
text: 'page 2'
# This Image is directly from the websource
# By using AsyncImage you can use that
AsyncImage:
source: 'http://kivy.org / logos / kivy-logo-black-64.png'
##########################################################################
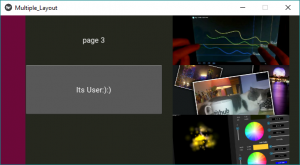
# Creating Page 3
# Using The Second Layout
# Creating GridLayout
GridLayout:
canvas:
Color:
rgba: 37 / 255. , 39 / 255. , 30 / 255. , 1
Rectangle:
pos: self .pos
size: self .size
# Adding grids to Page 3
# It may be row or coloumn
cols: 2
# In first Grid
# Adding Lable + Image
Label:
text: 'page 3'
AsyncImage:
source: 'http://kivy.org/slides/kivyandroid-thumb.jpg'
# In Second Grid
# Adding Button + Image
Button:
text: 'Its User:):)'
on_press: print ( "Heloo User This is the Last Page" )
AsyncImage:
source: 'http://kivy.org/slides/kivypictures-thumb.jpg'
# In third grid
# Adding Widget + Image
Widget
AsyncImage:
source: 'http://kivy.org/slides/particlepanda-thumb.jpg'输出如下:
图片1

图片2:
图片3:
视频输出:
参考:
https://kivy.org/doc/stable/gettingstarted/layouts.html
注意怪胎!巩固你的基础Python编程基础课程和学习基础知识。
首先, 你的面试准备可通过以下方式增强你的数据结构概念:Python DS课程。

