
Python Flask如何使用Webhook:了解如何在 Flask、Redis、SocketIO 和 Python 中的其他库的帮助下,通过使用 webhook 来创建具有实时图表的流应用程序,包括一些Webhook用法示例。
Webhook用法教程介绍
Webhook可以被认为是一种由事件而不是请求驱动的API。Webhook 是一种服务,它允许一个程序在发生特定事件时立即将数据发送到另一个程序,而不是一个应用程序向另一个应用程序发出请求以接收响应。
Webhook 有时被称为反向 API,因为通信是由发送数据的应用程序而不是接收数据的应用程序发起的。随着 Web 服务变得越来越互联,Webhooks 正在将更多的行动视为一种轻量级解决方案,用于启用实时通知和数据更新,而无需开发完整的 API。
Webhooks 通常充当较小数据的信使。它们有助于从服务器端应用程序向客户端应用程序发送消息、警报、通知和实时信息。
例如,假设你希望你的应用程序在提及某个帐户并包含特定主题标签的推文发布时得到通知。与你的应用程序不断向 Twitter 询问满足这些条件的新帖子不同,Twitter 仅在发生此类事件时向你的应用程序发送通知更有意义。
这是 webhook 的目的,而不必重复请求数据(轮询机制),接收应用程序可以坐下来获得它需要的东西,而不必向另一个系统发送重复的请求。
Webhooks 可以开启很多可能性:
- 你可以使用 webhook 将支付网关与你的电子邮件营销软件连接起来,以便在付款退回时向用户发送电子邮件。
- 你可以使用 Webhook 在其他应用程序中同步客户数据。例如,如果用户更改了他的电子邮件地址,你可以确保该更改也反映在你的 CRM 中。
- 你还可以使用 Webhook 将有关事件的信息发送到外部数据库或数据仓库,例如 Amazon 的 Redshift 或 Google Big Query,以进行进一步分析。
范围
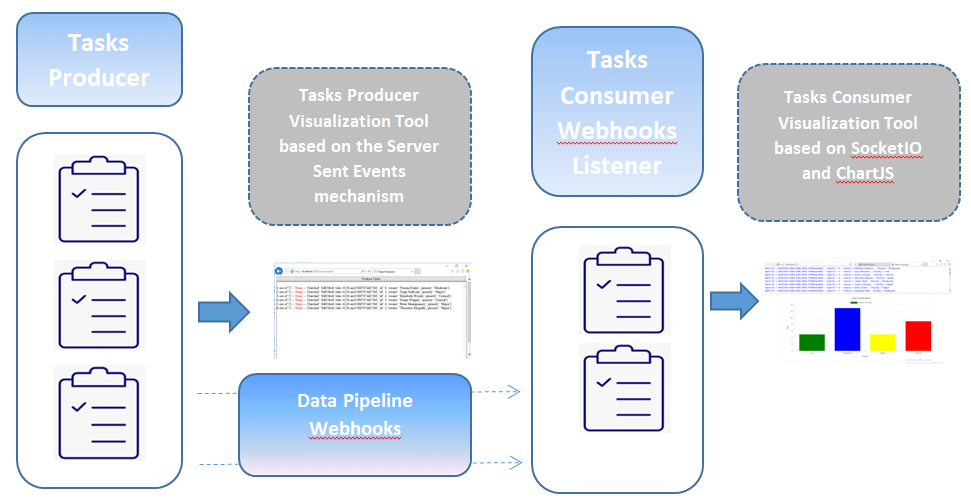
在本教程中,我们将为基于 webhooks 并包含多个组件的流应用奠定基础:
- 一个 webhooks 生成器,它模拟内部或外部服务向预先配置的 webhook 端点发出任务。
- 接收这些事件/任务的通知消息的 Webhook 侦听器。收到后,这些票将被呈现并转换为条形图,以生成有价值的见解。图表降低了数据的复杂性,并使任何用户都更容易理解。
我们将利用Redis、Flask、SocketIO和ChartJS等多个组件为上述组件开发漂亮的可视化工具。
Python Flask如何使用Webhook:处理流程图
 先决条件
先决条件
根据我们的要求,以下组件发挥作用:
- Redis是一种开源的高级键值存储,是构建高性能、可扩展的 Web 应用程序的合适解决方案。Redis 具有三个主要特点,使其与众不同:
- Redis 将其数据库完全保存在内存中,仅将磁盘用于持久性。
- 与许多其他键值数据存储相比,Redis 具有相对丰富的数据类型集。
- Redis 可以将数据复制到任意数量的从站。安装 Redis 不在本教程的范围内,但你可以查看本教程以在 Windows 上安装它。
- Socket.IO是一个用于实时 Web 应用程序的 JavaScript 库。它支持 Web 客户端和服务器之间的实时、双向通信。它有两个部分:一个在浏览器中运行的客户端库和一个服务器端库。
- Faker是一个为你生成假数据的 Python 包。无论你是需要引导数据库、创建美观的 XML 文档、填充持久性以对其进行压力测试,还是对从生产服务中获取的数据进行匿名化,Fake 都是你的正确选择。
- ChartJS是一个开源 Javascript 库,允许你使用 HTML5 画布元素绘制不同类型的图表。HTML5 元素提供了一种使用 Javascript 绘制图形的简单而强大的方法。该库支持 8 种不同类型的图形:线条、条形、甜甜圈、馅饼、雷达、极地区域、气泡和散射。
- Flask是一个用 Python 编写的微型 Web 框架。
如果本教程引起你的兴趣并让你想立即深入研究代码,你可以查看此存储库以查看本文中使用的代码。
相关: 在 Python 中使用 Celery 的异步任务。
Webhook用法教程:设置
设置包非常简单明了。当然,你需要在系统上安装 Python 3,强烈建议设置一个虚拟环境,我们将在其中安装所需的库:
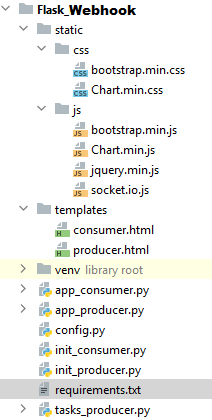
$ pip install Faker==8.2.0 Flask==1.1.2 Flask-SocketIO==5.0.1 redis==3.5.3 requests==2.25.1在本教程结束时,我们的文件夹结构将如下所示:
 让我们开始编写实际的代码。首先,让我们为我们的应用程序定义配置参数
config.py:
#Application configuration File
################################
#Secret key that will be used by Flask for securely signing the session cookie
# and can be used for other security related needs
SECRET_KEY = 'SECRET_KEY'
#######################################
#Minimum Number Of Tasks To Generate
MIN_NBR_TASKS = 1
#Maximum Number Of Tasks To Generate
MAX_NBR_TASKS = 100
#Time to wait when producing tasks
WAIT_TIME = 1
#Webhook endpoint Mapping to the listener
WEBHOOK_RECEIVER_URL = 'http://localhost:5001/consumetasks'
#######################################
#Map to the REDIS Server Port
BROKER_URL = 'redis://localhost:6379'
#######################################
接下来,为我们的任务和 webhooks 生产者创建一个初始化文件init_producer.py:
# init_producer.py
from flask import Flask

#Create a Flask instance
app = Flask(__name__)

#Load Flask configurations from config.py
app.secret_key = app.config['SECRET_KEY']
app.config.from_object("config")
现在让我们编写使用Faker模块生成任务所需的代码:
# tasks_producer.py
import random
from faker.providers import BaseProvider
from faker import Faker
import config
import time
import requests
import json
import uuid
# Define a TaskProvider
class TaskProvider(BaseProvider):
def task_priority(self):
severity_levels = [
'Low', 'Moderate', 'Major', 'Critical'
]
return severity_levels[random.randint(0, len(severity_levels)-1)]
# Create a Faker instance and seeding to have the same results every time we execute the script
# Return data in English
fakeTasks = Faker('en_US')
# Seed the Faker instance to have the same results every time we run the program
fakeTasks.seed_instance(0)
# Assign the TaskProvider to the Faker instance
fakeTasks.add_provider(TaskProvider)
# Generate A Fake Task
def produce_task(batchid, taskid):
# Message composition
message = {
'batchid': batchid, 'id': taskid, 'owner': fakeTasks.unique.name(), 'priority': fakeTasks.task_priority()
# ,'raised_date':fakeTasks.date_time_this_year()
# ,'description':fakeTasks.text()
}
return message
def send_webhook(msg):
"""
Send a webhook to a specified URL
:param msg: task details
:return:
"""
try:
# Post a webhook message
# default is a function applied to objects that are not serializable = it converts them to str
resp = requests.post(config.WEBHOOK_RECEIVER_URL, data=json.dumps(
msg, sort_keys=True, default=str), headers={'Content-Type': 'application/json'}, timeout=1.0)
# Returns an HTTPError if an error has occurred during the process (used for debugging).
resp.raise_for_status()
except requests.exceptions.HTTPError as err:
#print("An HTTP Error occurred",repr(err))
pass
except requests.exceptions.ConnectionError as err:
#print("An Error Connecting to the API occurred", repr(err))
pass
except requests.exceptions.Timeout as err:
#print("A Timeout Error occurred", repr(err))
pass
except requests.exceptions.RequestException as err:
#print("An Unknown Error occurred", repr(err))
pass
except:
pass
else:
return resp.status_code
# Generate A Bunch Of Fake Tasks
def produce_bunch_tasks():
"""
Generate a Bunch of Fake Tasks
"""
n = random.randint(config.MIN_NBR_TASKS, config.MAX_NBR_TASKS)
batchid = str(uuid.uuid4())
for i in range(n):
msg = produce_task(batchid, i)
resp = send_webhook(msg)
time.sleep(config.WAIT_TIME)
print(i, "out of ", n, " -- Status", resp, " -- Message = ", msg)
yield resp, n, msg
if __name__ == "__main__":
for resp, total, msg in produce_bunch_tasks():
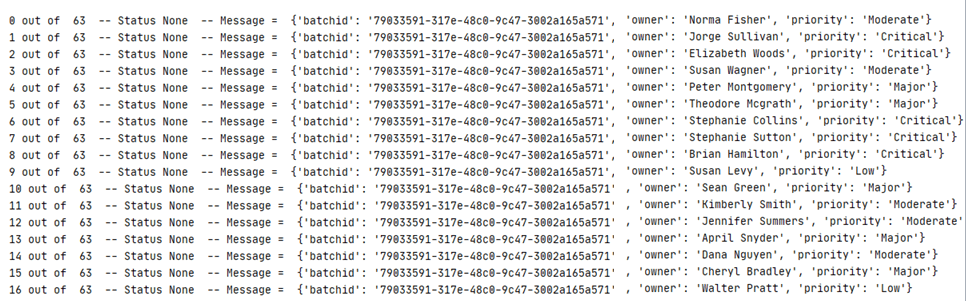
passPython Flask如何使用Webhook?上面的代码利用Faker模块来创建一个虚构的随机任务流,并为每个生成的任务发送一个 webhook 到WEBHOOK_RECEIVER_URL我们之前在配置文件中定义的端点config.py。
每批中生成的任务数将是由阈值控制MIN_NBR_TASKS并MAX_NBR_TASKS在 中定义的随机数config.py。
网络挂接JSON消息由以下属性: batchid, taskid, owner 和 priority。
生成的每批任务都将由一个名为 的唯一引用标识batchid。
任务优先级将限于预先选择的选项:低、中、高和严重。
Webhook用法示例:上面代码的主要用途是produce_bunch_tasks()函数,它是一个生成器,产生以下内容:
- 发出的 webhook 的状态。
- 产生的任务总数。
- 生成的 webhook 消息。
在进一步挖掘之前,让我们测试一下我们的tasks_producer.py程序:
$ python tasks_producer.py你应该会看到类似于以下内容的输出:
 现在让我们构建模拟服务生成任务的 Flask 应用程序:
#app_producer.py
from flask import Response, render_template
from init_producer import app
import tasks_producer

def stream_template(template_name, **context):
    app.update_template_context(context)
    t = app.jinja_env.get_template(template_name)
    rv = t.stream(context)
    rv.enable_buffering(5)
    return rv

@app.route("/", methods=['GET'])
def index():
    return render_template('producer.html')

@app.route('/producetasks', methods=['POST'])
def producetasks():
    print("producetasks")
    return Response(stream_template('producer.html', data= tasks_producer.produce_bunch_tasks() ))

if __name__ == "__main__":
   app.run(host="localhost",port=5000, debug=True)
在这个flask应用程序中,我们定义了两条主要路线:
"/": 呈现模板网页 (producer.html)"/producetasks":调用函数produce_bunch_tasks()并将生成的任务流传输到 Flask 应用程序。
服务器发送服务器发送事件 (SSE),这是一种服务器推送机制,每当服务器上发生新事件时,客户端都会收到通知。接下来,我们将定义模板producer.html文件:
<!doctype html>
<html>
  <head>
    <title>Tasks Producer</title>
    <style>
      .content {
        width: 100%;
      }
      .container{
        max-width: none;
      }
    </style>
    <meta name="viewport" content="width=device-width, initial-scale=1.0"/>
  </head>
<body class="container">
    <div class="content">
      <form method='post' id="produceTasksForm" action = "/producetasks">
        <button style="height:20%x;width:100%" type="submit" id="produceTasks">Produce Tasks</button>
      </form>
    </div>
    <div class="content">
        <div id="Messages" class="content" style="height:400px;width:100%; border:2px solid gray; overflow-y:scroll;"></div>
        {% for rsp,total, msg in data: %}
         <script>
            var rsp   = "{{ rsp }}";
            var total = "{{ total }}";
            var msg   = "{{ msg }}";
            var lineidx = "{{ loop.index }}";
            //If the webhook request succeeds color it in blue else in red.
            if (rsp == '200') {
                rsp = rsp.fontcolor("blue");
            }
            else {
                rsp = rsp.fontcolor("red");
            }
            //Add the details of the generated task to the Messages section.
            document.getElementById('Messages').innerHTML += "<br>" + lineidx  + " out of " + total + " -- "+ rsp + " -- " + msg;
        </script>
        {% endfor %}
    </div>
</body>
</html>
三个变量被传递给这个模板文件:
total:代表产生的任务总数。status: 表示已调度 webhook 的状态。msg:webhook JSON 消息。
模板文件包含一个 Javascript,它可以遍历接收到的流并在接收到 webhook/任务时显示它们。
现在我们的程序已经准备好了,让我们测试一下并检查生成的输出:
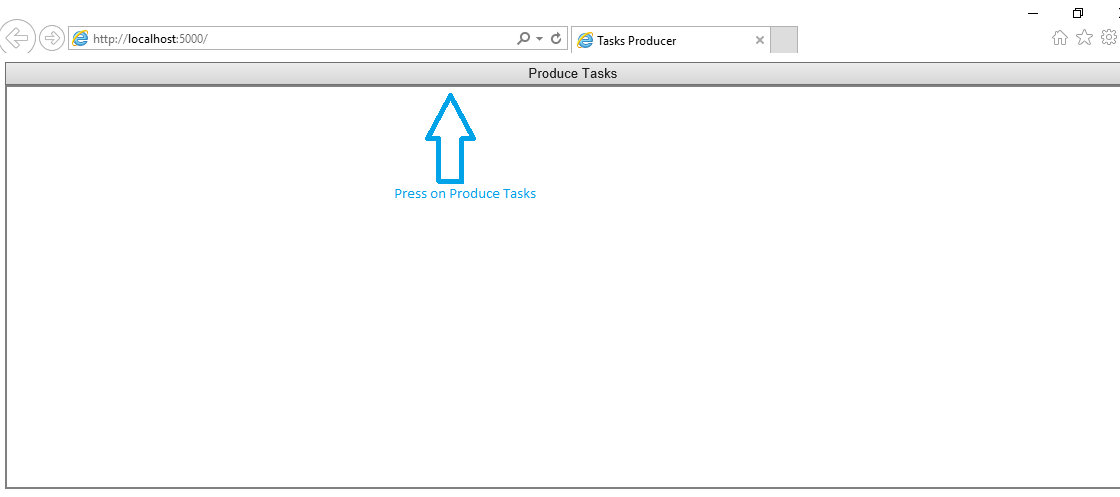
$ python app_producer.py访问http://localhost:5000运行 Flask 实例的链接,按下按钮Produce Tasks,你将看到自动生成的连续随机任务流,如下面的屏幕所示:
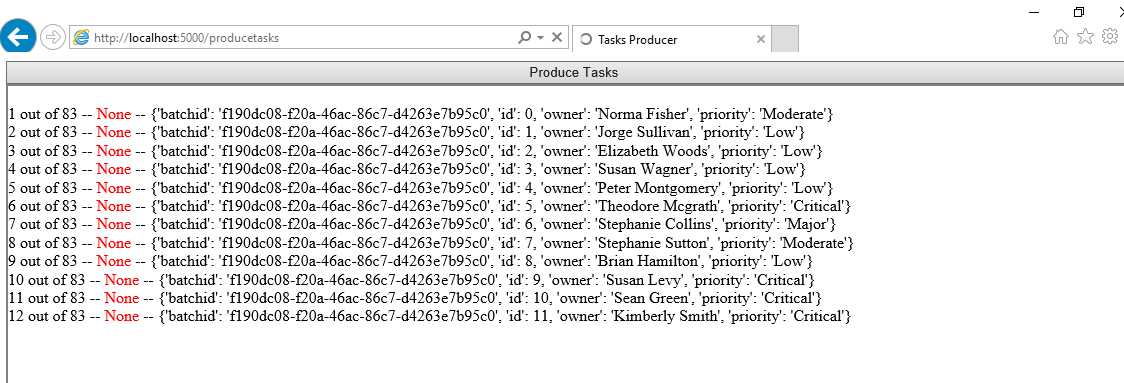 你会注意到已调度的 webhook 的响应状态等于
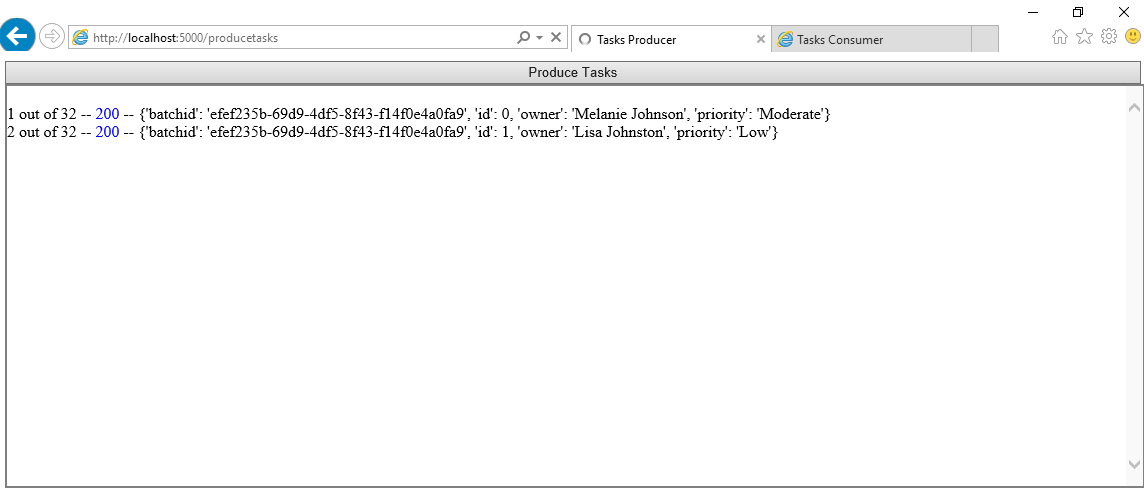
None,并以红色显示,表示无法到达目的地。稍后,当我们激活任务使用者时,你将概述已分派的 webhook 的响应状态等于200并以蓝色显示,表示成功到达 webhook 端点。
Python Flask如何使用Webhook?现在,让我们为我们的任务使用者/处理程序创建初始化文件:
# init_consumer.py
from flask import Flask

#Create a Flask instance
app = Flask(__name__)

#Load Flask configurations from config.py
app.secret_key = app.config['SECRET_KEY']
app.config.from_object("config")

#Setup the Flask SocketIO integration while mapping the Redis Server.
from flask_socketio import SocketIO
socketio = SocketIO(app,logger=True,engineio_logger=True,message_queue=app.config['BROKER_URL'])
接下来,让我们构建一个 Flask 应用程序来处理分派的 webhooks/任务。处理 webhooks 的第一步是构建自定义端点。此端点需要通过 POST 请求接收数据,并确认成功接收该数据:
#app_consumer.py
from flask import render_template, request,session
from flask_socketio import join_room
from init_consumer import app, socketio
import json
import uuid

#Render the assigned template file
@app.route("/", methods=['GET'])
def index():
    return render_template('consumer.html')

# Sending Message through the websocket
def send_message(event, namespace, room, message):
    # print("Message = ", message)
    socketio.emit(event, message, namespace=namespace, room=room)

# Registers a function to be run before the first request to this instance of the application
# Create a unique session ID and store it within the application configuration file
@app.before_first_request
def initialize_params():
    if not hasattr(app.config,'uid'):
        sid = str(uuid.uuid4())
        app.config['uid'] = sid
        print("initialize_params - Session ID stored =", sid)

# Receive the webhooks and emit websocket events
@app.route('/consumetasks', methods=['POST'])
def consumetasks():
    if request.method == 'POST':
        data = request.json
        if data:
           print("Received Data = ", data)
           roomid =  app.config['uid']
           var = json.dumps(data)
           send_message(event='msg', namespace='/collectHooks', room=roomid, message=var)
    return 'OK'

#Execute on connecting
@socketio.on('connect', namespace='/collectHooks')
def socket_connect():
    # Display message upon connecting to the namespace
    print('Client Connected To NameSpace /collectHooks - ', request.sid)

#Execute on disconnecting
@socketio.on('disconnect', namespace='/collectHooks')
def socket_connect():
    # Display message upon disconnecting from the namespace
    print('Client disconnected From NameSpace /collectHooks - ', request.sid)

#Execute upon joining a specific room
@socketio.on('join_room', namespace='/collectHooks')
def on_room():
    if app.config['uid']:
        room = str(app.config['uid'])
        # Display message upon joining a room specific to the session previously stored.
        print(f"Socket joining room {room}")
        join_room(room)

#Execute upon encountering any error related to the websocket
@socketio.on_error_default
def error_handler(e):
    # Display message on error.
    print(f"socket error: {e}, {str(request.event)}")

#Run using port 5001
if __name__ == "__main__":
    socketio.run(app,host='localhost', port=5001,debug=True)
Webhook用法教程:简而言之,我们执行了以下操作:
- 我们添加了一个函数
@app.before_first_request,该函数在对应用程序的第一个请求之前运行一次,并在后续请求中被忽略。在这个函数中,我们创建了一个唯一的会话 ID 并将其存储在配置文件中,这个唯一的会话 ID 将用于在处理 Web 套接字通信时为每个用户分配一个独占空间。 - 我们定义了一个 webhook 监听器,
"/consumetasks"它通过 POST 请求接收JSON数据,一旦接收到,它就会同时发出一个 web 套接字事件。 - 为了有效地管理我们通过网络 socker 的连接:
- 我们将为
/collectHooks命名空间设置值(命名空间用于通过单个共享连接分隔服务器逻辑)。 - 我们将为每个用户会话分配一个专用房间(房间是命名空间的细分或子频道)。
- 我们将为
Webhook用法示例:完成所有这些构建后,让我们为我们的 Web 应用程序编写前端代码,consumer.html在templates文件夹中创建并复制以下代码:
<!DOCTYPE html>
<html lang="en">
<head>
    <meta charset="UTF-8">
    <title>Tasks Consumer</title>
    <link rel="stylesheet" href="{{url_for('static',filename='css/bootstrap.min.css')}}">
    <link rel="stylesheet" href="{{url_for('static',filename='css/Chart.min.css')}}">
</head>
<body>
    <div class="content">
        <div id="Messages" class="content" style="height:200px;width:100%; border:1px solid gray; overflow-y:scroll;"></div>
    </div>
    <div class="container">
        <div class="row">
            <div class="col-12">
                <div class="card">
                    <div class="card-body">
                        <canvas id="canvas"></canvas>
                    </div>
                </div>
            </div>
        </div>
    </div>
    <!-- import the jquery library -->
    <script src="{{%20url_for('static',filename='js/jquery.min.js')%20}}"></script>
    <!-- import the socket.io library -->
    <script src="{{%20url_for('static',filename='js/socket.io.js')%20}}"></script>
    <!-- import the bootstrap library -->
    <script src="{{%20url_for('static',filename='js/bootstrap.min.js')%20}}"></script>
    <!-- import the Chart library -->
    <script src="{{%20url_for('static',filename='js/Chart.min.js')%20}}"></script>
<script>
      $(document).ready(function(){
        const config = {
            //Type of the chart - Bar Chart
            type: 'bar',
            //Data for our chart
            data: {
                labels: ['Low','Moderate','Major','Critical'],
                datasets: [{
                    label: "Count Of Tasks",
                    //Setting a color for each bar
                    backgroundColor: ['green','blue','yellow','red'],
                    borderColor: 'rgb(255, 99, 132)',
                    data: [0,0,0,0],
                    fill: false,
                }],
            },
            //Configuration options
            options: {
                responsive: true,
                title: {
                    display: true,
                    text: 'Tasks Priority Matrix'
                },
                tooltips: {
                    mode: 'index',
                    intersect: false,
                },
                hover: {
                    mode: 'nearest',
                    intersect: true
                },
                scales: {
                    xAxes: [{
                        display: true,
                        scaleLabel: {
                            display: true,
                            labelString: 'Priority'
                        }
                    }],
                    yAxes: [{
                        display: true
                     ,ticks: {
                            beginAtZero: true
                        }
                       ,scaleLabel: {
                            display: true,
                            labelString: 'Total'
                        }
                    }]
                }
            }
        };
        const context = document.getElementById('canvas').getContext('2d');
        //Creating the bar chart
        const lineChart = new Chart(context, config);
        //Reserved for websocket manipulation
        var namespace='/collectHooks';
        var url = 'http://' + document.domain + ':' + location.port + namespace;
        var socket = io.connect(url);
        //When connecting to the socket join the room
        socket.on('connect', function() {
                              socket.emit('join_room');
                            });
        //When receiving a message
        socket.on('msg' , function(data) {
                            var msg = JSON.parse(data);
                            var newLine = $('<li>'+ 'Batch ID. = ' + msg.batchid + ' -- Task ID. = ' + msg.id + ' -- Owner = ' + msg.owner + ' -- Priority = ' + msg.priority +'</li>');
                            newLine.css("color","blue");
                            $("#Messages").append(newLine);
                            //Retrieve the index of the priority of the received message
                            var lindex = config.data.labels.indexOf(msg.priority);
                            //Increment the value of the priority of the received message
                            config.data.datasets[0].data[lindex] += 1;
                            //Update the chart
                            lineChart.update();
                          });
      });
</script>
</body>
</html>
Python Flask如何使用Webhook?上述模板包括以下内容:
- 用于显示接收到的任务或 webhook 的详细信息的部分消息。
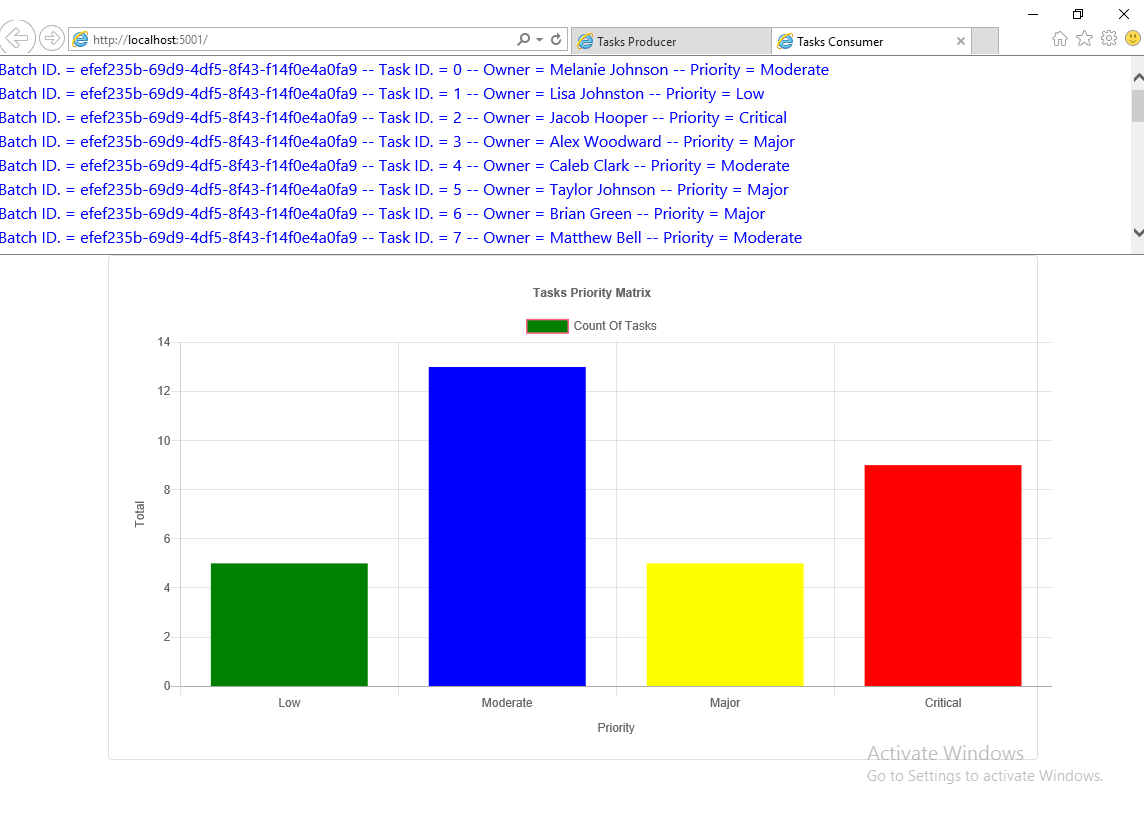
- 一个条形图,显示每个优先级在整个 Web 套接字事件中接收到的任务总数。构建图表的步骤如下:
- 在显示图表的位置放置一个画布元素。
- 在 label 属性中指定优先级,该属性指示要比较的实例的名称。
- 初始化一个数据集属性,它定义了一个对象数组,每个对象都包含我们要比较的数据。
- 每当通过 Web 套接字传输和接收新的 Webhook 时,条形图都会同步更新。
现在让我们测试我们的程序,请按照以下步骤进行:
- 打开终端并运行
app_producer.py:$ python app_producer.py复制 - 启动Redis服务器,确保Redis实例运行在TCP 6479端口。
- 打开另一个终端并运行
app_consumer.py:$ python app_consumer.py复制 - 打开浏览器并访问
http://localhost:5000链接以可视化任务生产者:
 点击生成任务按钮,会自动生成一批任务,并逐渐显示在屏幕上,如下图:
http://localhost:5001以可视化任务消费者,任务将逐渐出现在消息部分,并且每当收到 webhook 时,条形图将自动更新:
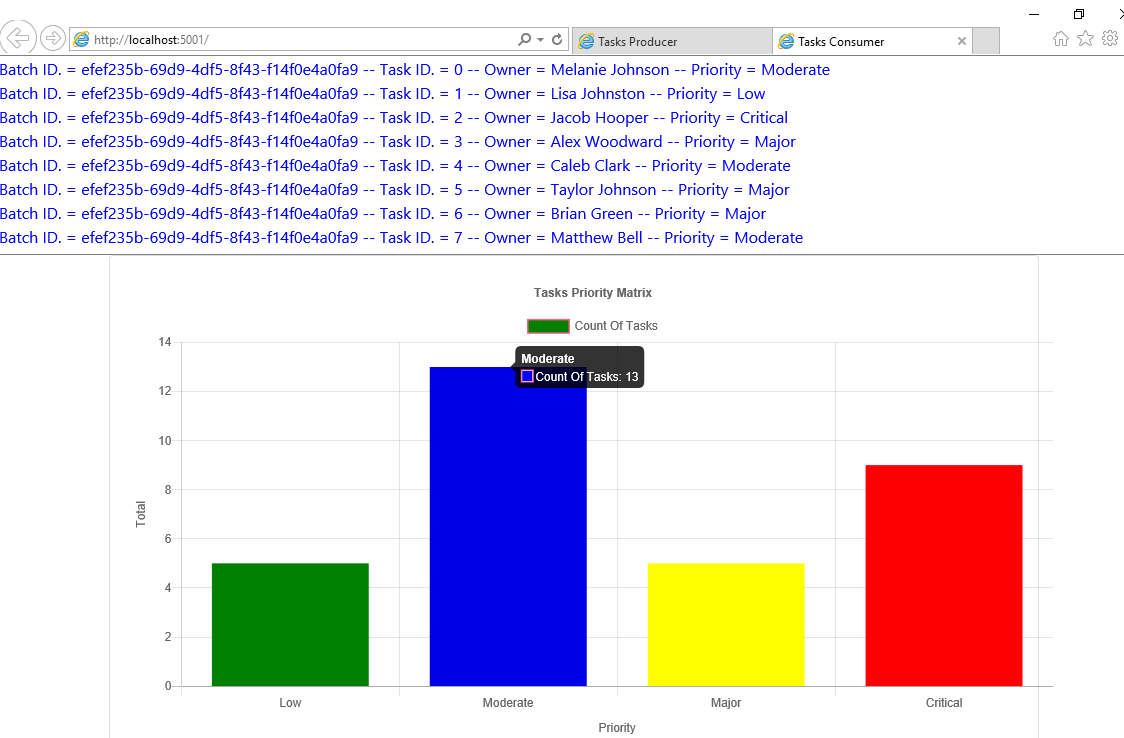
 将鼠标悬停在任何图表栏上时,会显示显示任务总数的工具提示:
Webhook用法教程总结
Webhooks 是网络的重要组成部分,它们正变得越来越流行。它们允许你的应用程序即时无缝地交换数据。
虽然 webhook 类似于 API,但它们都扮演着不同的角色,每个角色都有自己独特的用例。希望本文能扩展你的理解,并记住充分利用 webhooks 的关键是知道它们何时是你应用程序的正确选择。

