
Python如何制作进程监视器?本文使用 psutil 库在 Python 中监视操作系统进程并制作 Windows 任务管理器或 Linux 顶级实用程序的类似程序。
如何在Python中制作进程监视器?监视操作系统进程使我们能够实时监视和显示进程活动。在本教程中,你将学习如何使用 Python 检索有关操作系统中正在运行的进程的信息,并围绕它构建任务管理器!
现在你可能正在考虑创建这样的东西:
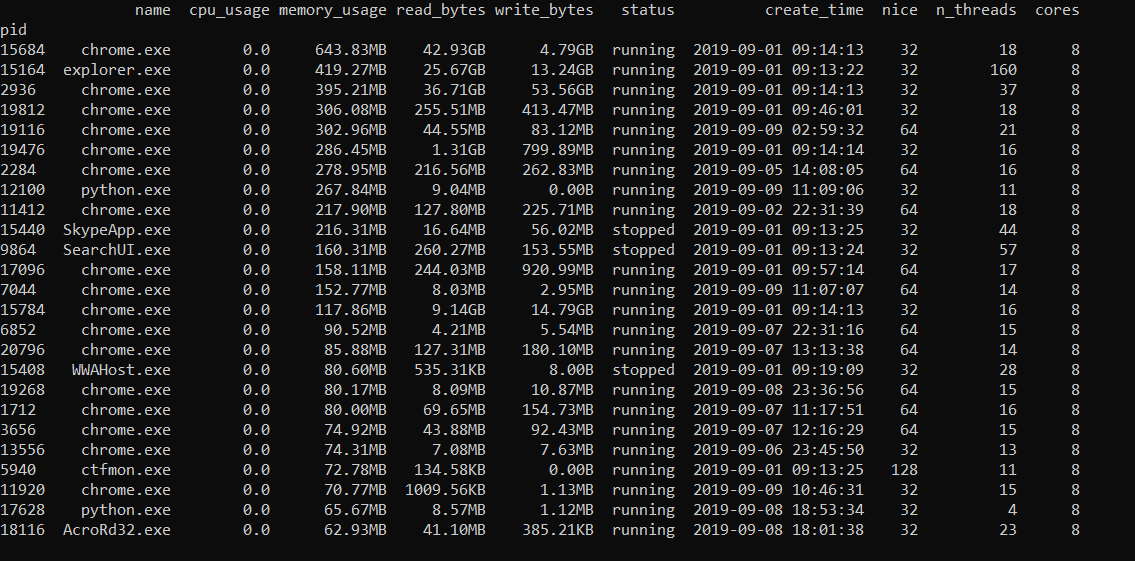
好吧,不完全是,我们要制作一个命令行版本,最终的脚本输出将是这样的:
但是,如果你是一名 GUI 程序员,你可以通过自己的设计使其更好,并与 Windows 任务管理器竞争!
相关: 如何使用 OS 模块在 Python 中处理文件。
好的,现在让我们开始构建它。首先,让我们安装依赖项:
pip3 install psutil pandas打开一个新的 Python 文件并导入必要的模块:
import psutil
from datetime import datetime
import pandas as pd
import time
import osPython如何制作进程监视器?我们将使用psutil,因为它是一个跨平台的库,用于在 Python 中检索正在运行的进程信息。
我们在这里需要pandas 的原因是在检索进程信息后,我们需要按列排序并以表格方式打印。
现在,我们需要一种方法来检索循环中的所有进程。幸运的是,有psutil.process_iter()函数返回一个生成器,为操作系统中的所有正在运行的进程生成一个进程实例。
Python制作进程监视器示例解析: 让我们构建返回所有进程信息的核心函数,我们将所有进程存储在字典列表中,以便稍后将其转换为数据帧:
def get_processes_info():
    # the list the contain all process dictionaries
    processes = []
让我们开始循环并迭代生成器:
    for process in psutil.process_iter():
        # get all process info in one shot
        with process.oneshot():
            # get the process id
            pid = process.pid
            if pid == 0:
                # System Idle Process for Windows NT, useless to see anyways
                continue
你可能已经注意到,我已经消除了 0 的 PID,它是 Windows NT 的系统空闲进程,无论如何它没有任何有用的信息。
如何在Python中制作进程监视器?process.oneshot()帮助我们有效地检索进程信息(更快的方式),我们已经得到了pid,让我们得到进程名称:
            # get the name of the file executed
            name = process.name()
在timestamp 中检索进程创建的时间,因此,我们将转换为正确的 Python datetime对象:
            # get the time the process was spawned
            try:
                create_time = datetime.fromtimestamp(process.create_time())
            except OSError:
                # system processes, using boot time instead
                create_time = datetime.fromtimestamp(psutil.boot_time())
让我们获取进程 CPU 使用率以及可以执行此进程的内核数:
            try:
                # get the number of CPU cores that can execute this process
                cores = len(process.cpu_affinity())
            except psutil.AccessDenied:
                cores = 0
            # get the CPU usage percentage
cpu_usage = process.cpu_percent()注意:cpu_affinity()方法仅适用于 Linux、Windows 和 FreeBSD,因此如果你使用其他操作系统(例如 MacOS),则应注释上述代码。
Python如何制作进程监视器?我将process.cpu_affinity()包装在try/except块中的原因是有时它会为系统进程引发psutil.AccessDenied(确保你以管理员身份运行 Python)。
process.cpu_percent()方法返回一个浮点数,以百分比形式表示当前进程的 CPU 利用率。它将进程时间与自上次调用以来经过的系统 CPU 时间进行比较,并立即返回。这意味着第一次调用 this 将返回0.0。
Python制作进程监视器示例介绍 - 获取进程的状态,是否正在运行、睡眠等:
            # get the status of the process (running, idle, etc.)
            status = process.status()
进程优先级:
            try:
                # get the process priority (a lower value means a more prioritized process)
                nice = int(process.nice())
            except psutil.AccessDenied:
                nice = 0
内存使用情况:
            try:
                # get the memory usage in bytes
                memory_usage = process.memory_full_info().uss
            except psutil.AccessDenied:
                memory_usage = 0
此进程写入和读取的总字节数:
            # total process read and written bytes
            io_counters = process.io_counters()
            read_bytes = io_counters.read_bytes
            write_bytes = io_counters.write_bytes
产生的线程总数:
            # get the number of total threads spawned by this process
            n_threads = process.num_threads()
最后,生成该进程的用户:
            # get the username of user spawned the process
            try:
                username = process.username()
            except psutil.AccessDenied:
                username = "N/A"
让我们将所有这些信息添加到我们的列表中并退出循环并返回它:
        processes.append({
            'pid': pid, 'name': name, 'create_time': create_time,
            'cores': cores, 'cpu_usage': cpu_usage, 'status': status, 'nice': nice,
            'memory_usage': memory_usage, 'read_bytes': read_bytes, 'write_bytes': write_bytes,
            'n_threads': n_threads, 'username': username,
        })

    return processes
Python制作进程监视器示例 - 如前所述,我们将进程列表转换为pandas.DataFrame ,因此,以下函数将前面的进程列表转换为数据帧:
def construct_dataframe(processes):
    # convert to pandas dataframe
    df = pd.DataFrame(processes)
    # set the process id as index of a process
    df.set_index('pid', inplace=True)
    # sort rows by the column passed as argument
    df.sort_values(sort_by, inplace=True, ascending=not descending)
    # pretty printing bytes
    df['memory_usage'] = df['memory_usage'].apply(get_size)
    df['write_bytes'] = df['write_bytes'].apply(get_size)
    df['read_bytes'] = df['read_bytes'].apply(get_size)
    # convert to proper date format
    df['create_time'] = df['create_time'].apply(datetime.strftime, args=("%Y-%m-%d %H:%M:%S",))
    # reorder and define used columns
    df = df[columns.split(",")]
    return df
上面的函数不仅将该列表转换为数据帧,它还执行许多其他操作:
- 它将数据帧中每一行的索引设置为进程 ID(因为它是唯一标识符)。
- 它按
sort_by将作为命令行参数传递的列对行进行排序(我们将介绍它)。 - 由于我们需要一种打印字节的好方法,因此它应用了get_size()函数(我们将在稍后声明)将一堆大数字转换为字节格式(例如54.4MB、103.3KB等)
- 它还将 格式化
create_time为可读日期。
这是get_size()函数:
def get_size(bytes):
    """
    Returns size of bytes in a nice format
    """
    for unit in ['', 'K', 'M', 'G', 'T', 'P']:
        if bytes < 1024:
            return f"{bytes:.2f}{unit}B"
        bytes /= 1024
现在让我们做一些命令行参数解析:
if __name__ == "__main__":
    import argparse
    parser = argparse.ArgumentParser(description="Process Viewer & Monitor")
    parser.add_argument("-c", "--columns", help="""Columns to show,
                                                available are name,create_time,cores,cpu_usage,status,nice,memory_usage,read_bytes,write_bytes,n_threads,username.
                                                Default is name,cpu_usage,memory_usage,read_bytes,write_bytes,status,create_time,nice,n_threads,cores.""",
                        default="name,cpu_usage,memory_usage,read_bytes,write_bytes,status,create_time,nice,n_threads,cores")
    parser.add_argument("-s", "--sort-by", dest="sort_by", help="Column to sort by, default is memory_usage .", default="memory_usage")
    parser.add_argument("--descending", action="store_true", help="Whether to sort in descending order.")
    parser.add_argument("-n", help="Number of processes to show, will show all if 0 is specified, default is 25 .", default=25)
    parser.add_argument("-u", "--live-update", action="store_true", help="Whether to keep the program on and updating process information each second")

    # parse arguments
    args = parser.parse_args()
    columns = args.columns
    sort_by = args.sort_by
    descending = args.descending
    n = int(args.n)
    live_update = args.live_update
如果你不熟悉 Python 的argparse内置模块,它允许我们轻松解析从命令行(即终端)传递的参数。
如何在Python中制作进程监视器?我们添加了一堆参数,如列显示,sort_by列,我们将排序的数据帧,进程数显示,和live_update是否要保持程序的运行,并不断更新和印刷负责每次处理信息(如 Linux 中的 top 命令)。
最后,让我们调用我们创建的函数并显示数据框:
    # print the processes for the first time
    processes = get_processes_info()
    df = construct_dataframe(processes)
    if n == 0:
        print(df.to_string())
    elif n > 0:
        print(df.head(n).to_string())
    # print continuously
    while live_update:
        # get all process info
        processes = get_processes_info()
        df = construct_dataframe(processes)
        # clear the screen depending on your OS
        os.system("cls") if "nt" in os.name else os.system("clear")
        if n == 0:
            print(df.to_string())
        elif n > 0:
            print(df.head(n).to_string())
        time.sleep(0.7)
我在这里使用head()方法打印前n行。
Python如何制作进程监视器?现在,要执行此操作,你应该以管理员身份运行它以获取有关系统进程的信息,这是我的 Linux 机器的Python制作进程监视器示例输出:
root@rockikz:~/pythonscripts# python3 process_monitor.py --columns name,cpu_usage,memory_usage,status -n 20 --sort-by memory_usage --descending
                name  cpu_usage memory_usage    status
pid
1312          mysqld        0.0     144.63MB  sleeping
915      gnome-shell        0.0      81.00MB  sleeping
3214         python3        0.0      58.12MB   running
1660   rtorrent main        0.0      35.84MB  sleeping
2466   rtorrent main        0.0      24.02MB  sleeping
3186             php        0.0      19.58MB  sleeping
737             Xorg        0.0      15.52MB  sleeping
1452         apache2        0.0      12.18MB  sleeping
872      teamviewerd        0.0      11.53MB  sleeping
974        gsd-color        0.0       8.65MB  sleeping
553   NetworkManager        0.0       7.71MB  sleeping
1045          colord        0.0       7.16MB  sleeping
982     gsd-keyboard        0.0       6.23MB  sleeping
969    gsd-clipboard        0.0       6.09MB  sleeping
548     ModemManager        0.0       5.68MB  sleeping
986   gsd-media-keys        0.0       4.94MB  sleeping
1001       gsd-power        0.0       4.72MB  sleeping
962    gsd-xsettings        0.0       4.59MB  sleeping
1023       gsd-wacom        0.0       4.40MB  sleeping
961      packagekitd        0.0       4.31MB  sleeping
我们走了!我们已经完成了这个,如上所述,你可以制作一个 GUI 版本,使用按钮来终止、暂停和恢复进程,因为已经有可用的函数(process.kill(),process.suspend()和process.resume())。
你还可以检索此处未讨论的其他信息,为所有可用字段和方法键入help(psutil.Process),或查看其官方文档。
在此处查看完整代码。
此外,你可以使用psutil来检索一般系统和硬件信息。

