
Python TensorFlow 2和Keras实现疟疾分类 - 了解如何构建深度学习疟疾检测模型,将细胞图像分类为感染或未感染疟疾 Tensorflow 2 和 Python 中的 Keras API。
过去几年,深度学习在医学中的用例有了很大的飞跃,从患者自动诊断到计算机视觉,该领域正在开发许多前沿模型。
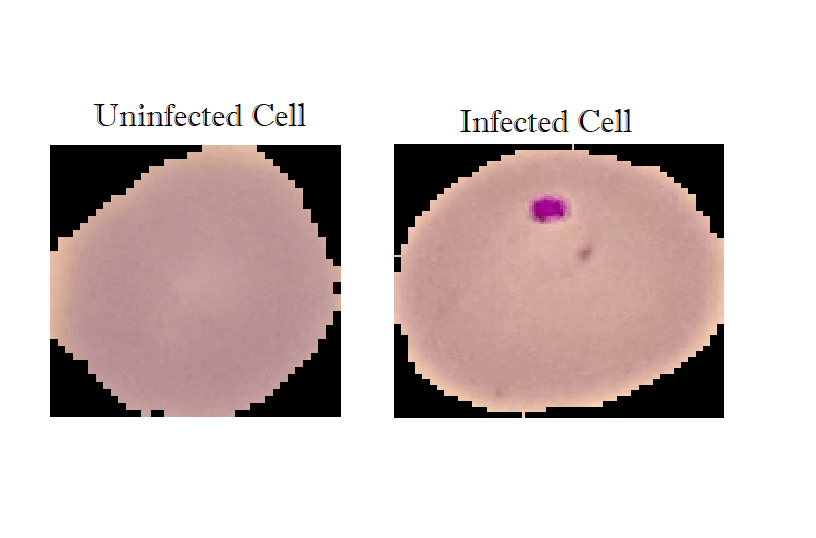
Python如何对疟疾分类?在本教程中,我们将使用 TensorFlow (Keras API) 为二进制分类任务实现一个深度学习模型,该任务包括将细胞的图像标记为感染或未感染疟疾。
Python TensorFlow 2和Keras疟疾分类教程 - 安装所需的库和框架:
pip install numpy tensorflow opencv-python sklearn matplotlib另请参阅: 如何使用 Tensorflow 2 和 Keras 在 Python 中制作图像分类器。
下载数据集
我们要成为一个用 疟疾细胞图像数据集从Kaggle,一压脚提升下载和解压的文件夹,你会看到cell_images,这个文件夹将包含两个子文件夹:寄生,未感染 和其它重复cell_images文件夹,随意删除一个。
我还邀请你将图像从两个类移动到另一个文件夹testing-samples,以便我们可以在完成模型训练后对其进行推断。
 使用 OpenCV 进行图像预处理
OpenCV是一个优化的开源库,用于图像处理和计算机视觉。我们将使用它来预处理我们的图像,并将它们以 NumPy 数组(数字格式)的形式转换为灰度,并将其调整为一个(70x70)形状:
import cv2
import tensorflow as tf
from tensorflow.keras.models import Sequential
from tensorflow.keras.layers import Dense, Conv2D, MaxPool2D, Flatten, Activation
from sklearn.model_selection import train_test_split
import numpy as np
import matplotlib.pyplot as plt
import glob
import os

# after you extract the dataset,
# put cell_images folder in the working directory
img_dir="cell_images"
img_size=70

def load_img_data(path):
    image_files = glob.glob(os.path.join(path, "Parasitized/*.png")) + \
                  glob.glob(os.path.join(path, "Uninfected/*.png"))
    X, y = [], []
    for image_file in image_files:
        # 0 for uninfected and 1 for infected
        label = 0 if "Uninfected" in image_file else 1
        # load the image in gray scale
        img_arr = cv2.imread(image_file, cv2.IMREAD_GRAYSCALE)
        # resize the image to (70x70)
        img_resized = cv2.resize(img_arr, (img_size, img_size))
        X.append(img_resized)
        y.append(label)
return X, y我们使用glob内置模块获取该格式的所有图像(以.png特定文件夹结尾)。
然后我们迭代这些图像文件名并以灰度加载每个图像,调整其大小并将其附加到我们的数组中,我们也对标签执行相同的操作(0 表示未感染,1 表示寄生)。
相关: 在 Python 中使用 OpenCV 进行人脸检测。
准备和规范化数据集
Python如何对疟疾分类?现在我们有了加载数据集的函数,让我们调用它并做一些准备:
# load the data
X, y = load_img_data(img_dir)
# reshape to (n_samples, 70, 70, 1) (to fit the NN)
X = np.array(X).reshape(-1, img_size, img_size, 1)
# scale pixels from the range [0, 255] to [0, 1]
# to help the neural network learn much faster
X = X / 255

# shuffle & split the dataset
X_train, X_test, y_train, y_test = train_test_split(X, y, test_size=0.1, stratify=y)
print("Total training samples:", X_train.shape)
print("Total validation samples:", X_test.shape[0])
Python TensorFlow 2和Keras疟疾分类教程:加载预处理后的数据集后,我们将图像数组形状扩展(n_samples, 70, 70, 1)为适合神经网络输入。
此外,为了帮助网络更快地收敛,我们应该进行数据归一化。sklearn 中有一些缩放方法,例如:
StandardScaler:x_norm =(X -平均值)/ STD (其中std是 标准偏差)MinMaxScaler: x_norm = (x - x_min) / (x_max - x_min) 这导致x_norm介于0 和 1之间 。
在我们的例子中,我们不会使用这些。相反,我们将除以255,因为像素可以达到的最大值是255,这将导致应用缩放后像素范围在 0 和 1 之间。
然后我们将使用sklearn的train_test_split()方法将数据集划分为训练集和测试集,我们使用总数据的 10% 进行验证。该stratify参数将保留目标在原始数据集、训练和测试数据集中的比例。
train_test_split()方法默认对数据进行混洗(shuffle设置为True),我们想要这样做,因为原始排序是由前半部分的0 s 标签和后半部分的1 s 标签组成,这可能会导致错误的训练网络稍后。
实现 CNN 模型架构
Python TensorFlow 2和Keras实现疟疾分类:我们的神经网络架构将遵循图中所示的相同架构: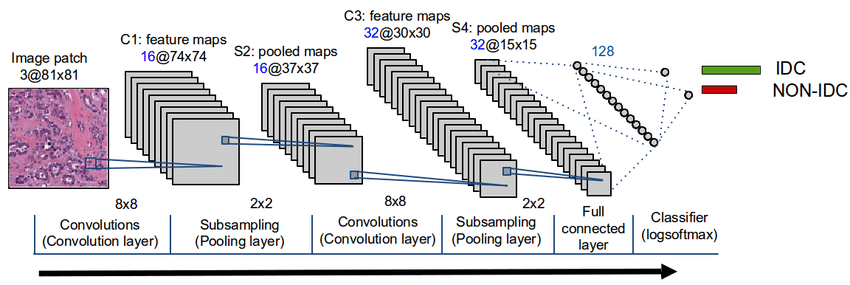
在我们的例子中,我们将添加 3 个卷积层,然后Flatten是由层组成的全连接Dense层。
让我们定义这些层和属性:
- 卷积层:卷积层的作用是通过仅保留最重要的特征来将图像简化为更简单的形式。矩阵过滤器将遍历图像以应用卷积操作。
- 池化层:它们的作用在于减少卷积操作产生的空间体积。有两种类型的池化层;平均池化层和最大池化层(在我们的例子中我们将使用后者)。
- Flatten:一个层负责将卷积和轮询的结果转换为一维形状,然后在全连接层中进行前馈。
model = Sequential()
model.add(Conv2D(64, (3, 3), input_shape=X_train.shape[1:]))
model.add(Activation("relu"))
model.add(MaxPool2D(pool_size=(2, 2)))

model.add(Conv2D(64, (3, 3)))
model.add(Activation("relu"))
model.add(MaxPool2D(pool_size=(2, 2)))

model.add(Conv2D(64, (3, 3)))
model.add(Activation("relu"))
model.add(MaxPool2D(pool_size=(2, 2)))

model.add(Flatten())

model.add(Dense(64))
model.add(Activation("relu"))

model.add(Dense(64))
model.add(Activation("relu"))

model.add(Dense(1))
model.add(Activation("sigmoid"))

model.compile(loss="binary_crossentropy", optimizer="adam", metrics=["accuracy"])

# train the model with 3 epochs, 64 batch size
model.fit(X_train, np.array(y_train), batch_size=64, epochs=3, validation_split=0.2)
# if you already trained the model, uncomment below and comment above
# so you can only load the previously trained model
# model.load_weights("malaria-cell-cnn.h5")由于输出是二进制的(感染或未感染),我们使用Sigmoid (1/(1+exp(-x))作为输出层的激活函数。
这是我的训练输出:
Train on 19840 samples, validate on 4960 samples
Epoch 1/3
19840/19840 [==============================] - 14s 704us/sample - loss: 0.5067 - accuracy: 0.7135 - val_loss: 0.1949 - val_accuracy: 0.9300
Epoch 2/3
19840/19840 [==============================] - 12s 590us/sample - loss: 0.1674 - accuracy: 0.9391 - val_loss: 0.1372 - val_accuracy: 0.9482
Epoch 3/3
19840/19840 [==============================] - 12s 592us/sample - loss: 0.1428 - accuracy: 0.9495 - val_loss: 0.1344 - val_accuracy: 0.9518
你可能已经注意到,我们在训练数据集及其验证拆分上实现了95%的准确率。
模型评估
Python如何对疟疾分类?现在让我们使用evaluate()来自 Keras API 来评估测试数据集上的模型:
loss, accuracy = model.evaluate(X_test, np.array(y_test), verbose=0)
print(f"Testing on {len(X_test)} images, the results are\n Accuracy: {accuracy} | Loss: {loss}")
Testing on 2756 images, the results are
Accuracy: 0.9444847702980042 | Loss: 0.15253388267470028该模型在测试数据中也表现良好,准确率达到94%。
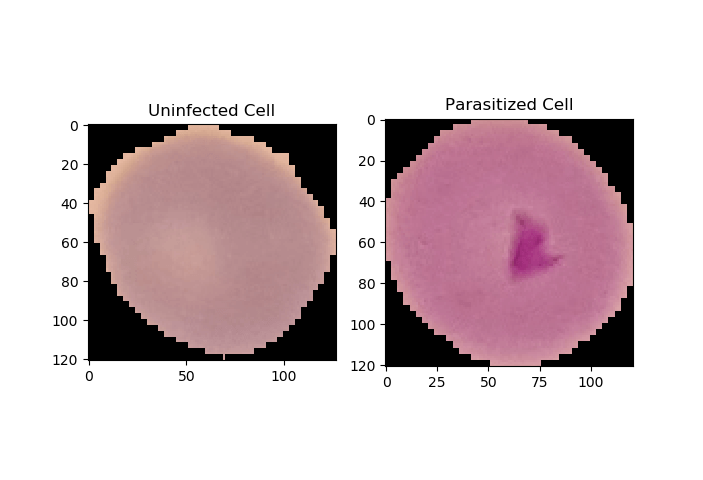
现在让我们使用这个模型对我们在本教程前面放置在testing-samples文件夹中的两个图像进行推断。首先,让我们绘制它们:
# testing some images
uninfected_cell = "cell_images/testing-samples/C1_thinF_IMG_20150604_104919_cell_82.png"
infected_cell = "cell_images/testing-samples/C38P3thinF_original_IMG_20150621_112116_cell_204.png"

_, ax = plt.subplots(1, 2)
ax[0].imshow(plt.imread(uninfected_cell))
ax[0].title.set_text("Uninfected Cell")
ax[1].imshow(plt.imread(infected_cell))
ax[1].title.set_text("Parasitized Cell")
plt.show()
输出:
太好了,现在让我们加载这些图像并进行预处理:
img_arr_uninfected = cv2.imread(uninfected_cell, cv2.IMREAD_GRAYSCALE)
img_arr_infected = cv2.imread(infected_cell, cv2.IMREAD_GRAYSCALE)
# resize the images to (70x70)
img_arr_uninfected = cv2.resize(img_arr_uninfected, (img_size, img_size))
img_arr_infected = cv2.resize(img_arr_infected, (img_size, img_size))
# scale to [0, 1]
img_arr_infected = img_arr_infected / 255
img_arr_uninfected = img_arr_uninfected / 255
# reshape to fit the neural network dimensions
# (changing shape from (70, 70) to (1, 70, 70, 1))
img_arr_infected = img_arr_infected.reshape(1, *img_arr_infected.shape)
img_arr_infected = np.expand_dims(img_arr_infected, axis=3)
img_arr_uninfected = img_arr_uninfected.reshape(1, *img_arr_uninfected.shape)
img_arr_uninfected = np.expand_dims(img_arr_uninfected, axis=3)我们现在要做的就是使用predict()方法进行推理:
# perform inference
infected_result = model.predict(img_arr_infected)[0][0]
uninfected_result = model.predict(img_arr_uninfected)[0][0]
print(f"Infected: {infected_result}")
print(f"Uninfected: {uninfected_result}")
输出:
Infected: 0.9827326536178589
Uninfected: 0.005085020791739225
太棒了,该模型有98% 的把握确定受感染的细胞实际上已被感染,并且他确定未感染细胞在99.5%的时间内未受感染。
保存模型
最后,我们将通过保存我们的模型来结束所有这个过程。
# save the model & weights
model.save("malaria-cell-cnn.h5")
Python TensorFlow 2和Keras疟疾分类教程总结
Python TensorFlow 2和Keras实现疟疾分类 - 在本教程中,你学习了:
- 如何处理原始图像,使用 OpenCV 将它们转换为灰度和 NumPy 数组(数字格式)。
- Python如何对疟疾分类
- 卷积神经网络背后的架构及其各种组件。
- 在 Tensorflow/Keras 中实现 CNN。
- 评估和保存深度学习模型,并对其进行推理。
我鼓励你调整模型参数,或者你可能想要使用迁移学习,以便你可以表现得更好。你还可以训练彩色图像而不是灰度,这可能会有所帮助!
除了准确性之外,还有其他指标,例如灵敏度和特异性,它们在医学领域中广泛使用,我也邀请你在此处添加它们。如果你不确定我们如何在皮肤癌检测教程中完成所有这些工作!

