
本文概述
Tkinter 是用于创建GUI应用程序的Python包。 Python有很多GUI框架, 但是Tkinter是Python标准库中唯一内置的框架。 Tkinter具有多项优势。它是跨平台的, 因此相同的代码可在Windows, macOS和Linux上使用。与其他框架相比, Tkinter轻巧且使用起来相对轻松。这使得它成为在Python中构建GUI应用程序的极具吸引力的选择, 尤其是对于那些不需要现代外观的应用程序, 并且当务之急是快速构建具有功能性和跨平台的应用程序。
为了更好地了解Tkinter, 我们将创建一个简单的GUI。
入门
1.导入tkinter软件包及其所有模块。
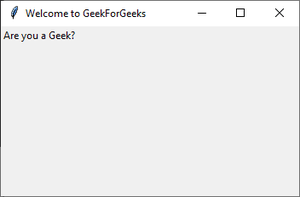
2.创建根窗口。给根窗口一个标题(使用title())和一个维度(使用geometry())。所有其他小部件都在根窗口中。
3.使用mainloop()调用窗口的无限循环。如果你忘记调用它,用户将看不到任何东西。窗口将等待任何用户交互,直到我们关闭它。
例子:
Python3
from tkinter import *

# create root window
root = Tk()

# root window title and dimension
root.title( "Welcome to GeekForGeeks" )
root.geometry( '350x200' )

# all widgets will be here

root.mainloop()
输出如下:

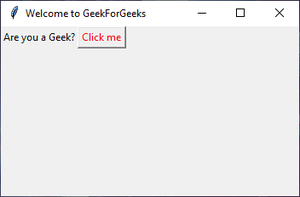
4.我们将使用"标签类"添加标签, 并根据需要更改其文本配置。的格()函数是几何图形管理器, 可将标签保持在窗口内的所需位置。如果默认情况下未提及任何参数, 则将其放置在空白单元格中;那是0, 0, 因为那是第一个位置。
例子:
Python3
from tkinter import *

# create root window
root = Tk()

# root window title and dimension
root.title( "Welcome to GeekForGeeks" )
root.geometry( '350x200' )

#adding a label to the root window
lbl = Label(root, text = "Are you a Geek?" )
lbl.grid()

root.mainloop()
输出如下:
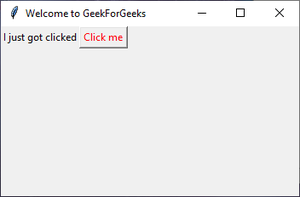
5.现在, 在根窗口中添加一个按钮。更改按钮配置为我们提供了很多选择。在此示例中, 我们将使按钮在单击后显示一个文本, 并更改按钮内部文本的颜色。
例子:
Python3
from tkinter import *

# create root window
root = Tk()

# root window title and dimension
root.title( "Welcome to GeekForGeeks" )
root.geometry( '350x200' )

# adding a label to the root window
lbl = Label(root, text = "Are you a Geek?" )
lbl.grid()

# function to display text when
# button is clicked
def clicked():
     lbl.configure(text = "I just got clicked" )

# button widget with red color text
# inside
btn = Button(root, text = "Click me" , fg = "red" , command = clicked)

btn.grid(column = 1 , row = 0 )

root.mainloop()
输出如下:
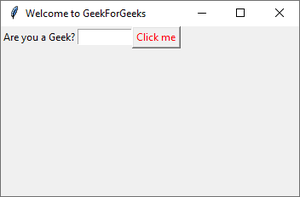
6.使用条目()类, 我们将创建一个文本框供用户输入。要显示用户输入的文字, 我们将对功能进行更改clicked()。我们可以使用得到()功能。当。。。的时候纽扣输入文本后, 将默认文本与用户文本连接在一起。还将按钮网格位置更改为第2列, 如下所示:条目()将列1。
例子:
Python3
from tkinter import *

# create root window
root = Tk()

# root window title and dimension
root.title( "Welcome to GeekForGeeks" )
root.geometry( '350x200' )

# adding a label to the root window
lbl = Label(root, text = "Are you a Geek?" )
lbl.grid()

# adding Entry Field
txt = Entry(root, width = 10 )
txt.grid(column = 1 , row = 0 )


# function to display user text when
# button is clicked
def clicked():

     res = "You wrote" + txt.get()
     lbl.configure(text = res)

# button widget with red color text inside
btn = Button(root, text = "Click me" , fg = "red" , command = clicked)

btn.grid(column = 2 , row = 0 )

root.mainloop()
输出如下:

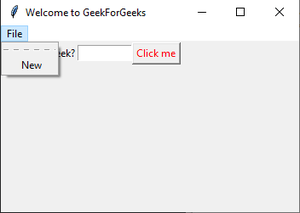
7.要添加菜单栏, 你可以使用菜单类。首先, 我们创建一个菜单, 然后添加第一个标签, 最后, 将菜单分配给我们的窗口。我们可以使用来在任何菜单下添加菜单项add_cascade()。
例子:
Python3
from tkinter import *


# create root window
root = Tk()

# root window title and dimension
root.title( "Welcome to GeekForGeeks" )
root.geometry( '350x200' )

# adding menu bar in root window
# new item in menu bar labelled as 'New'
# adding more items in the menu bar
menu = Menu(root)
item = Menu(menu)
item.add_command(label = 'New' )
menu.add_cascade(label = 'File' , menu = item)
root.config(menu = menu)

# adding a label to the root window
lbl = Label(root, text = "Are you a Geek?" )
lbl.grid()

# adding Entry Field
txt = Entry(root, width = 10 )
txt.grid(column = 1 , row = 0 )


# function to display user text when
# button is clicked
def clicked():

     res = "You wrote" + txt.get()
     lbl.configure(text = res)

# button widget with red color text inside
btn = Button(root, text = "Click me" , fg = "red" , command = clicked)

btn.grid(column = 2 , row = 0 )

root.mainloop()
输出:
这个简单的GUI涵盖了Tkinter软件包的基础。同样, 你可以添加更多的小部件并根据需要更改其配置。
小部件
kiner提供了各种控件, 例如GUI应用程序中使用的按钮, 标签和文本框。这些控件通常称为小部件。常用清单小部件下面提到–
| 编号 | 小部件 | 描述 |
| 1 | Label | 标签窗口小部件用于为其他窗口小部件提供单行标题。它还可以包含图像。 |
| 2 | Button | Button小部件用于在你的应用程序中显示按钮。 |
| 3 | Entry | Entry小部件用于显示单行文本字段, 以接受来自用户的值。 |
| 4 | Menu | 菜单小部件用于向用户提供各种命令。这些命令包含在Menubutton中。 |
| 5 | Canvas | "画布"小部件用于在你的应用程序中绘制形状, 例如线条, 椭圆, 多边形和矩形。 |
| 6 | Checkbutton | Checkbutton小部件用于将许多选项显示为复选框。用户可以一次选择多个选项。 |
| 7 | Frame | 框架小部件用作组织其他小部件的容器小部件。 |
| 8 | Listbox | 列表框窗口小部件用于向用户提供选项列表。 |
| 9 | Menubutton | Menubutton小部件用于显示应用程序中的菜单。 |
| 10 | Message | 消息小部件用于显示多行文本字段, 以接受来自用户的值。 |
| 11 | Radiobutton | 单选按钮小部件用于将许多选项显示为单选按钮。用户一次只能选择一个选项。 |
| 12 | Scale | 缩放小部件用于提供滑块小部件。 |
| 13 | Scrollbar | 滚动条小部件用于向各种小部件(例如列表框)添加滚动功能。 |
| 14 | Text | 文本小部件用于显示多行文本。 |
| 15 | Toplevel | 顶级窗口小部件用于提供单独的窗口容器。 |
| 16 | LabelFrame | 标签框是一个简单的容器小部件。它的主要目的是充当复杂窗口布局的间隔物或容器。 |
| 17 | tkMessageBox | 此模块用于在你的应用程序中显示消息框。 |
| 18 | Spinbox | Spinbox小部件是标准Tkinter Entry小部件的一种变体, 可用于从固定数量的值中进行选择。 |
| 19 | PanedWindow | PanedWindow是一个容器小部件, 可以包含任意数量的水平或垂直排列的窗格。 |
几何管理
所有的Tkinter小部件都可以访问特定的几何管理方法, 该方法的目的是在整个父小部件区域中组织小部件。 Tkinter公开以下几何图形管理器类:包装, 网格和位置。他们的描述在下面提到–
| 编号 | 函数 | 描述 |
| 1 | pack() | 该几何管理器将小部件组织成块, 然后再将其放置在父小部件中。 |
| 2 | grid() | 该几何管理器在父窗口小部件中以表格状结构组织窗口小部件。 |
| 3 | place() | 该几何管理器通过将小部件放置在父小部件中的特定位置来组织小部件。 |
首先, 你的面试准备可通过以下方式增强你的数据结构概念:Python DS课程。

