
Kivy是Python中与平台无关的GUI工具。由于它可以在Android, IOS, Linux和Windows等操作系统上运行。它基本上是用于开发Android应用程序, 但这并不意味着它不能在桌面应用程序上使用。
👉🏽Kivy教程–通过示例学习Kivy。
StackLayout:
要使用StackLayout firt, 请通过以下命令导入StackLayout:
from kivy.uix.stacklayout import StackLayout的StackLayout垂直或水平排列子级, 并尽可能地容纳该布局。各个子窗口小部件的大小不必相同。有4个行方向和4个列方向。
StackLayout Orientation (2D):
 - right to left or left to right
 - top to bottom or bottom to top
 - 'rl-bt', 'rl-tb', lr-bt', 'lr-tb'(Row wise)
 - 'bt-rl', 'bt-lr', 'tb-rl', 'tb-lr'(Column wise)
Basic Approach to create Stack layout :
1) import kivy
2) import kivyApp
3) import Button
4) import Stacklayout
5) Set minimum version(optional)
6) Create the StackLayout class
7) Create the App class
8) Set up .kv file (name same as App class)
9) return StackLayout Class
10) Run an instance of the class下面是行方向和列方向的实现:
main.py文件–
# code to show how to use StackLayout using .kv file

# base Class of your App inherits from the App class.
# app:always refers to the instance of your application
from kivy.app import App

# creates the button in kivy
# if not imported shows the error
from kivy.uix.button import Button

# The StackLayout arranges children vertically
# or horizontally, as many as the layout can fit.
from kivy.uix.stacklayout import StackLayout

# creating the root widget used in .kv file
class StackLayout(StackLayout):
     pass

# class in which name .kv file must be named Slider.kv.
# or creating the App class
class StackApp(App):
     def build( self ):
         # returning the instance of StackLayout class
         return StackLayout()

# run the app
if __name__ = = '__main__' :
     StackApp().run()
的名称.kv文件必须与App类相同, 即Stack.kv
.kv文件–
<StackLayout>:

   # Different orentation
   # ['lr-tb', 'tb-lr', 'rl-tb', 'tb-rl', 'lr-bt', 'bt-lr', 'rl-bt', 'bt-rl']
   orientation: 'lr-tb'

   # Creating Multiple Buttons
   Button:
     text: 'B1'
     size_hint: [. 2 , . 1 ]

   Button:
     text: 'B2'
     size_hint: [. 2 , . 1 ]

   Button:
     text: 'B3'
     size_hint: [. 2 , . 1 ]

   Button:
     text: 'B4'
     size_hint: [. 2 , . 1 ]

   Button:
     text: 'B5'
     size_hint: [. 2 , . 1 ]

   Button:
     text: 'B6'
     size_hint: [. 2 , . 1 ]

   Button:
     text: 'B7'
     size_hint: [. 2 , . 1 ]

   Button:
     text: 'B8'
     size_hint: [. 2 , . 1 ]

   Button:
     text: 'B9'
     size_hint: [. 2 , . 1 ]

   Button:
     text: 'B10'
     size_hint: [. 2 , . 1 ]
输出如下:
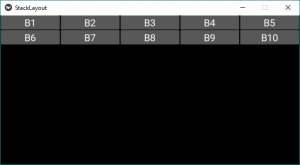
这是针对方向" lr-tb"的。首先, 将小部件从左到右添加, 然后从上到下添加。
注意:如果要更改方向, 只需更改方向04行中的方向.kv文件具有以下任何一种取向–
For row wise orientation use:
  -'lr-tb'
  -'lr-bt'
  -'rl-tb'
  -'rl-bt'

For column wise orientation use:
  -'tb-lr'
  -'tb-rl'
  -'bt-lr'
  -'bt-rl'
下面是图片输出, 上面所有方向–
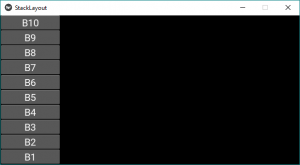
对于行方向使用:
'lr-tb'输出如下:

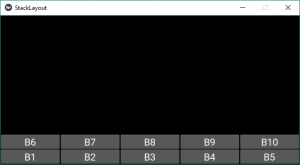
'lr-bt'输出如下:
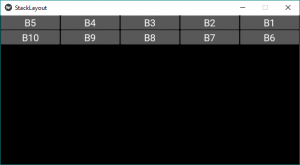
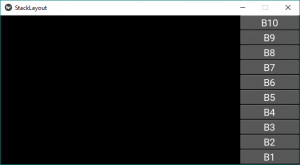
'rl-tb'输出如下:
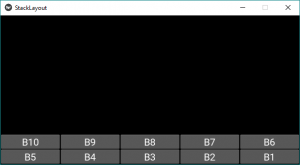
'rl-bt'输出如下:
对于列方向定向, 请使用:
'tb-lr'输出如下:

'tb-rl'输出如下:

'bt-lr'输出如下:
'bt-rl'输出如下:
首先, 你的面试准备可通过以下方式增强你的数据结构概念:Python DS课程。

