
CSS表单用于为用户创建交互式表单。它提供了许多设置样式的方法。
有许多可用的CSS属性, 可用于创建HTML表单并设置其样式, 以使其更具交互性, 下面列出其中一些:
属性选择器:
输入表单的属性类型可以采用多种形式, 具体取决于用户的选择。它可以是任何可能的类型, 例如文本, 搜索, URL, 电话, 电子邮件, 密码, 日期选择器, 数字, 复选框, 单选, 文件等。用户在创建表单时需要指定类型。
例子:
<!DOCTYPE html>
< html >
< head >
< style >
body{
background-color:green;
}
</ style >
</ head >
< body >
< center >
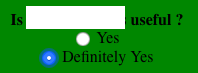
< b >Is lsbin useful ?</ b >
< form >
< input type = "radio" name = "useful" value = "yes" checked>
Yes < br >
< input type = "radio" name = "useful" value = "def_yes" >
Definitely Yes
</ form >
</ center >
</ body >
</ html >输出如下
:
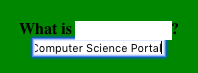
考虑另一个示例, 其中输入类型只是文本:
<!DOCTYPE html>
< html >
< head >
     < style >
         body{
             background-color:green;
         }
     </ style >
</ head >

< body >
     < center >
     < form >
         < b >Do you find lsbin helpful?</ b >
             < br >
         < input type = "text" name = "info" >< br >
     </ form >
     </ center >
</ body >
</ html >
输出如下
:
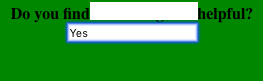
设置输入的宽度
:
宽度
属性用于设置输入字段的宽度。考虑下面的示例, 其中宽度设置为整个屏幕的10%。
<!DOCTYPE html>
< html >
< head >
     < style >
         input{
             width:10%;
         }

         body{
             background-color:green;
         }
     </ style >
</ head >

< body >
     < center >
     < form >
         < b >Do you find lsbin helpful?</ b >
             < br >
         < input type = "text" name = "info" >< br >
     </ form >
     </ center >
</ body >
</ html >
输出如下
:
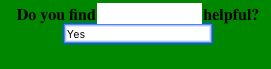
在输入中添加填充
:
填充
属性用于在文本字段内添加空格。考虑以下示例:
<!DOCTYPE html>
< html >
< head >
     < style >
         input{
             width:10%;
             padding: 12px;
         }

         body{
             background-color:green;
         }
     </ style >
</ head >

< body >
     < center >
         < form >
             < b >Do you find lsbin helpful?</ b >< br >
             < input type = "text" name = "info" >< br >
         </ form >
     </ center >
</ body >
</ html >
输出如下
:
设置输入保证金
:
保证金
属性用于在输入字段外部添加空间。输入很多时会很有帮助。考虑下面带有两个输入的示例, 并观察它们之间的空间(边距)。
<!DOCTYPE html>
< html >
< head >
     < style >
         input{
             width:10%;
             margin: 8px;
         }

         body{
             background-color:green;
         }
     </ style >
</ head >

< body >
     < center >
     < form >
         < b >Mention two topics that you liked on lsbin</ b >
             < br >
         < input type = "text" name = "info" >< br >
         < input type = "text" name = "info" >< br >
     </ form >
     </ center >
</ body >
</ html >
输出如下
:

添加边框和边框半径
:
边境
属性用于更改边框的大小和颜色, 而边框半径属性用于添加圆角。
考虑以下示例, 其中2像素 稳定的红色创建的边框的半径为4像素.
<!DOCTYPE html>
< html >
< head >
     < style >
         input{
             width:10%;
             margin: 8px;
             border: 2px solid red;
             border-radius: 4px;
         }

         body{
             background-color:green;
         }
     </ style >
</ head >

< body >
     < center >
         < form >
             < b >
                 Mention two topics that you liked on
                 lsbin
             </ b >
             < br >
             < input type = "text" name = "info" >< br >
             < input type = "text" name = "info" >< br >
         </ form >
     </ center >
</ body >
</ html >
输出如下
:

注意:用户还可以在任何特定的边上都具有边框, 并去除其他边或具有不同颜色的所有边框。考虑下面的示例, 其中用户只希望在顶部(蓝色)和底部(红色)边框。
<!DOCTYPE html>
< html >
< head >
     < style >
         input{
             width:10%;
             margin: 8px;
             border: none;
             border-top: 3px solid blue;
             border-bottom: 3px solid red;
         }

         body{
             background-color:green;
         }
     </ style >
</ head >

< body >
     < center >
         < form >
             < b >
                 Mention two topics that you liked on
                 lsbin
             </ b >
             < br >
             < input type = "text" name = "info" >< br >
             < input type = "text" name = "info" >< br >
         </ form >
     </ center >
</ body >
</ html >
输出如下
:

为文本和背景添加颜色
:
颜色
属性用于更改输入中文本的颜色, 并且
背景颜色
属性用于更改输入字段背景的颜色。
考虑下面的示例, 其中文本的颜色为黑色, 背景色设置为绿色。
<!DOCTYPE html>
< html >
< head >
     < style >
         input{
             width:10%;
             margin: 8px;
             border: none;
             background-color: green;
             color: black;
         }

         body{
             background-color:white;
         }
     </ style >
</ head >

< body >
     < center >
         < form >
             < b >
                 Mention two topics that you liked
                 on lsbin
             </ b >
             < br >
             < input type = "text" name = "info" >< br >
             < input type = "text" name = "info" >< br >
         </ form >
     </ center >
</ body >
</ html >
输出如下
:

焦点选择器
:当我们单击输入字段时, 它会显示蓝色轮廓。你可以使用:focus选择器更改此行为。
考虑下面的示例, 其中用户在聚焦时需要3px的纯红色轮廓和绿色背景。
<!DOCTYPE html>
< html >
< head >
     < style >
         input{
             width:10%;
             margin: 8px;
             color: black;
         }

         input[type=text]:focus {
         border: 3px solid red;
         background-color: green;
         }

         body{
             background-color:white;
         }
     </ style >
</ head >

< body >
     < center >
     < form >
         < b >
             Mention two topics that you liked
             on lsbin
         </ b >
         < br >
         < input type = "text" name = "info" >< br >
         < input type = "text" name = "info" >< br >
     </ form >
     </ center >
</ body >
</ html >
输出如下
:

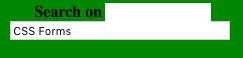
在输入表单中添加图像
:
背景图片
属性可以用于将图像放置在输入表单中, 并且可以使用background-position属性进行定位, 并且用户还可以决定是否重复。
考虑下面的示例, 其中背景图像为无重复模式。
<!DOCTYPE html>
< html >
< head >
     < style >
         input{
             width: 20%;
             background-image: url('search.png');
             background-position: 10px 10px;
             background-repeat: no-repeat;
             padding: 12px 20px 12px 40px;
         }

         body{
             background-color:white;
         }
     </ style >
</ head >

< body >
     < center >
     < form >
         < b >Search on lsbin</ b >< br >
         < input type = "text" name = "info" placeholder = "Search.." >< br >
     </ form >
     </ center >
</ body >
</ html >
输出如下
:
过渡属性
:
过渡
通过指定松弛宽度和聚焦宽度以及进行操作的时间段, 可以在输入字段上使用属性来更改字段的大小。
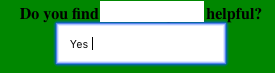
考虑下面的示例, 其中松弛的输入字段宽度为15%, 当聚焦时其宽度在1秒内变为30%。
<!DOCTYPE html>
< html >
< head >
     < style >
         input{
             width: 15%;
             -webkit-transition: width 1s ease-in-out;
             transition: width 1s ease-in-out;
         }

         input[type=text]:focus {
             width: 30%;
             border:4px solid blue;
         }

         body{
             background-color:green;
         }
     </ style >
</ head >

< body >
     < center >
     < form >
         < b >Search on lsbin</ b >< br >
         < input type = "text" name = "info" placeholder = "Search.." >< br >
     </ form >
     </ center >
</ body >
</ html >
输出如下
:
放松时
当专注时


