

在应用中添加声音是吸引用户的好方法。新通知的提示音,发送邮件时的“嗖嗖”声,或删除文件时的嘈杂声,都有助于为React Native应用创造更好的用户体验。
如何使用react-native-sound播放声音?在本指南中,我们将探索 react-native-sound,这是一个强大的音频组件,可以为你的 React Native 应用程序处理与声音相关的任务。
我们将通过实际示例介绍以下内容:
- 什么是 react-native-sound?
- 设置 react-native-sound(iOS 和 Android)
- 为你的 React Native 应用添加声音
- 播放捆绑中的声音
- 导入声音文件
- 从远程路径播放声音文件
要继续学习,你应该熟悉React Native的基础知识,包括JSX、组件(类和函数)和样式。
你可以简单地复制并粘贴本指南中的代码块,但我建议你通读整个教程以获得完整的理解。本react-native-sound播放声音教程假设你已经为你的应用程序完成了基本设置。
什么是 react-native-sound?
react-native-sound是 React Native 中的一个模块,用于在 iOS、Android 和 Windows 上播放声音片段。此模块使你能够添加来自各种来源的音频,例如应用程序包(本机)、JavaScript 包或远程路径(本地存储或远程 URL)。
react-native-sound 更像是一个类而不是类组件,它有助于使用预定义的方法控制实例,而无需更新状态或道具。这减轻了与应用程序缓慢重新渲染相关的担忧。
尽管它的文档警告说 react-native-sound 是“alpha 质量并且可能有错误”,但它是当今最受欢迎和使用最广泛的 React Native 声音库之一。
设置 react-native-sound(iOS 和 Android)
要开始使用 react-native-sound,如果远程不可用(即,它们在应用程序的包内,而不是在设备的外部存储或远程服务器上),你需要在应用程序中播放的声音)。
react-native-sound播放声音实例:要将 react-native-sound 添加到你的应用程序,只需使用你首选的包管理器(例如,npm 或 yarn)在你的应用程序目录中输入以下命令:
$ yarn add react-native-sound 如果你为 Android 构建,则在构建过程中会处理链接。
对于 iOS,只需导航到 iOS 目录并调用pod install. 这将添加 react-native-sound 所需的 pod。
为你的 React Native 应用添加声音
如何使用react-native-sound播放声音?现在是添加你想要播放的声音的时候了。这一步只是为了学习如何将音频文件捆绑在本机包中。我们还将通过一种更简单的方式从资源目录中获取音频文件。
对于 Android,创建原始目录并将声音复制到该目录:
{appDirectory}/android/app/src/main/res/raw对于 iOS,在 Xcode 中打开工作区,然后右键单击项目并单击Add files to {project_name},如下所示:
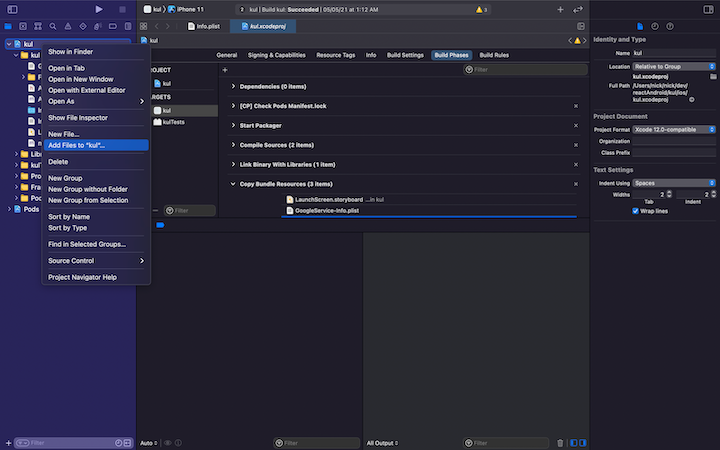
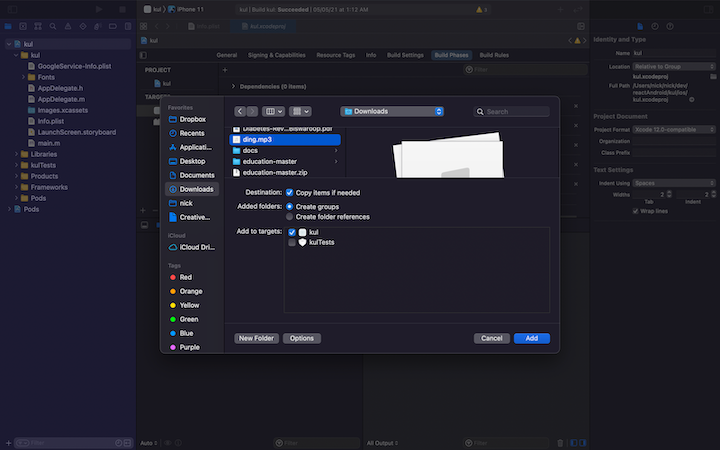
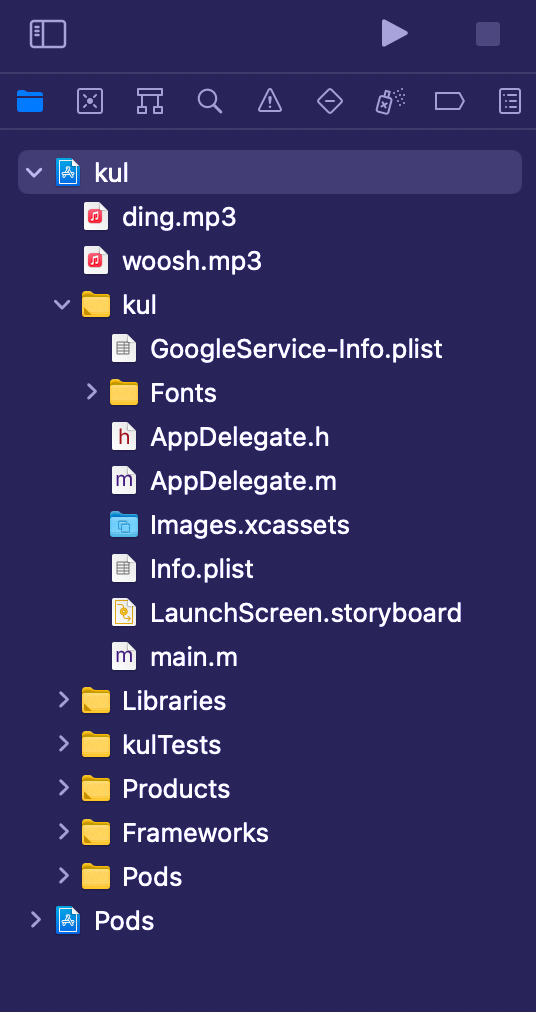
结果应该是这样的:
添加声音文件后,只需构建应用程序并在模拟器上运行它,或者最好在真实设备上运行。
react-native-sound播放声音实例:从一个bundle中播放声音
成功运行应用程序后,就可以开始编码了。
首先我们需要在应用中导入声音组件:
import Sound from 'react-native-sound';在设置我们要播放的声音之前,我们需要指定声音的类别:
Sound.setCategory('Playback');要初始化声音,请使用以下代码:
var ding = new Sound('ding.mp3', Sound.MAIN_BUNDLE, (error) => {
  if (error) {
    console.log('failed to load the sound', error);
    return;
  }
  // when loaded successfully
  console.log('duration in seconds: ' + whoosh.getDuration() + 'number of channels: ' + whoosh.getNumberOfChannels());
});上面的代码使用第一个参数,使用第二个参数指定的包中的文件,并在第三个参数中返回回调。ding.mp3Sound.MAIN_BUNDLE
\``getDuration用于以秒为单位获取音频文件的时长,getNumberOfChannels用于获取音频通道数。
要设置播放的音量,我们可以使用以下方法:
ding.setVolume(1);在这里,1是最高音量和0最低音量,它们之间的差异以小数位表示 - 例如,要将音量降低到 50%,你可以将其设置为0.5。
要播放文件,我们可以使用playfrom的方法Sound,如下所示:
ding.play(success => {
  if (success) {
    console.log('successfully finished playing');
  } else {
    console.log('playback failed due to audio decoding errors');
  }
});
成功完成回报后会有回调(或者如果出现任何问题,就此而言)。
react-native-sound播放声音教程:总结上述步骤:
- 设置要播放的声音的类别
- 初始化声音文件
- 如有必要,调整音量
- 播放声音
这是从包中播放声音的最终代码:
import React, {useEffect} from 'react';
import {View, StyleSheet, TouchableOpacity} from 'react-native';
import Ionicons from 'react-native-vector-icons/Ionicons';

var Sound = require('react-native-sound');


Sound.setCategory('Playback');


var ding = new Sound('ding.mp3', Sound.MAIN_BUNDLE, (error) => {
if (error) {
    console.log('failed to load the sound', error);
    return;
  }
  // if loaded successfully
  console.log('duration in seconds: ' + ding.getDuration() + 'number of channels: ' + ding.getNumberOfChannels());

});
const App = () => {
  useEffect(() => {
    ding.setVolume(1);
    return () => {
      ding.release();
    };
  }, []);
  const playPause = () => {
    ding.play(success => {
      if (success) {
        console.log('successfully finished playing');
      } else {
        console.log('playback failed due to audio decoding errors');
      }
    });
  };
  return (
    <View style={styles.container}>
      <TouchableOpacity style={styles.playBtn} onPress={playPause}>
        <Ionicons name={'ios-play-outline'} size={36} color={'#fff'} />
      </TouchableOpacity>
    </View>
  );
};
const styles = StyleSheet.create({
  container: {
    flex: 1,
    alignItems: 'center',
    justifyContent: 'center',
    backgroundColor: '#000',
  },
  playBtn: {
    padding: 20,
  },
});
export default App;
react-native-sound播放声音教程:导入声音文件
现在,对于来自 assets 目录(或应用程序中的任何目录)的文件,我们可以使用相同的旧文件require或import获取文件的实例并使用 react-native-sound 播放它。
只需导入文件 -
import dings from './src/assets/ding.mp3';——并在Sound包中使用,如下图:
var ding = new Sound(dings, error => {
  if (error) {
    console.log('failed to load the sound', error);
    return;
  }
  // if loaded successfully
  console.log('duration in seconds: ' + ding.getDuration() + 'number of channels: ' + ding.getNumberOfChannels());
});使用来自资源的导入或必需文件与捆绑文件的区别在于,你不必basePath为文件指定。相反,回调取而代之。
react-native-sound播放声音实例:这是用于播放导入文件的组件的代码:
import React, {useEffect} from 'react';
import {View, StyleSheet, TouchableOpacity} from 'react-native';
import dings from './src/assets/ding.mp3';
import Ionicons from 'react-native-vector-icons/Ionicons';

var Sound = require('react-native-sound');

Sound.setCategory('Playback');

var ding = new Sound(dings, error => {
  if (error) {
    console.log('failed to load the sound', error);
    return;
  }
  // if loaded successfully
  console.log(
    'duration in seconds: ' +
      ding.getDuration() +
      'number of channels: ' +
      ding.getNumberOfChannels(),
  );
});
const App = () => {
  useEffect(() => {
    ding.setVolume(1);
    return () => {
      ding.release();
    };
  }, []);
  const playPause = () => {
    ding.play(success => {
      if (success) {
        console.log('successfully finished playing');
      } else {
        console.log('playback failed due to audio decoding errors');
      }
    });
  };
  return (
    <View style={styles.container}>
      <TouchableOpacity style={styles.playBtn} onPress={playPause}>
        <Ionicons name={'ios-play-outline'} size={36} color={'#fff'} />
      </TouchableOpacity>
    </View>
  );
};
const styles = StyleSheet.create({
  container: {
    flex: 1,
    alignItems: 'center',
    justifyContent: 'center',
    backgroundColor: '#000',
  },
  playBtn: {
    padding: 20,
  },
});
export default App;
下面是上面代码的结果。只需点击播放按钮即可播放声音。

从远程路径播放声音文件
如何使用react-native-sound播放声音?你可能想要播放远程文件或本地存储中的文件。这基本上就像使用 react-native-sound 播放捆绑文件一样简单。你只需要将 URL 添加为第一个参数Sound并将第二个参数设置为 null,因为该文件来自远程或本地存储,而不是来自应用程序。
var audio = new Sound(
  'https://file-examples-com.github.io/uploads/2017/11/file_example_MP3_700KB.mp3',
  null,
  error => {
    if (error) {
      console.log('failed to load the sound', error);
      return;
    }
    // if loaded successfully
    console.log(
      'duration in seconds: ' +
        audio.getDuration() +
        'number of channels: ' +
        audio.getNumberOfChannels(),
    );
  },
);
react-native-sound播放声音实例:下面是一个完整的示例,说明在应用程序关闭或组件卸载后如何播放、暂停和释放音频:
import React, {useEffect, useState} from 'react';
import {View, StyleSheet, TouchableOpacity} from 'react-native';
import Ionicons from 'react-native-vector-icons/Ionicons';

var Sound = require('react-native-sound');


Sound.setCategory('Playback');

var audio = new Sound(
  'https://file-examples-com.github.io/uploads/2017/11/file_example_MP3_700KB.mp3',
  null,
  error => {
    if (error) {
      console.log('failed to load the sound', error);
      return;
    }
    // if loaded successfully
    console.log(
      'duration in seconds: ' +
        audio.getDuration() +
        'number of channels: ' +
        audio.getNumberOfChannels(),
    );
  },
);
const App = () => {
  const [playing, setPlaying] = useState();
  useEffect(() => {
    audio.setVolume(1);
    return () => {
      audio.release();
    };
  }, []);
  const playPause = () => {
    if (audio.isPlaying()) {
      audio.pause();
      setPlaying(false);
    } else {
      setPlaying(true);
      audio.play(success => {
        if (success) {
          setPlaying(false);
          console.log('successfully finished playing');
        } else {
          setPlaying(false);
          console.log('playback failed due to audio decoding errors');
        }
      });
    }
  };
  return (
    <View style={styles.container}>
      <TouchableOpacity style={styles.playBtn} onPress={playPause}>
        <Ionicons
          name={playing ? 'ios-pause-outline' : 'ios-play-outline'}
          size={36}
          color={'#fff'}
        />
      </TouchableOpacity>
    </View>
  );
};
const styles = StyleSheet.create({
  container: {
    flex: 1,
    alignItems: 'center',
    justifyContent: 'center',
    backgroundColor: '#000',
  },
  playBtn: {
    padding: 20,
  },
});
export default App;.release()用于释放为播放音频文件保留的内存。在卸载组件或不再播放音频后释放内存非常重要。这有助于避免内存泄漏或其他错误。
react-native-sound播放声音教程结论
如何使用react-native-sound播放声音?react-native-sound是一个很棒的模块,用于为React Native应用添加声音或构建简单的音频播放器。 在本教程中,我们学习了如何从本地捆绑包和远程文件中添加和播放音频。如果你想在这方面探索更多的选项,我建议你尝试一下Expo unimodules中的Expo-av模块,在React Native应用中播放音频或视频文件。

