
Angular 是 AngularJS 框架的新版本,由 Google 开发。它带有完全重写和各种改进,包括优化的构建和更快的编译时间。在这个 Angular 5 教程中,我们将从头开始构建一个笔记应用程序。如果你一直在等待学习 Angular 5,那么本Angular 5用法教程适合你。

可以在此处找到该应用程序的最终源代码。
该框架有两个主要版本:AngularJS(版本 1)和 Angular(版本 2+)。从版本 2 开始,Angular 不再是一个 JavaScript 框架,因此它们之间存在巨大差异,需要进行根本的名称更改。
Angular 5项目示例指南:我应该使用 Angular 吗?
这取决于。一些开发人员会告诉你,最好使用 React 构建自己的组件,而不需要太多额外的代码。但这也可能是一个问题。Angular 是一个完全集成的框架,它允许你快速开始你的项目,而无需考虑选择哪些库以及如何处理日常问题。我认为 Angular 用于前端,而 RoR 用于后端。
TypeScript
如何使用Angular 5?如果你不知道TypeScript,请不要害怕。你的 JavaScript 知识足以快速学习 TypeScript,而大多数现代编辑器在这方面都非常有效。现在最可取的选择是VSCode和任何 JetBrains IntelliJ 系列(例如,Webstorm或在我的情况下,RubyMine)。对我来说,最好使用比 更智能的编辑器vim,因为它会让你对代码中的任何错误有额外的提醒,因为TypeScript 是强类型的。另一件事要提到的是,Angular CLI 及其 Webpack 负责将 TS 编译为 JS,因此你不应该让 IDE 为你编译它。
Angular CLI
Angular 5用法教程:Angular 现在有自己的CLI或command line interface,它将为你完成大部分常规操作。要开始使用 Angular,我们必须安装它。它需要 Node 6.9.0 或更高版本以及 NPM 3 或更高版本。我们不会为你的系统介绍它们的安装,因为最好自己查找最新的安装文档。安装它们后,我们将通过运行以下命令来安装 Angular CLI:
npm install -g @angular/cli
安装成功后,我们可以通过运行以下ng new命令来生成一个新项目:
ng new getting-started-ng5
  create getting-started-ng5/README.md (1033 bytes)
  create getting-started-ng5/.angular-cli.json (1254 bytes)
  create getting-started-ng5/.editorconfig (245 bytes)
  create getting-started-ng5/.gitignore (516 bytes)
  create getting-started-ng5/src/assets/.gitkeep (0 bytes)
  create getting-started-ng5/src/environments/environment.prod.ts (51 bytes)
  create getting-started-ng5/src/environments/environment.ts (387 bytes)
  create getting-started-ng5/src/favicon.ico (5430 bytes)
  create getting-started-ng5/src/index.html (304 bytes)
  create getting-started-ng5/src/main.ts (370 bytes)
  create getting-started-ng5/src/polyfills.ts (2405 bytes)
  create getting-started-ng5/src/styles.css (80 bytes)
  create getting-started-ng5/src/test.ts (1085 bytes)
  create getting-started-ng5/src/tsconfig.app.json (211 bytes)
  create getting-started-ng5/src/tsconfig.spec.json (304 bytes)
  create getting-started-ng5/src/typings.d.ts (104 bytes)
  create getting-started-ng5/e2e/app.e2e-spec.ts (301 bytes)
  create getting-started-ng5/e2e/app.po.ts (208 bytes)
  create getting-started-ng5/e2e/tsconfig.e2e.json (235 bytes)
  create getting-started-ng5/karma.conf.js (923 bytes)
  create getting-started-ng5/package.json (1324 bytes)
  create getting-started-ng5/protractor.conf.js (722 bytes)
  create getting-started-ng5/tsconfig.json (363 bytes)
  create getting-started-ng5/tslint.json (3040 bytes)
  create getting-started-ng5/src/app/app.module.ts (316 bytes)
  create getting-started-ng5/src/app/app.component.css (0 bytes)
  create getting-started-ng5/src/app/app.component.html (1141 bytes)
  create getting-started-ng5/src/app/app.component.spec.ts (986 bytes)
  create getting-started-ng5/src/app/app.component.ts (207 bytes)
Installing packages for tooling via yarn.
yarn install v1.3.2
info No lockfile found.
[1/4] 🔍  Resolving packages...
[2/4] 🚚  Fetching packages...
[3/4] 🔗  Linking dependencies...
warning "@angular/cli > @schematics/angular@0.1.10" has incorrect peer dependency "@angular-devkit/schematics@0.0.40".
warning "@angular/cli > @angular-devkit/schematics > @schematics/schematics@0.0.10" has incorrect peer dependency "@angular-devkit/schematics@0.0.40".
[4/4] 📃  Building fresh packages...
success Saved lockfile.
✨  Done in 44.12s.
Installed packages for tooling via yarn.
Successfully initialized git.
Project 'getting-started-ng5' successfully created.
完成后,我们可以要求我们的新应用程序通过ng serve耗尽其目录来启动:
ng serve
** NG Live Development Server is listening on localhost:4200, open your browser on http://localhost:4200/ **
Date: 2017-12-13T17:48:30.322Z
Hash: d147075480d038711dea
Time: 7425ms
chunk {inline} inline.bundle.js (inline) 5.79 kB [entry] [rendered]
chunk {main} main.bundle.js (main) 20.8 kB [initial] [rendered]
chunk {polyfills} polyfills.bundle.js (polyfills) 554 kB [initial] [rendered]
chunk {styles} styles.bundle.js (styles) 34.1 kB [initial] [rendered]
chunk {vendor} vendor.bundle.js (vendor) 7.14 MB [initial] [rendered]

webpack: Compiled successfully.
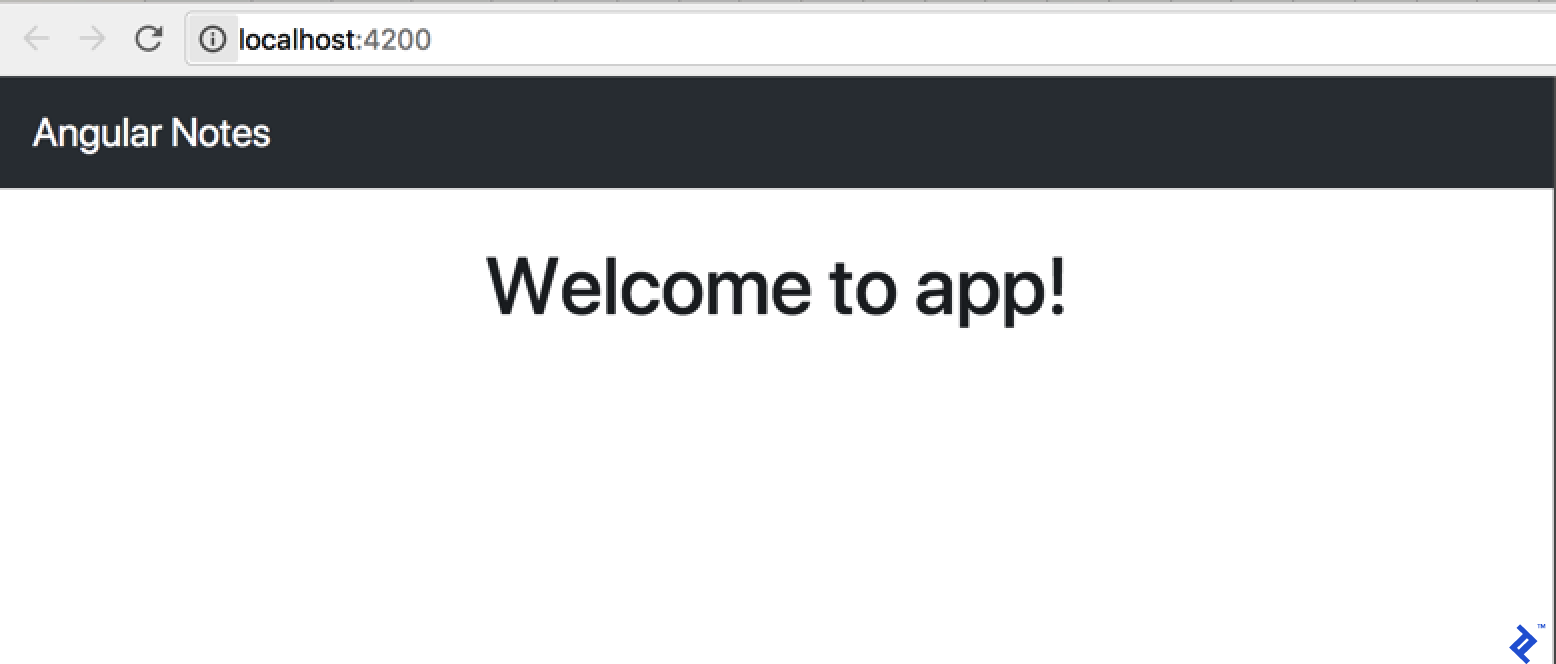
如果我们将浏览器导航到该链接,它将如下图所示显示:

那么,这里究竟发生了什么?Angular CLI 运行webpack dev server,它在下一个空闲端口上呈现我们的应用程序(以便你可以在同一台机器上运行多个应用程序),并实时重新加载。它还监视项目源中的每个更改并重新编译所有更改,然后它要求浏览器重新加载打开的页面。因此,通过使用 Angular CLI,我们已经在开发环境中工作,而无需编写一行配置或实际执行任何操作。但我们才刚刚开始……
Angular 5项目示例指南:组件
我们正在运行我们的空应用程序。让我们来谈谈 Angular 中的应用程序组合。如果你有AngularJS 开发方面的一些背景,你就会知道有些控制器、指令和组件在某种程度上类似于指令但更简单,可以让你升级到 Angular 2。对于那些没有那种不得不选择的美妙体验的人他们之间,弄清楚什么去哪里,别担心。现在它大多只是组件。组件是 Angular 世界中最基本的构建块。让我们看看 Angular CLI 为我们生成的代码。
首先,这里是index.html:
<!doctype html>
<html lang="en">
<head>
  <meta charset="utf-8">
  <title>GettingStartedNg5</title>
  <base href="/">

  <meta name="viewport" content="width=device-width, initial-scale=1">
  <link rel="icon" type="image/x-icon" href="favicon.ico">
</head>
<body>
  <app-root></app-root>
</body>
</html>
它看起来就像你每天看到的那种标记。但是有一个特殊的标签,app-root. Angular 是如何做到这一点的,我们如何知道其中发生了什么?
让我们打开src/app目录,看看里面有什么。你可以先在ng new此处查看输出表单,也可以在你选择的 IDE 中打开它。你会看到我们有app.component.ts下一点(这可能会根据你的 Angular 版本的最新程度而有所不同):
import { Component } from '@angular/core';

@Component({
  selector: 'app-root',
  templateUrl: './app.component.html',
  styleUrls: ['./app.component.css']
})
export class AppComponent {
  title = 'app';
}
@Component(...)这里看起来像一个函数调用……它是什么?这是TypeScript 装饰器,我们稍后会讨论。现在,让我们试着理解它在做什么,传递的参数就像selector用来生成我们的组件声明一样。它只是为我们做了很多样板工作,并以其工作形式返回我们的组件声明。我们不必实现额外的代码来支持任何装饰器的参数。这一切都由装饰者处理。所以,一般来说,我们称之为工厂方法。
我们已经app-root在我们的index.html. 下面是 Angular 如何知道如何找到与我们的标签对应的组件。显然,templateUrl并styleUrls定义 Angular 应该从哪里获取我们的标记和 CSS。组件装饰器还有很多参数,我们将在我们的新应用程序中使用其中的一些,但是如果你想要完整的参考,你可以随时查看这里。
让我们看看该组件的标记:
<!--The content below is only a placeholder and can be replaced.-->
<div style="text-align:center">
  <h1>
    Welcome to {{ title }}!
  </h1>
  <img width="300" alt="Angular Logo" src="data:image/svg+xml;base64,PHN2ZyB4bWxucz0iaHR0cDovL3d3dy53My5vcmcvMjAwMC9zdmciIHZpZXdCb3g9IjAgMCAyNTAgMjUwIj4KICAgIDxwYXRoIGZpbGw9IiNERDAwMzEiIGQ9Ik0xMjUgMzBMMzEuOSA2My4ybDE0LjIgMTIzLjFMMTI1IDIzMGw3OC45LTQzLjcgMTQuMi0xMjMuMXoiIC8+CiAgICA8cGF0aCBmaWxsPSIjQzMwMDJGIiBkPSJNMTI1IDMwdjIyLjItLjFWMjMwbDc4LjktNDMuNyAxNC4yLTEyMy4xTDEyNSAzMHoiIC8+CiAgICA8cGF0aCAgZmlsbD0iI0ZGRkZGRiIgZD0iTTEyNSA1Mi4xTDY2LjggMTgyLjZoMjEuN2wxMS43LTI5LjJoNDkuNGwxMS43IDI5LjJIMTgzTDEyNSA1Mi4xem0xNyA4My4zaC0zNGwxNy00MC45IDE3IDQwLjl6IiAvPgogIDwvc3ZnPg==">
</div>
<h2>Here are some links to help you start: </h2>
<ul>
  <li>
    <h2><a target="_blank" rel="noopener" href="https://angular.io/tutorial">Tour of Heroes</a></h2>
  </li>
  <li>
    <h2><a target="_blank" rel="noopener" href="https://github.com/angular/angular-cli/wiki">CLI Documentation</a></h2>
  </li>
  <li>
    <h2><a target="_blank" rel="noopener" href="https://blog.angular.io/">Angular blog</a></h2>
  </li>
</ul>
因此,除了将 Angular 徽标嵌入为 SVG 之外,这非常简洁,这似乎也是典型的日常标记。除了一件事 ( Welcome to {{ title }}!),如果我们再次查看我们的组件代码,我们会看到title = 'app';. 所以,如果你已经在模板语言方面有过一些练习,或者已经使用过 AngularJS,那么这里发生的事情就很明显了。如果你不知道,这称为 Angular Interpolation,通过它从我们的组件中提取双花括号内的表达式(你可以将其{{ title }}视为 的简化形式{{ this.title }})并显示在我们的标记上。
我们现在已经看到了我们自动生成的 Angular 应用程序的所有部分,这些部分实际上发生在我们浏览器中显示的页面中。让我们回顾一下它的实际工作原理:Angular CLI 运行 Webpack,它将我们的 Angular 应用程序编译成JavaScript 包并将它们注入到我们的index.html. 如果我们使用检查功能查看浏览器中的实际代码,我们会看到如下内容:
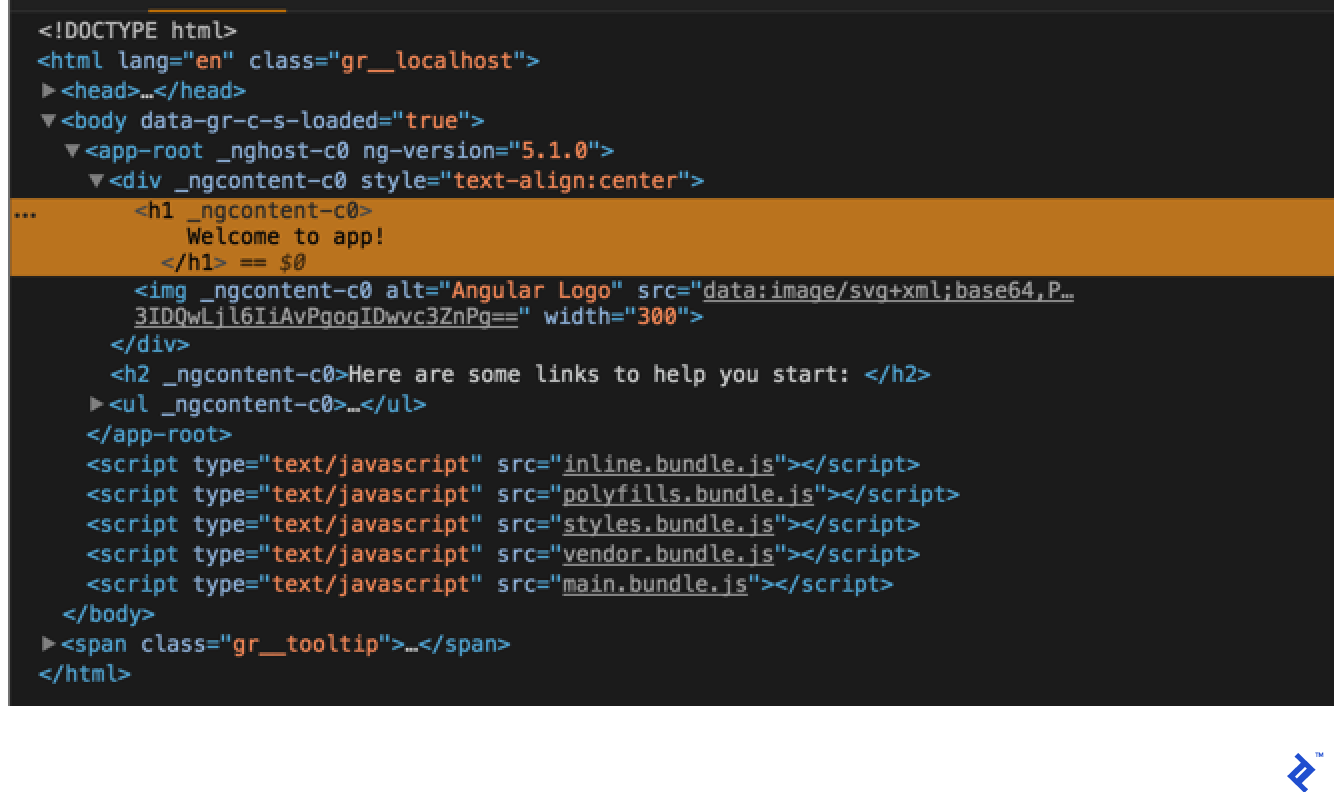
每次我们更改代码时,Angular CLI 都会重新编译、在需要时重新注入,并要求我们的浏览器在页面打开时重新加载页面。Angular 完成得非常快,因此在大多数情况下,当你将窗口从 IDE 切换到浏览器时,它已经为你重新加载。
所以,让我们开始朝着我们的目标前进,首先,让我们将我们的项目从 CSS 切换到 Sass,然后打开我们的.angular-cli.json和 编辑styles和styleExt属性:
"styles": [
  "styles.scss"
],
[...]
"defaults": {
  "styleExt": "scss",
  "component": {}
}
我们还需要将 Sass 库添加到我们的项目中并重命名styles.css为styles.scss. 所以要添加 Sass,我正在使用yarn:
yarn add sass
yarn add v1.3.2
[1/4] 🔍  Resolving packages...
[2/4] 🚚  Fetching packages...
[3/4] 🔗  Linking dependencies...
[...]
[4/4] 📃  Building fresh packages...
success Saved lockfile.
success Saved 1 new dependency.
└─ sass@1.0.0-beta.4
✨  Done in 12.06s.
yarn add node-sass@4.7.2 --dev
✨  Done in 5.78s.
我还想在我们的项目中使用 Twitter Bootstrap,所以我还运行yarn add bootstrap@v4.0.0-beta.2并编辑我们的styles.scss以包含以下内容:
/* You can add global styles to this file, and also import other style files */
@import "../node_modules/bootstrap/scss/bootstrap";

body {
  padding-top: 5rem;
}
我们需要index.html通过将标记的元更改为以下内容来进行编辑以使我们的页面具有响应性:
<meta name="viewport" content="width=device-width, initial-scale=1.0, user-scalable=no">
现在我们可以app.component.html用这个替换:
<!-- Fixed navbar -->
<nav class="navbar navbar-expand-md navbar-dark bg-dark fixed-top">
  <a class="navbar-brand" href="#">Angular Notes</a>
</nav>
<div class="container-fluid text-center pb-5">
  <div style="text-align:center">
    <h1>
      Welcome to {{title}}!
    </h1>
  </div>
</div>
现在,如果我们打开浏览器,我们会看到以下内容:
这就是样板文件。让我们继续创建我们自己的组件。
Angular 5用法教程:我们的第一个组件
我们将在我们的界面中将笔记显示为卡片,所以让我们从生成我们的第一个组件开始,代表卡片本身。为此,让我们通过运行以下命令来使用 Angular CLI:
ng generate component Card
  create src/app/card/card.component.scss (0 bytes)
  create src/app/card/card.component.html (23 bytes)
  create src/app/card/card.component.spec.ts (614 bytes)
  create src/app/card/card.component.ts (262 bytes)
  update src/app/app.module.ts (390 bytes)
如果我们查看src/app/card/card.component.ts,我们可以看到它们几乎与我们在 AppComponent 中的代码相同,只有一个小区别:
[...]
@Component({
  selector: 'app-card',
[...]
export class CardComponent implements OnInit {

  constructor() { }

  ngOnInit() {
  }
}
在这一点上,我想提一下,在我们的组件选择器前面加上一个公共前缀被认为是一种很好的做法,默认情况下,它是app-. 你可以通过编辑 中的prefix属性将其更改为你偏好的前缀.angular-cli.json,因此最好ng generate在第一次使用之前这样做。
所以,我们有一个组件的构造ngOnInit函数和一个函数。如果你好奇我们为什么这样做,你可以在Angular 的文档中阅读它。但在基本层面上,请像这样考虑这些方法:在组件创建后不久,构造函数被调用,远在要传递给它的数据准备好并填充之前,而ngOnInit仅在对组件的第一个循环更改之后运行数据,因此你可以访问组件输入。我们很快就会讨论输入和组件通信,但现在,让我们记住最好将构造函数用于常量,例如实际硬编码到组件ngOnInit中的事物,以及依赖于外部的所有事物数据。
如何使用Angular 5?让我们填充我们的 CardComponent 实现。首先,让我们为它添加一些标记。标记的默认内容是这样的:
<p>
  card works!
</p>
让我们用代码替换它,使其表现得像一张卡片:
<div class="card">
  <div class="card-block">
    <p class="card-text">Text</p>
  </div>
</div>
现在是展示卡片组件的好时机,但这引发了额外的问题:谁将负责展示卡片?应用组件?但是 AppComponent 会先于应用程序中的任何其他内容加载,因此我们必须考虑它的整洁和小巧。我们最好再创建一个组件来处理存储卡片列表并将其显示在我们的页面上。
正如我们描述了我们组件的职责,很明显这应该是一个卡片列表组件。让我们让 Angular CLI 为我们生成它:
ng generate component CardList
  create src/app/card-list/card-list.component.scss (0 bytes)
  create src/app/card-list/card-list.component.html (28 bytes)
  create src/app/card-list/card-list.component.spec.ts (643 bytes)
  create src/app/card-list/card-list.component.ts (281 bytes)
  update src/app/app.module.ts (483 bytes)
在我们开始实现它之前,让我们来看看我们在生成第一个组件后忽略的东西。Angular CLI 告诉我们它已app.module.ts为我们更新。我们从未研究过它,所以让我们更正它:
import { BrowserModule } from '@angular/platform-browser';
import { NgModule } from '@angular/core';


import { AppComponent } from './app.component';
import { CardComponent } from './card/card.component';
import { CardListComponent } from './card-list/card-list.component';


@NgModule({
  declarations: [
    AppComponent,
    CardComponent,
    CardListComponent,
  ],
  imports: [
    BrowserModule
  ],
  providers: [],
  bootstrap: [AppComponent]
})
export class AppModule { }
显然,BrowserModule并且NgModule是内部的 Angular 模块。我们可以在文档中阅读更多关于它们的信息。AppComponent 在我们开始生成任何代码之前就已经存在了,所以我们的新组件实际上在两个地方填充了模块:首先,它们是从它们的定义文件中导入的,然后,它们被包含在我们的 NgModule 装饰器的声明数组中。如果你正在从头开始创建一个新组件并且忘记向 NgModule 添加一个新模块但尝试将其添加到你的标记中,你的应用程序将不会在 JS 控制台中出现下一个错误:
Uncaught Error: Template parse errors:
'app-card-list' is not a known element:
1. If 'app-card-list' is an Angular component, then verify that it is part of this module.
2. If 'app-card-list' is a Web Component then add 'CUSTOM_ELEMENTS_SCHEMA' to the '@NgModule.schemas' of this component to suppress this message. ("
因此,如果你的应用程序无法正常工作,没有明显原因,请不要忘记检查你的控制台。
让我们填充我们的卡片列表组件标记 ( src/app/card-list/card-list.component.html):
<div class="container-fluid text-center pb-5">
  <div class="row">
    <app-card class="col-4"></app-card>
    <app-card class="col-4"></app-card>
    <app-card class="col-4"></app-card>
  </div>
</div>
如果我们在浏览器中打开它,我们会看到如下内容:

目前,我们使用硬编码标记显示我们的卡片。让我们通过将硬编码的卡片数组移动到我们的应用程序中,使我们的代码更接近真实案例场景:
export class AppComponent {
  public cards: Array<any> = [
    {text: 'Card 1'},
    {text: 'Card 2'},
    {text: 'Card 3'},
    {text: 'Card 4'},
    {text: 'Card 5'},
    {text: 'Card 6'},
    {text: 'Card 7'},
    {text: 'Card 8'},
    {text: 'Card 9'},
    {text: 'Card 10'},
  ];
}
我们有我们的初始列表,但仍然需要将它传递给组件并在那里渲染它。为此,我们需要创建我们的第一个输入。让我们将它添加到 CardList 组件中:
import {Component, Input, OnInit} from '@angular/core';
[...]
export class CardListComponent implements OnInit {
  @Input() cards: Array<any>;
[...]
我们Input从 Angular 代码中导入,并将其用作任何类型对象数组类型的类级变量卡的装饰器。理想情况下,我们不应该使用any,而应该使用严格类型,以便我们可以定义类似接口卡的东西,它将包含我们卡的所有属性,但我们稍后会使其工作 - 现在,我们any只使用进行快速而肮脏的实施。
现在,我们的 CardList 中有我们的卡片数组。我们如何显示它而不是我们当前的标记?我们来看看卡片列表组件中的新代码:
<app-card class="col-4" *ngFor="let card of cards"></app-card>
这对我们来说是新事物,一个以星号开头的属性名称。这是什么意思?这是命名 Angular结构指令的默认约定。结构指令控制我们模板的结构。这里的星号实际上是“语法糖”,你可以进一步阅读以了解它是如何工作的。但是对于你当前的示例,了解将其添加到组件时会发生什么就足够了。所以ngFor一个repeater指令,它会为卡片数组中的每个元素重复我们的应用卡片。如果我们查看浏览器,接下来会看到:

有什么不对的;我们有一系列卡片,但我们得到了一个空白页面。
我们在 AppComponent 级别定义了我们的卡片数组,但我们还没有将它传递给 CardList 输入。让我们编辑我们的 AppComponent 模板来做到这一点。
<app-card-list [cards]="cards"></app-card-list>
这种语法——方括号中的属性——告诉 Angular 我们希望将我们的组件变量单向绑定cards到我们的卡片列表组件[cards]输入。一旦我们这样做,我们就会得到这个:

当然,我们想要显示卡片数组的实际内容,为此,我们还需要将卡片对象传递给卡片组件。让我们扩展我们的 Card List 组件:
<app-card class="col-4" *ngFor="let card of cards" [card]="card"></app-card>
如果我们现在查看浏览器,我们将在 JS 控制台中看到下一个错误:Can't bind to 'card' since it isn't a known property of 'app-card'.. Angular 告诉我们,我们仍然需要在 Card 组件中定义我们的输入。所以我们可以这样编辑:
import {Component, Input, OnInit} from '@angular/core';
[...]
export class CardComponent implements OnInit {
  @Input() card:any;
[...]
让我们将卡片文本属性添加到卡片组件模板中:
[...]
<p class="card-text">{{ card.text }}</p>
[...]
现在让我们看看它是如何工作的:
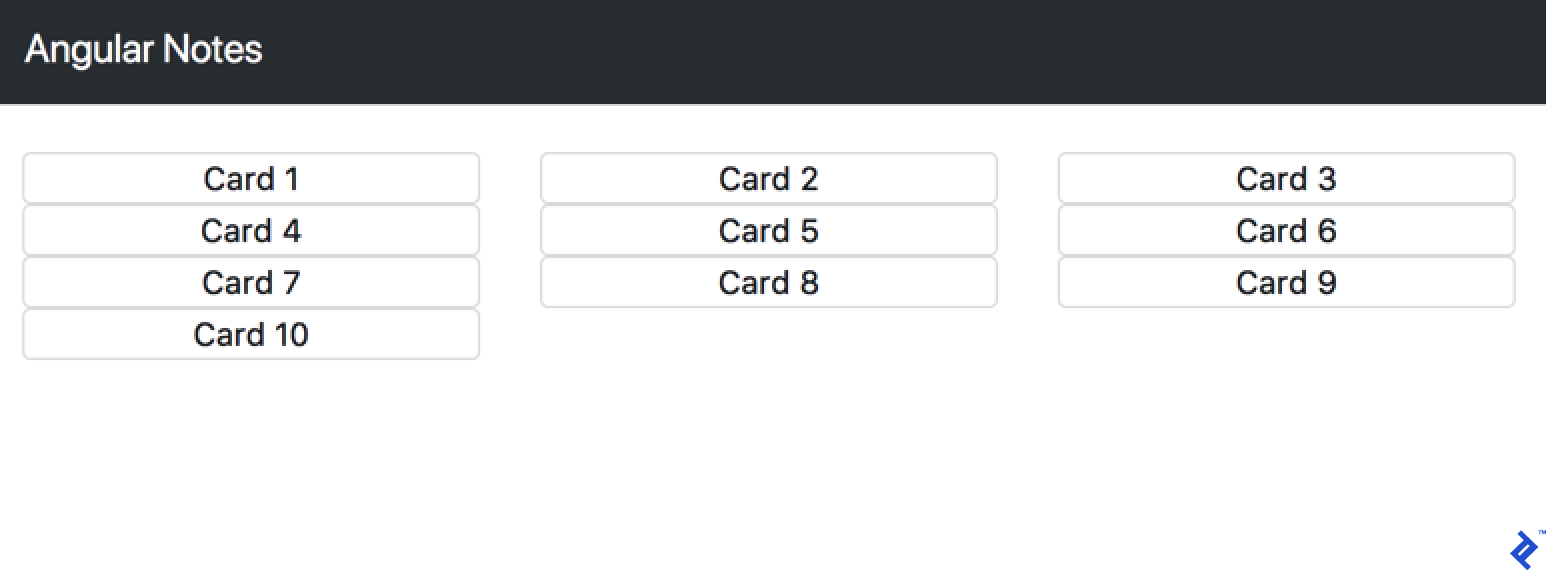
看起来不错,就是风格有点差。让我们通过向 中添加新样式来解决这个问题card.component.css:
.card {
    margin-top: 1.5rem;
}
现在看起来更好了:

组件通讯
让我们添加一个新的卡片输入组件,它允许我们添加注释:
ng g component NewCardInput
  create src/app/new-card-input/new-card-input.component.scss (0 bytes)
  create src/app/new-card-input/new-card-input.component.html (33 bytes)
  create src/app/new-card-input/new-card-input.component.spec.ts (672 bytes)
  create src/app/new-card-input/new-card-input.component.ts (300 bytes)
  update src/app/app.module.ts (593 bytes)
并将其添加到其模板旁边:
<div class="card">
  <div class="card-block">
    <input placeholder="Take a note..." class="form-control">
  </div>
</div>
接下来,将其添加到组件装饰器中:
[...]
@Component({
  selector: 'app-new-card-input',
[...]
  host: {'class': 'col-4'}
})
[...]
并将我们的新组件添加到 AppComponent 模板中:
[...]
<div class="container-fluid text-center pb-5">
  <div class="row justify-content-end">
    <app-new-card-input></app-new-card-input>
  </div>
</div>
<app-card-list [cards]="cards"></app-card-list>
我们来看看浏览器。
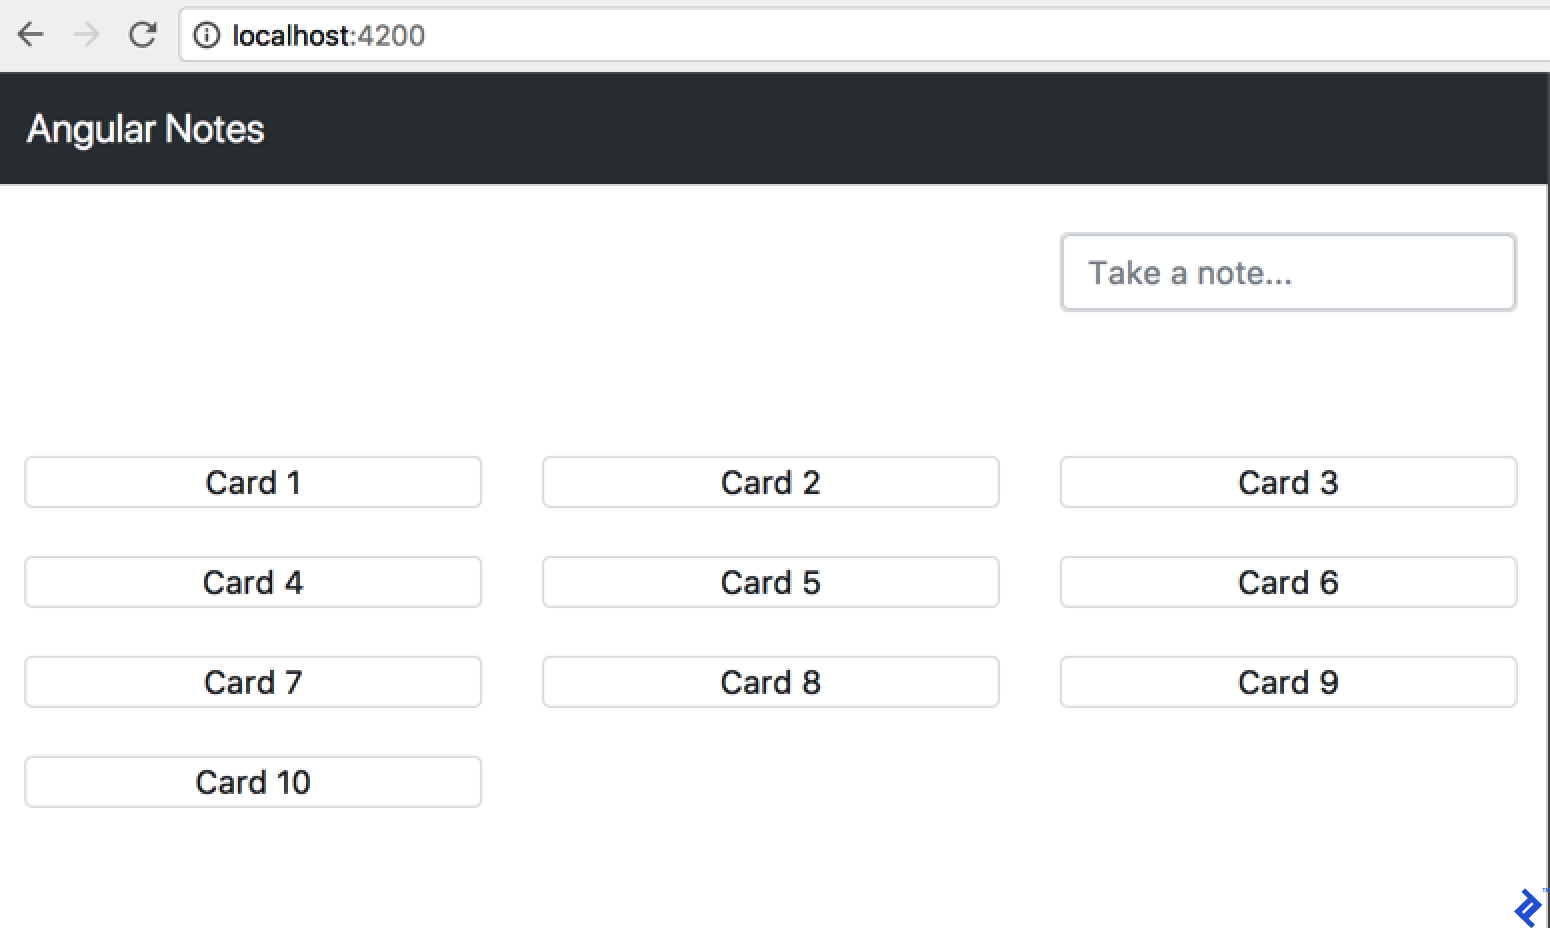
问题是我们的新组件没有做任何事情。让我们让它工作——让我们开始添加一个变量来保存我们的新卡:
[...]
export class NewCardInputComponent implements OnInit {
[...]
public newCard: any = {text: ''};
[...]
我们如何用我们的输入填充它?如果你以前使用过 AngularJS,你可能知道双向数据绑定的概念。或者,你可能已经在所有那些花哨的 AngularJS 演示中看到它,在那里你输入值到 input 并为我们更新页面内容。
这是一个有趣的花絮:Angular 中不再提供双向数据绑定。但这并不意味着我们无法访问该行为。我们已经看到并使用了[value]="expression",它将表达式绑定到输入元素的 value 属性。但是我们也有(input)="expression",一种将表达式绑定到输入元素的输入事件的声明性方式。它们可以一起使用:
<input [value]="newCard.text" (input)="newCard.text = $event.target.value">
所以,每次我们的newCard.text值改变时,它都会被传递给我们的组件输入。每次用户将数据输入到我们的 input 和浏览器输出中时input $event,我们都会将 our 分配newCard.text给 input 值。
在我们实现它之前还有一件事:这个输入看起来有点多,不是吗?实际上,Angular 给了我们一些语法糖,我们可以在这里使用,所以我从不同的角度开始解释这个糖是如何工作的。
<input placeholder="Take a note..." class="form-control" [(ngModel)]="newCard.text">
这种语法,在盒子里([])称为香蕉或ngModel,是 Angular 指令,负责从事件和所有这些中获取价值。因此,我们可以编写更简单的代码,获取我们的值并将其绑定到代码中的输入值和变量。
不幸的是,在我们添加之后ngModel,我们得到了错误,Can't bind to 'ngModel' since it isn't a known property of 'input'.。我们需要导入ngModel到我们的 AppModule。但从哪里来?如果我们查看文档,我们可以看到它在 Angular Forms 模块中。所以我们需要这样编辑 AppModule:
[...]
import {FormsModule} from "@angular/forms";

@NgModule({
[...]
  imports: [
    BrowserModule,
    FormsModule
  ],
[...]
使用本地事件
所以我们已经填充了我们的变量,但我们仍然需要将该值发送到 AppComponent 中的卡片列表。为了向组件 Angular 传递数据,我们必须有输入。似乎为了在组件外传递数据,我们有输出,我们像使用输入一样使用它——我们从 Angular 代码中导入它并使用装饰器来定义它:
import {Component, EventEmitter, OnInit, Output} from '@angular/core';
[...]
export class NewCardInputComponent implements OnInit {
[...]
@Output() onCardAdd = new EventEmitter<string>();
[...]
}
但不仅仅是输出;我们还定义了一个叫做 EventEmitter 的东西,因为组件输出应该是一个事件,但我们不应该像处理那些旧的 JavaScript 事件那样考虑它。它们不是泡沫。你不需要调用preventDefault每个事件侦听器。要从组件发送数据,我们应该使用其有效负载。所以我们需要订阅事件——我们该怎么做?让我们更改 AppComponent 模板:
<app-new-card-input (onCardAdd)="addCard($event)"></app-new-card-input>
onCardAdd正如我们在NewCardInput组件中提到的那样,我们还将一个表达式绑定到 event 。现在我们需要addCard在我们的AppComponent.
[...]
export class AppComponent {
[...]
addCard(cardText: string) {
  this.cards.push({text: cardText});
}
但是我们仍然没有从任何地方输出它。让我们试着让它在用户点击enter键时发生。我们需要在组件中监听 DOM 按键事件并输出由此触发的 Angular 事件。为了监听 DOM 事件,Angular 为我们提供了HostListener装饰器。它是一个函数装饰器,它采用我们想要监听的本地事件的名称以及 Angular 想要调用的函数来响应它。让我们实现它并讨论它是如何工作的:
import {Component, EventEmitter, OnInit, Output, HostListener} from '@angular/core';
[...]
export class NewCardInputComponent implements OnInit {
[...]
@HostListener('document:keypress', ['$event'])
handleKeyboardEvent(event: KeyboardEvent) {
  if (event.code === "Enter" && this.newCard.text.length > 0) {
    this.addCard(this.newCard.text);
   }
}
[...]
addCard(text) {
  this.onCardAdd.emit(text);
  this.newCard.text = '';
}
[...]
所以,如果document:keypress事件发生,我们检查按下的键是 Enter 并且我们newCard.text有东西在里面。之后,我们可以调用我们的addCard方法,在该方法中,我们onCardAdd从卡片中输出带有文本的Angular ,并将卡片文本重置为空字符串,以便用户可以继续添加新卡片而无需编辑旧卡片的文本。
Angular 5项目示例指南:使用表单
在 Angular 中有两种处理表单的方法——一种是模板驱动的,我们已经在使用其中最有价值的部分:ngModel双向绑定。但是 Angular 中的表单不仅与模型值有关,还与有效性有关。目前,我们在 HostListener 函数中检查 NewCardInput 的有效性。让我们把它移到一个更加模板驱动的表单上。为此,我们可以更改组件的模板:
<form novalidate #form="ngForm">
  <input placeholder="Take a note..." class="form-control" name="text" [(ngModel)]="newCard.text" required>
</form>
这是来自 Angular 的另一种语法糖。散列#form是一个模板引用变量,我们可以使用它从我们的代码中访问我们的表单。让我们用它来确保我们实际使用了必需的属性验证,而不是手动检查值长度:
import {Component, EventEmitter, OnInit, Output, HostListener, ViewChild} from '@angular/core';
import {NgForm} from '@angular/forms';
[...]
export class NewCardInputComponent implements OnInit {
[...]
@ViewChild('form') public form: NgForm;
[...]
  @HostListener('document:keypress', ['$event'])
  handleKeyboardEvent(event: KeyboardEvent) {
    if (event.code === "Enter" && this.form.valid) {
[...]
另一个新的装饰器在这里:ViewChild。使用它,我们可以访问任何由模板引用值标记的元素——在这种情况下,我们的表单,我们实际上将它声明为我们的组件公共变量表单,因此我们可以编写this.form.valid.
使用模板驱动的表单与我们之前使用简单的 HTML 表单完全相同。如果我们需要更复杂的东西,那么在 Angular 中有一种不同的形式:反应式。我们将介绍转换我们的表单后他们的反应。为此,让我们添加一个新的导入到我们的AppModule:
[...]
import {FormsModule, ReactiveFormsModule} from "@angular/forms";
[...]
imports: [
[...]
ReactiveFormsModule,
]
[...]
响应式表单是在代码中定义的,而不是模板驱动的表单,所以让我们更改NewCardInput组件代码:
[...]
import {FormBuilder, FormGroup, Validators} from '@angular/forms';
[...]
export class NewCardInputComponent implements OnInit {
[...]
newCardForm: FormGroup;

constructor(fb: FormBuilder) {
  this.newCardForm = fb.group({
    'text': ['', Validators.compose([Validators.required, Validators.minLength(2)])],
  });
}
[...]
if (event.code === "Enter" && this.form.valid) {
   this.addCard(this.newCardForm.controls['text'].value);
[...]
addCard(text) {
  this.onCardAdd.emit(text);
  this.newCardForm.controls['text'].setValue('');
}
除了导入新模块之外,这里还发生了一些新事情。首先,我们在构造函数上对 FormBuilder使用依赖注入并用它构建我们的表单。文本中有我们字段的名称,一个空字符串是初始值,Validators.compose显然允许我们在单个字段上组合多个验证器。我们使用.value和.setValue('')访问我们领域的价值。
让我们看看我们为这种处理表单的新方式所做的标记:
<form [formGroup]="newCardForm" novalidate>
  <input placeholder="Take a note..." class="form-control" name="text" formControlName="text">
</form>
我们使用FormGroupDirective来告诉 Angular Angular 需要在哪个表单组中查找其定义。通过使用 formControlName,我们告诉 Angular 我们应该使用响应式表单中的哪个字段。
目前,以前使用模板驱动形式的方法与使用反应式形式的新方法之间的主要区别在于反应式方面的更多编码。如果我们不需要动态定义表单,真的值得吗?
绝对是。为了理解它如何有帮助,让我们首先讨论为什么这种方法被称为“反应式”。
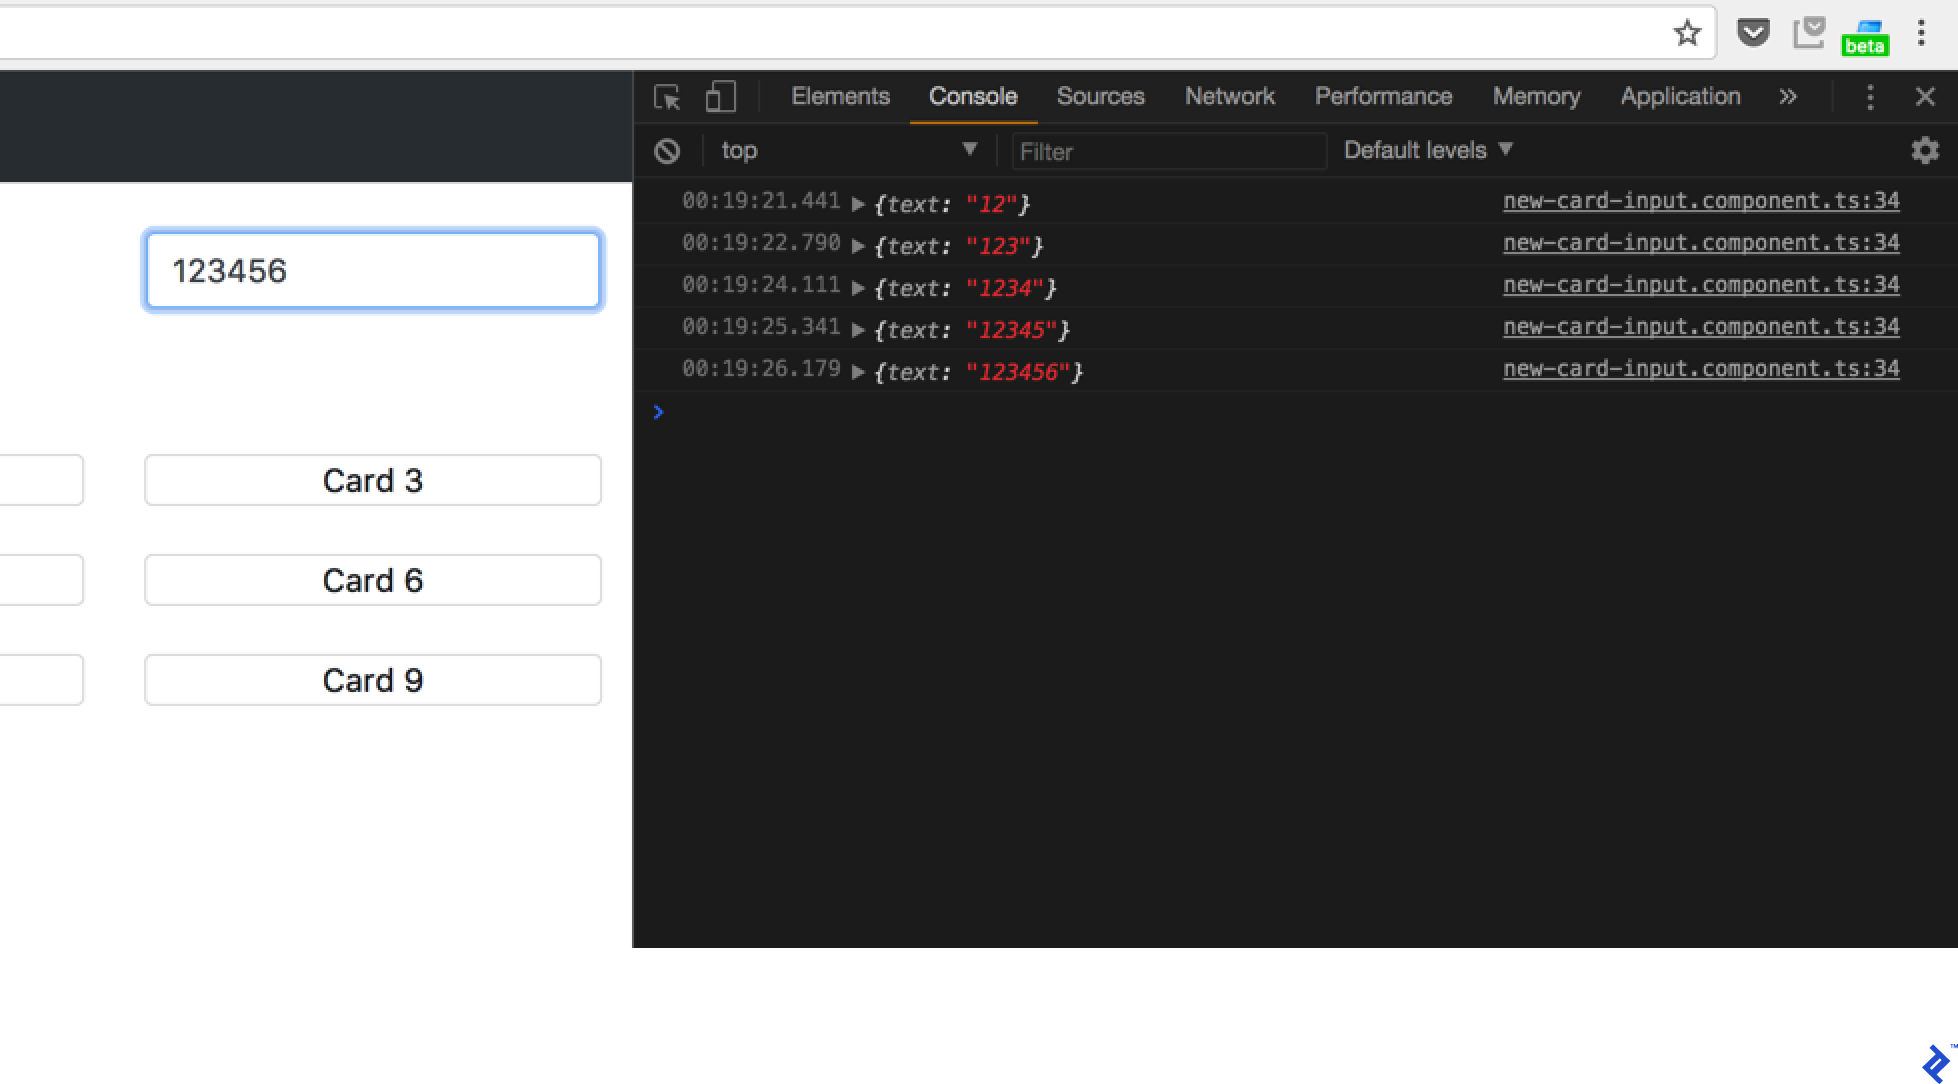
让我们首先向我们的 New Card Input 组件构造函数添加额外的代码:
import { takeWhile, debounceTime, filter } from 'rxjs/operators';
[...]
this.newCardForm.valueChanges.pipe(
    filter((value) => this.newCardForm.valid),
  debounceTime(500),
  takeWhile(() => this.alive)
).subscribe(data => {
   console.log(data);
});
打开浏览器和开发者工具控制台,看看当我们在输入中输入新值时会发生什么:
RxJS
那么这里究竟发生了什么?我们看到RxJS正在运行。让我们讨论一下。我想你们都至少对promise和构建异步代码有所了解。Promise 处理单个事件。POST例如,我们要求浏览器 make ,它返回给我们一个承诺。RxJS 使用 Observables 操作,它处理事件流。像这样思考:我们刚刚实现了在表单的每次更改时调用的代码。如果我们使用 promise 处理用户更改,则在我们需要重新订阅之前,只会处理第一个用户更改。与此同时,Observable 能够处理几乎无穷无尽的“承诺”流中的每一个事件。我们可以通过在此过程中遇到一些错误或取消订阅 Observable 来打破它。
什么是takeWhile在这里吗?我们在组件中订阅了 Observable。它们用于我们应用程序的不同部分,因此它们可能会在此过程中被销毁——例如,当我们在路由中使用组件作为页面时(我们将在本指南后面讨论路由)。但是,虽然代替 Observable 的承诺只会运行一次并在此之后被处理,但只要流正在更新并且我们不会取消订阅,Observable 就会持续存在。所以我们的订阅需要像这样取消订阅(如果我们不是在寻找内存泄漏):
const subscription = observable.subscribe(value => console.log(value));
[...]
subscription.unsubscribe();
但是在我们的应用程序中,我们有很多不同的订阅。我们需要做所有的样板代码吗?实际上,我们可以欺骗并使用takeWhile运算符。通过使用它,我们确保我们的流在this.alive变为 false 时将停止发出新值,我们只需要在onDestroy组件的函数中设置该值。
Angular 5用法教程:使用后端
由于我们不是在这里构建服务器端,我们将使用 Firebase 作为我们的 API。如果你确实有自己的 API 后端,让我们在 development server 中配置我们的后端。为此,请proxy.conf.json在项目的根目录中创建并在其中添加以下内容:
{
  "/api": {
    "target": "http://localhost:3000",
    "secure": false
  }
}
对于从我们的应用程序到其主机(如果你还记得,它是 Webpack 开发服务器)的每个请求,/api路由服务器应该将请求代理到http://localhost:3000/api. 为此,我们需要在应用程序配置中再添加一件事;在package.json,我们需要替换start我们项目的命令:
[...]
"scripts": {
[...]
  "start": "ng serve --proxy-config proxy.conf.json",
现在,我们可以使用yarn start或运行我们的项目npm start并获得代理配置。我们如何使用 Angular 的 API?Angular 为我们提供了HttpClient。让我们为当前的应用程序定义 CardService:
import { Injectable } from '@angular/core';
import {HttpClient} from '@angular/common/http';

@Injectable()
export class CardService {

  constructor(private http: HttpClient) { }

  get() {
    return this.http.get(`/api/v1/cards.json`);
  }

  add(payload) {
    return this.http.post(`/api/v1/cards.json`, {text: trim(payload)});
  }

  remove(payload) {
    return this.http.delete(`/api/v1/cards/${payload.id}.json`);
  }

  update(payload) {
    return this.http.patch(`/api/v1/cards/${payload.id}.json`, payload);
  }
}
那么Injectable这里是什么 意思呢?我们已经确定依赖注入帮助我们将我们使用的服务注入到我们的组件中。为了访问我们的新服务,我们需要将它添加到我们的提供者列表中AppModule:
[...]
import { CardService } from './services/card.service';
[...]
@NgModule({
[...]
 providers: [CardService],
现在我们可以将它注入到我们的 AppComponent 中,例如:
import { CardService } from './services/card.service';
[...]
  constructor(private cardService: CardService) {
    cardService.get().subscribe((cards: any) => this.cards = cards);
  }

如何使用Angular 5?现在让我们配置Firebase,在 Firebase 中创建一个演示项目并点击Add Firebase to your app按钮。然后,我们将 Firebase 向我们显示的凭据复制到我们应用的环境文件中,如下所示:src/environments/
export const environment = {
[...]
  firebase: {
    apiKey: "[...]",
    authDomain: "[...]",
    databaseURL: "[...]",
    projectId: "[...]",
    storageBucket: "[...]",
    messagingSenderId: "[...]"
  }
};
我们需要将它添加到environment.ts和environment.prod.ts。并且只是为了让你对这里的环境文件有一些了解,它们实际上包含在编译阶段的项目中,并且.prod.由--environment开关定义的部分ng serveor ng build。你可以在项目的所有部分使用该文件中的值,并environment.ts在 Angular CLI 负责提供来自相应environment.your-environment.ts.
让我们添加我们的 Firebase 支持库:
yarn add firebase@4.8.0 angularfire2
yarn add v1.3.2
[1/4] 🔍  Resolving packages...
[2/4] 🚚  Fetching packages...
[3/4] 🔗  Linking dependencies...
[...]
success Saved lockfile.
success Saved 28 new dependencies.
[...]
✨  Done in 40.79s.
现在让我们更改 CardService 以支持 Firebase:
import { Injectable } from '@angular/core';
import { AngularFireDatabase, AngularFireList, AngularFireObject } from 'angularfire2/database';
import { Observable } from 'rxjs/Observable';

import { Card } from '../models/card';

@Injectable()
export class CardService {

  private basePath = '/items';

  cardsRef: AngularFireList<Card>;
  cardRef:  AngularFireObject<Card>;

  constructor(private db: AngularFireDatabase) {
    this.cardsRef = db.list('/cards');
  }

  getCardsList(): Observable<Card[]> {
    return this.cardsRef.snapshotChanges().map((arr) => {
      return arr.map((snap) => Object.assign(snap.payload.val(), { $key: snap.key }) );
    });
  }

  getCard(key: string): Observable<Card | null> {
    const cardPath = `${this.basePath}/${key}`;
    const card = this.db.object(cardPath).valueChanges() as Observable<Card | null>;
    return card;
  }

  createCard(card: Card): void {
    this.cardsRef.push(card);
  }

  updateCard(key: string, value: any): void {
    this.cardsRef.update(key, value);
  }

  deleteCard(key: string): void {
    this.cardsRef.remove(key);
  }

  deleteAll(): void {
    this.cardsRef.remove();
  }

  // Default error handling for all actions
  private handleError(error: Error) {
    console.error(error);
  }
}
我们在这里看到了一些有趣的东西,在导入的卡的第一个模型上。我们来看看它的组成:
export class Card {
    $key: string;
    text: string;

    constructor(text: string) {
        this.text = text;
    }
}
所以我们用类来构建我们的数据,除了我们的文本,我们key$从 Firebase添加。让我们更改 AppComponent 以使用该服务:
[...]
import { AngularFireDatabase } from 'angularfire2/database';
import {Observable} from 'rxjs/Observable';
import { Card } from './models/card';
[...]
export class AppComponent {
public cards$: Observable<Card[]>;

addCard(cardText: string) {
  this.cardService.createCard(new Card(cardText));
}

constructor(private cardService: CardService) {
  this.cards$ = this.cardService.getCardsList();
}
什么是cards$?我们通过添加$到它们来标记我们的可观察变量,以确保我们按照应有的方式对待它们。让我们将我们的添加cards$到 AppComponent 模板中:
[...]
<app-card-list [cards]="cards$"></app-card-list>
作为回报,我们在控制台中收到此错误:
CardListComponent.html:3 ERROR Error: Cannot find a differ supporting object '[object Object]' of type 'object'. NgFor only supports binding to Iterables such as Arrays.
为什么这样?我们正在从 Firebase 获得可观察值。但是我们*ngFor在 CardList 组件中等待的是对象数组,不能观察到这样的数组。所以我们可以订阅那个 observable 并将它分配给一个静态的卡片数组,但有一个更好的选择:
<app-card-list [cards]="cards$ | async"></app-card-list>
异步管道实际上是 Angular 提供给我们的另一种语法糖,它做我们讨论过的同样的事情——订阅 Observable 并返回它的当前值作为我们表达式评估的结果。
Reactive Angular – Ngrx
让我们谈谈我们的应用程序状态,我的意思是我们的应用程序的所有属性,这些属性从字面上定义了其当前行为和状态。State是一个单一的、不可变的数据结构——至少是 Ngrx 为我们实现它的方式。而 Ngrx 是“受 Redux 启发,用于 Angular 应用程序的 RxJS 驱动的状态管理库”。
Ngrx的灵感来自Redux。“Redux 是一种管理应用程序状态的模式。” 所以它更像是一组约定(对于那些听说过 Ruby on Rails 中的约定优于配置的人,稍后你会看到一些相似之处),它允许我们回答我们的应用程序应该如何决定它需要显示的问题一些界面元素(如可折叠的侧边栏)或它从服务器接收到会话状态后应该存储它的位置。
让我们看看这是如何实现的。我们谈到了State它的不可变性,这意味着我们不能在创建它之后更改它的任何属性。这使得将我们的应用程序状态存储在我们的State. 但并不完全——每个状态都是不可变的,但是Store我们访问 的方式State实际上是状态的一个 Observable。State值流中的单个值也是如此Store。为了改变应用程序的状态,我们需要制作一些Actions 来获取我们当前的状态State并将其替换为新的状态。两者都是不可变的,但第二个基于第一个,因此我们不是在我们的 上改变值State,而是创建一个新State对象。为此,我们使用Reducers的纯函数,这意味着对于任何给定的StateandAction及其payload减速器,它将返回与具有相同参数的该减速器函数的任何其他调用相同的状态。
Actions 由动作类型和可选的有效载荷组成:
export interface Action {
  type: string;
  payload?: any;
}
对于我们的任务,让我们看看添加新卡片的操作是怎样的:
store.dispatch({
  type: 'ADD',
  payload: 'Test Card'
});
让我们看看一个减速器:
export const cardsReducer = (state = [], action) => {
  switch(action.type) {
    case 'ADD':
      return {...state, cards: [...cards, new Card(action.payload)]};
    default:
      return state;
  }
}
每个新Action事件都会调用此函数。稍后我们将介绍Action调度。现在,让我们假设如果我们调度我们的ADD_CARD动作,它就会进入那个 case 语句。那里发生了什么?我们通过使用 TypeScript扩展语法返回State基于我们之前State的新的,所以在大多数情况下我们不必使用类似的东西。我们永远不应该在这些 case 语句之外改变我们的状态,否则当我们浪费时间寻找我们的代码行为不可预测的原因时,它会让生活变得悲惨。Object.assign
让我们将 Ngrx 添加到我们的应用程序中。为此,让我们在控制台中运行下一步:
yarn add @ngrx/core @ngrx/store ngrx-store-logger
yarn add v1.3.2
[1/4] 🔍  Resolving packages...
[2/4] 🚚  Fetching packages...
[3/4] 🔗  Linking dependencies...
[...]
[4/4] 📃  Building fresh packages...
success Saved lockfile.
success Saved 2 new dependencies.
├─ @ngrx/core@1.2.0
└─ @ngrx/store@4.1.1
└─ ngrx-store-logger@0.2.0
✨  Done in 25.47s.
现在,添加我们的Action定义 ( app/actions/cards.ts):
import { Action } from '@ngrx/store';

export const ADD = '[Cards] Add';

export const REMOVE = '[Cards] Remove';

export class Add implements Action {
    readonly type = ADD;

    constructor(public payload: any) {}
}

export class Remove implements Action {
    readonly type = REMOVE;

    constructor(public payload: any) {}
}

export type Actions
  = Add
| Remove;
而我们的Reducer定义 ( app/reducers/cards.ts):
import * as cards from '../actions/cards';
import { Card } from '../models/card';

export interface State {
    cards: Array<Card>;
}

const initialState: State = {
    cards: []
}

export function reducer(state = initialState, action: cards.Actions): State {
    switch (action.type) {
      case cards.ADD:
        return {
            ...state,
            cards: [...state.cards, action.payload]
        };
      case cards.REMOVE:
        const index = state.cards.map((card) => card.$key).indexOf(action.payload);
        return {
            ...state,
            cards: [...state.cards.slice(0, index), ...state.cards.slice(index+1)]
        };
      default:
        return state;
    }
}
在这里,我们可以看到如何使用扩展和原生 TypeScript 函数,例如map将元素从我们的列表中删除。
让我们更进一步,确保如果我们的应用程序状态将包含不止一种类型的数据,我们将从每种类型的单独隔离状态组合它。为此,让我们使用 ( )来使用模块解析app/reducers/index.ts:
import * as fromCards from './cards';
import {ActionReducer, ActionReducerMap, createFeatureSelector, createSelector, MetaReducer} from '@ngrx/store';
import {storeLogger} from 'ngrx-store-logger';
import {environment} from '../../environments/environment';

export interface State {
    cards: fromCards.State;
}

export const reducers: ActionReducerMap<State> = {
    cards: fromCards.reducer
}

export function logger(reducer: ActionReducer<State>): any {
    // default, no options
    return storeLogger()(reducer);
}

export const metaReducers: MetaReducer<State>[] = !environment.production
  ? [logger]
  : [];

/**
 * Cards Reducers
 */
export const getCardsState = createFeatureSelector<fromCards.State>('cards');
export const getCards = createSelector(
    getCardsState,
    state => state.cards
);
我们还在开发环境中为 Ngrx 包含了一个记录器,并为我们的卡片阵列创建了一个选择器函数。让我们将它包含在我们的AppComponent:
import { Component } from '@angular/core';
import { CardService } from './services/card.service';
import { Observable } from 'rxjs/Observable';
import { Card } from './models/card';
import * as fromRoot from './reducers';
import * as cards from './actions/cards';
import { Store } from '@ngrx/store';

@Component({
  selector: 'app-root',
  templateUrl: './app.component.html',
  styleUrls: ['./app.component.css']
})
export class AppComponent {
  public cards$: Observable<Card[]>;

  addCard(card: Card) {
    this.store.dispatch(new cards.AddCard(card));
  }

  constructor(private store: Store<fromRoot.State>) {
    this.cards$ = this.store.select(fromRoot.getCards);
  }
}
现在,我们看看如何使用我们的 store 调度我们的动作。但是这段代码仍然不可用,因为我们没有在我们的应用程序中包含我们的减速器(减速器和元减速器)。让我们通过改变我们的AppModule:
[...]
import { StoreModule } from '@ngrx/store';
import {reducers, metaReducers} from './reducers/index';
[...]
imports: [
[...]
  StoreModule.forRoot(reducers, { metaReducers }),
[...]
现在它正在工作。的种类。请记住,我们碰巧将 Firebase 集成到我们的应用程序中。现在由于高度可维护的 Ngrx 存储而丢失了。也就是说,它没有存储在任何地方。我们可以使用诸如ngrx-store-localstorage 之类的东西来将我们的数据存储在浏览器的 localStore 中,但是如何使用 API 呢?也许我们可以将我们之前的 API 集成添加到我们的 Reducer 中?但是我们不能,因为我们的 Reducer 函数应该是一个纯函数。因此,“对结果的评估不会导致任何语义上可观察的副作用或输出,例如可变对象的变异或输出到 I/O 设备”……我们可以用它做什么?答案在该定义中实际上是正确的。Ngrx 的副作用来救援。
Angular 5项目示例指南:Ngrx 效果
那么什么是副作用呢?它的一段代码Actions或多或少以与我们的减速器相同的方式捕获我们的代码,但它们实际上发送 API 请求,并根据结果调度 new ,而不是更改我们的状态中的某些内容Actions。与往常一样,向你展示比告诉你更简单。让我们让我们的新配置支持 Firebase。为此,让我们安装effects模块:
yarn add @ngrx/effects
[...]
success Saved 1 new dependency.
└─ @ngrx/effects@4.1.1
✨  Done in 11.28s.
现在,我们将向 Card Actions 添加新动作以加载支持 ( src/app/actions/cards.ts):
[...]
export const LOAD = '[Cards] Load';

export const LOAD_SUCCESS = '[Cards] Load Success';

export const SERVER_FAILURE = '[Cards] Server failure';
[...]
export class Load implements Action {
    readonly type = LOAD;
}

export class LoadSuccess implements Action {
    readonly type = LOAD_SUCCESS;

    constructor(public payload: any) {}
}

export class ServerFailure implements Action {
    readonly type = SERVER_FAILURE;

    constructor(public payload: any) {}
}
[...]
export type Actions
[...]
    | Load
  | LoadSuccess
  | ServerFailure
所以我们有三个新动作,一个用于加载卡片列表,两个用于处理成功和不成功的响应。让我们实现我们的效果 ( src/app/effects/cards.ts):
import {Injectable} from '@angular/core';
import {Actions, Effect} from '@ngrx/effects';
import {CardService} from '../services/card.service';
import { of } from 'rxjs/observable/of';

import * as Cards from '../actions/cards';

import {exhaustMap, map, mergeMap, catchError} from 'rxjs/operators';

@Injectable()
export class CardsEffects {
    @Effect()
    loadCards$ = this.actions$
        .ofType(Cards.LOAD).pipe(
            mergeMap(action => {
                return this.cardService.getCardsList().pipe(
                map(res => new Cards.LoadSuccess(res)),
                catchError(error => of(new Cards.ServerFailure(error))))}
            )
        );

    @Effect({dispatch: false})
    serverFailure$ = this.actions$
        .ofType(Cards.SERVER_FAILURE).pipe(
        map((action: Cards.ServerFailure) => action.payload),
        exhaustMap(errors => {
            console.log('Server error happened:', errors);
            return of(null);
        }));

    constructor(
        private actions$: Actions,
        private cardService: CardService) {}
}
所以我们有可注入的 CardsEffects,它使用@Effect装饰器在我们的顶部定义效果,Actions并使用ofType 操作符仅过滤必要的动作。你可以使用 ofType 来创建将在多种操作类型上触发的效果。但是现在,我们只需要三个动作中的两个。对于Load动作,我们正在将每个动作转换为基于 getCardList 方法调用结果的新 observable。在成功的情况下,observable 将被映射到一个LoadSuccess带有我们请求结果有效载荷的新动作,在错误的情况下,我们将返回一个ServerFailure动作(注意of那里的操作符——它转换单个值或数组可观察值的值)。
因此,我们的 Effects 在制作依赖于外部系统(准确地说是我们的 Firebase)的东西之后会调度新的 Action。但是在相同的代码中,我们看到了另一种效果,它ServerFailure使用装饰器参数处理动作dispatch: false。这是什么意思?正如我们从它的实现中看到的那样,它还将我们的ServerFailure操作映射到其有效负载,然后将此有效负载(我们的服务器错误)显示到console.log. 显然,在这种情况下,我们不应该更改状态内容,因此我们不必发送任何内容。这就是我们如何让它在不需要任何空操作的情况下工作。
所以,既然我们已经涵盖了三个操作中的两个,让我们继续LoadSuccess。据我们目前所知,我们正在从服务器下载一张卡片列表,我们需要将它们合并到我们的State. 所以我们需要将它添加到我们的 reducer ( src/app/reducers/cards.ts) 中:
[...]
switch (action.type) {
[...]
case cards.LOAD_SUCCESS:
        return {
            ...state,
            cards: [...state.cards, ...action.payload]
        }
[...]
与之前的故事一样,我们使用扩展运算符在其中打开我们的对象和卡片数组,并将其与扩展负载(在我们的示例中来自服务器的卡片)连接起来。让我们将新的 Load 操作添加到 AppComponent 中:
[...]
export class AppComponent implements OnInit {
  public cards$: Observable<Card[]>;

  addCard(card: Card) {
    this.store.dispatch(new cards.AddCard(card));
  }

  constructor(private store: Store<fromRoot.State>) {
  }

  ngOnInit() {
    this.store.dispatch(new cards.Load());
    this.cards$ = this.store.select(fromRoot.getCards);
  }
}
这应该从 Firebase 加载我们的卡片。我们来看看浏览器:

有些东西不起作用。从我们的日志中可以看出,我们显然正在调度 Action,但这里没有服务器请求。怎么了?我们忘记将我们的效果加载到我们的 AppModule。让我们这样做:
[...]
import { EffectsModule } from '@ngrx/effects';
import { CardsEffects } from './effects/cards.effects';
[...]
imports: [
[...]
    EffectsModule.forRoot([CardsEffects]),
现在,回到浏览器……

现在它正在工作。这就是将效果集成到从服务器加载数据的方式。但是我们仍然需要在创建卡片时将其发送回那里。让我们也让它发挥作用。为此,让我们更改CardServicecreateCard 方法:
  createCard(card: Card): Card {
    const result = this.cardsRef.push(card);
    card.$key = result.key;
    return card;
  }
并为添加卡添加效果:
    @Effect()
    addCards$ = this.actions$
        .ofType(Cards.ADD).pipe(
            map((action: Cards.Add) => action.payload),
            exhaustMap(payload => {
              const card = this.cardService.createCard(payload);
                if (card.$key) {
                    return of(new Cards.LoadSuccess([card]));
                }
            })
        );
因此,如果要创建卡片,它将$key从 Firebase获取,然后我们会将其合并到我们的卡片数组中。我们还需要case cards.ADD:从我们的减速器中删除分支。让我们在行动中尝试一下:
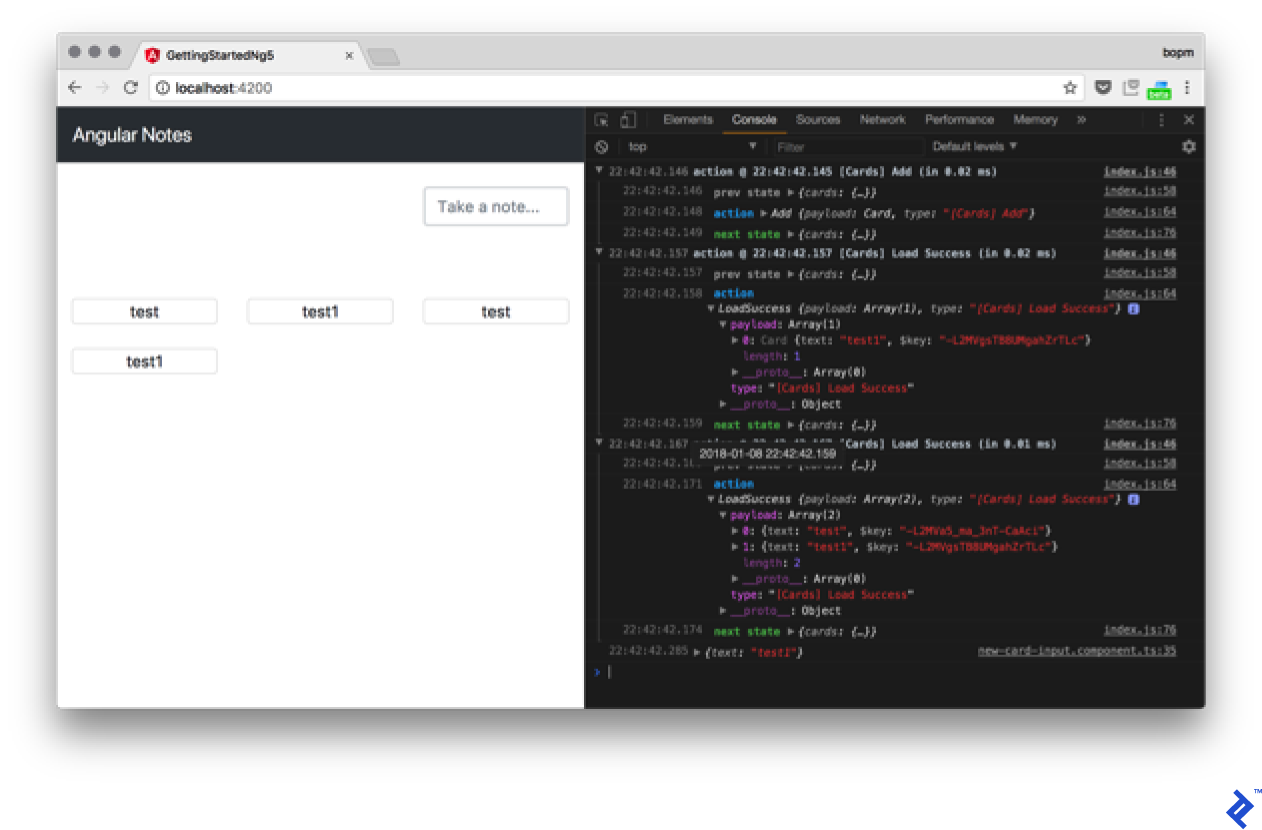
如何使用Angular 5?出于某种原因,我们在卡片添加操作中获得了重复的数据。让我们试着找出原因。如果我们仔细观察控制台,我们会看到两个LoadSuccess动作首先用我们的新卡发送,第二个是用我们的两张卡发送的。如果不是在效果中,它在我们的动作中被派往何处?
我们对卡片的加载效果具有以下代码:
return this.cardService.getCardsList().pipe(
  map(res => new Cards.LoadSuccess(res)),
我们的 getCardsList 是可观察的。所以当我们向我们的卡片集合中添加一张新卡片时,它是输出。因此,要么我们不需要自己添加该卡,要么我们需要take(1)在该管道中使用运算符。它将需要一个值并取消订阅。但是有实时订阅似乎更合理(想必,我们系统中会有不止一个用户),所以让我们更改我们的代码来处理订阅。
让我们为我们的效果添加一个非调度元素:
@Effect({dispatch: false})
addCards$ = this.actions$
  .ofType(Cards.ADD).pipe(
    map((action: Cards.Add) => action.payload),
    exhaustMap(payload => {
      this.cardService.createCard(payload);
      return of(null);
    })
  );
现在我们只需要改变reducerLoadSuccess来替换卡片,而不是将它们组合起来:
case cards.LOAD_SUCCESS:
  return {
    ...state,
    cards: action.payload
  };
现在它可以正常工作:

你remove action现在可以以相同的方式实施。当我们从该订阅中获取数据时,你只需实现Remove效果。但我会把它留给你。
Angular 5用法教程:路由和模块
让我们谈谈我们的应用程序组合。如果我们About的应用程序需要一个页面怎么办?我们如何将它添加到我们当前的代码库中?显然,页面应该是一个组件(就像 Angular 中的其他任何东西一样,主要是)。让我们生成那个组件。
ng g component about --inline-template --inline-style
[...]
  create src/app/about/about.component.ts (266 bytes)
  update src/app/app.module.ts (1503 bytes)
并向其添加下一个标记:
[...]
@Component({
  selector: 'app-about',
  template: `
<div class="jumbotron">
  <h1 class="display-3">Cards App</h1>
</div>
  `,
[...]
所以现在,我们有了关于页面。我们如何访问它?让我们添加一些更多的代码到我们的AppModule:
[...]
import { AboutComponent } from './about/about.component';
import { MainComponent } from './main/main.component';
import {Routes, RouterModule, Router} from "@angular/router";


const routes: Routes = [
  {path: '', redirectTo: 'cards', pathMatch: 'full'},
  {path: 'cards', component: MainComponent},
  {path: 'about', component: AboutComponent},
]

@NgModule({
  declarations: [
[...]
    AboutComponent,
    MainComponent,
  ],
  imports: [
[...]
    RouterModule.forRoot(routes, {useHash: true})
什么是MainComponent在这里吗?现在,只需像我们一样生成它AboutComponent,我们稍后会填充它。至于路线结构,它或多或少不言自明。我们定义了两条路线:/cards和/about。我们确保空路径重定向到/cards.
现在让我们将卡片处理代码移至MainComponent:
import { Component, OnInit } from '@angular/core';
import { Observable } from 'rxjs/Observable';
import { Card } from '../models/card';
import * as fromRoot from '../reducers';
import * as cards from '../actions/cards';
import { Store } from '@ngrx/store';


@Component({
  selector: 'app-main',
  template: `
<div class="container-fluid text-center pb-5">
  <div class="row justify-content-end">
    <app-new-card-input (onCardAdd)="addCard($event)"></app-new-card-input>
  </div>
</div>
<app-card-list [cards]="cards$ | async"></app-card-list>
  `,
  styles: []
})
export class MainComponent implements OnInit {
  public cards$: Observable<Card[]>;

  addCard(card: Card) {
    this.store.dispatch(new cards.Add(card));
  }

  constructor(private store: Store<fromRoot.State>) {
  }

  ngOnInit() {
    this.store.dispatch(new cards.Load());
    this.cards$ = this.store.select(fromRoot.getCards);
  }
}
让我们把它从AppComponent:
import { Component, OnInit } from '@angular/core';

@Component({
  selector: 'app-root',
  templateUrl: './app.component.html',
  styleUrls: ['./app.component.css']
})
export class AppComponent implements OnInit {
  constructor() {
  }

  ngOnInit() {
  }
}
也来自标记:
<!-- Fixed navbar -->
<nav class="navbar navbar-expand-md navbar-dark bg-dark fixed-top">
  <a class="navbar-brand" href="#">Angular Notes</a>
  <ul class="navbar-nav mr-auto">
    <li class="nav-item" [routerLinkActive]="['active']">
      <a class="nav-link" [routerLink]="['cards']">Cards</a>
    </li>
    <li class="nav-item" [routerLinkActive]="['active']">
      <a class="nav-link" [routerLink]="['about']">About</a>
    </li>
  </ul>
</nav>
<router-outlet></router-outlet>
如你所见,我们添加了更多内容。首先,我们为RouterLinkActive添加了路由器指令,它在我们的路由处于活动状态时设置一个类,以及为我们替换的routerLinkhref。这是routerOutlet,它告诉Router在当前页面上显示其内容的位置。因此,结合这些,我们现在在每个页面上都有菜单,以及两个具有不同内容的页面:

有关更多详细信息,请阅读路由器指南。
随着我们的应用程序的增长,我们可能会开始考虑优化。例如,如果我们喜欢默认加载 About 组件,并且仅在用户通过单击 Cards 链接隐式请求它之后才加载其他组件,该怎么办?为此,我们可以使用模块的延迟加载。让我们从生成开始CardsModule:
ng g module cards --flat
  create src/app/cards.module.ts (189 bytes)
通过使用该flat标志,我们告诉 Angular 不要为我们的模块创建单独的目录。让我们将所有与卡片相关的东西转移到我们的新模块中:
import { NgModule } from '@angular/core';
import { CommonModule } from '@angular/common';
import { CardService } from './services/card.service';
import { CardComponent } from './card/card.component';
import { CardListComponent } from './card-list/card-list.component';
import { NewCardInputComponent } from './new-card-input/new-card-input.component';

import {FormsModule, ReactiveFormsModule} from "@angular/forms";

import { AngularFireModule } from 'angularfire2';
import { AngularFireDatabaseModule } from 'angularfire2/database';
import { AngularFireAuthModule } from 'angularfire2/auth';

import { StoreModule } from '@ngrx/store';
import { EffectsModule } from '@ngrx/effects';
import { reducers } from './reducers';
import { CardsEffects } from './effects/cards.effects';

import { environment } from './../environments/environment';
import { MainComponent } from './main/main.component';

import {Routes, RouterModule, Router} from "@angular/router";

const routes: Routes = [
  {path: '', redirectTo: 'cards', pathMatch: 'full'},
  {path: 'cards', component: MainComponent},
]

@NgModule({
  imports: [
    CommonModule,
    FormsModule,
    ReactiveFormsModule,
    StoreModule.forFeature('cards', reducers),
    EffectsModule.forFeature([CardsEffects]),
    RouterModule.forChild(routes),
    AngularFireModule.initializeApp(environment.firebase),
    AngularFireDatabaseModule,
    AngularFireAuthModule,
  ],
  providers: [CardService],
  declarations: [
    CardComponent,
    CardListComponent,
    NewCardInputComponent,
    MainComponent
  ]
})
export class CardsModule { }
以前,我们forRoot在导入中看到了很多调用,但是在这里,我们调用了很多forFeatureor forChild。这就是我们如何告诉我们的组件我们正在扩展我们的配置,而不是从头开始创建它。
让我们看看我们的AppModule:
[...]
import { reducers, metaReducers } from './reducers/root';

const routes: Routes = [
  {path: '', redirectTo: 'about', pathMatch: 'full'},
  {path: 'about', component: AboutComponent},
  { path: 'cards', loadChildren: './cards.module#CardsModule'}
]

@NgModule({
  declarations: [
    AppComponent,
    AboutComponent,
  ],
  imports: [
    BrowserModule,
    RouterModule.forRoot(routes, {useHash: true}),
    StoreModule.forRoot(reducers, { metaReducers }),
    EffectsModule.forRoot([]),
  ],

  bootstrap: [AppComponent]
})
export class AppModule { }
在这里,我们仍然定义EffectsModule.forRoot或者它不会在我们加载的模块中工作(因为它将无处添加延迟加载)。我们还在这里看到了路由器的新语法loadChildren,当我们请求 路由时,它告诉我们的路由器延迟加载CardsModule位于./cards.module文件中的文件cards。我们从新./reducers/root.ts文件中包含了元减速器——让我们来看看它:
import {ActionReducer, ActionReducerMap, createFeatureSelector, createSelector, MetaReducer} from '@ngrx/store';
import {storeLogger} from 'ngrx-store-logger';
import {environment} from '../../environments/environment';

export interface State {
}

export const reducers: ActionReducerMap<State> = {
}

export function logger(reducer: ActionReducer<State>): any {
    // default, no options
    return storeLogger()(reducer);
}

export const metaReducers: MetaReducer<State>[] = !environment.production
  ? [logger]
  : [];
在根级别,我们目前没有任何状态,但我们仍然需要定义空状态,以便我们可以在延迟加载的过程中扩展它。这也意味着我们的卡片状态必须在其他地方定义,对于这个例子,我们在src/app/reducers/index.ts:
import * as fromCards from './cards';
import {ActionReducer, ActionReducerMap, createFeatureSelector, createSelector, MetaReducer} from '@ngrx/store';
import {storeLogger} from 'ngrx-store-logger';
import {environment} from '../../environments/environment';
import * as fromRoot from './root';

export interface CardsState {
    cards: fromCards.State;
}

export interface State extends fromRoot.State {
  cards: CardsState;
}

export const reducers = {
    cards: fromCards.reducer
}

/**
 * Cards Reducers
 */
export const getCardsState = createFeatureSelector<CardsState>('cards');
export const getCards = createSelector(
    getCardsState,
    state => state.cards.cards
);
所以我们通过卡键扩展我们的根状态。这给了我们最后的关键嵌套重复(作为一个模块和一个名为 的数组cards)。
如果我们现在打开我们的应用程序并查看开发者控制台的网络选项卡,我们会看到cards.module.chunk.js只有在我们点击/cards链接后才会加载它。
准备生产
因此,让我们构建我们的应用程序以供生产使用。为此,让我们运行构建命令:
ng build --aot -prod
 65% building modules 465/466 modules 1 active ...g/getting-started-ng5/src/styles.scssNode#moveTo was deprecated. Use Container#append.
Date: 2018-01-09T22:14:59.803Z
Hash: d11fb9d870229fa05b2d
Time: 43464ms
chunk {0} 0.657b0d0ea895bd46a047.chunk.js () 427 kB  [rendered]
chunk {1} polyfills.fca27ddf9647d9c26040.bundle.js (polyfills) 60.9 kB [initial] [rendered]
chunk {2} main.5e577f3b7b05660215d6.bundle.js (main) 279 kB [initial] [rendered]
chunk {3} styles.e5d5ef7041b9b072ef05.bundle.css (styles) 136 kB [initial] [rendered]
chunk {4} inline.1d85c373f8734db7f8d6.bundle.js (inline) 1.47 kB [entry] [rendered]
那么这里发生了什么?我们正在将我们的应用程序构建为可以从任何 Web 服务器提供服务的静态资产(如果你想从子目录提供服务ng build,请选择--base-href)。通过使用-prod,我们告诉 AngularCLI 我们需要生产构建。并--aot告诉它我们喜欢提前编译。在大多数情况下,我们更喜欢这样,因为它允许我们获得更小的包和更快的代码。此外,请记住,AoT 对你的代码质量过于严格,因此可能会产生你以前从未见过的错误。提前运行构建,以便更容易修复。
如何使用Angular 5:i18n
构建我们的应用程序的另一个原因是 Angular 如何处理i18n,或者说是国际化。Angular 不是在运行时处理它,而是在编译时处理它。让我们为我们的应用程序配置它。为此,让我们将 i18n 属性添加到我们的 AboutComponent。
<div class="jumbotron">
  <h1 class="display-3" i18n>Cards App</h1>
</div>
通过使用它,我们告诉 Angular 编译器标签的内容需要被翻译。它不是 Angular 指令,它在编译过程中被编译器删除,并由给定语言的翻译替换。所以我们标记了我们的第一条翻译消息,但是接下来呢?我们如何才能真正翻译它?为此,Angular 为我们提供了ng xi18n命令:
ng xi18n
cat src/messages.xlf
<?xml version="1.0" encoding="UTF-8" ?>
<xliff version="1.2" xmlns="urn:oasis:names:tc:xliff:document:1.2">
  <file source-language="en" datatype="plaintext" original="ng2.template">
    <body>
      <trans-unit id="80dcbb43f590ee82c132b8c725df2b7b433dc10e" datatype="html">
        <source>Cards App</source>
        <context-group purpose="location">
          <context context-type="sourcefile">app/about/about.component.ts</context>
          <context context-type="linenumber">3</context>
        </context-group>
      </trans-unit>
    </body>
  </file>
</xliff>
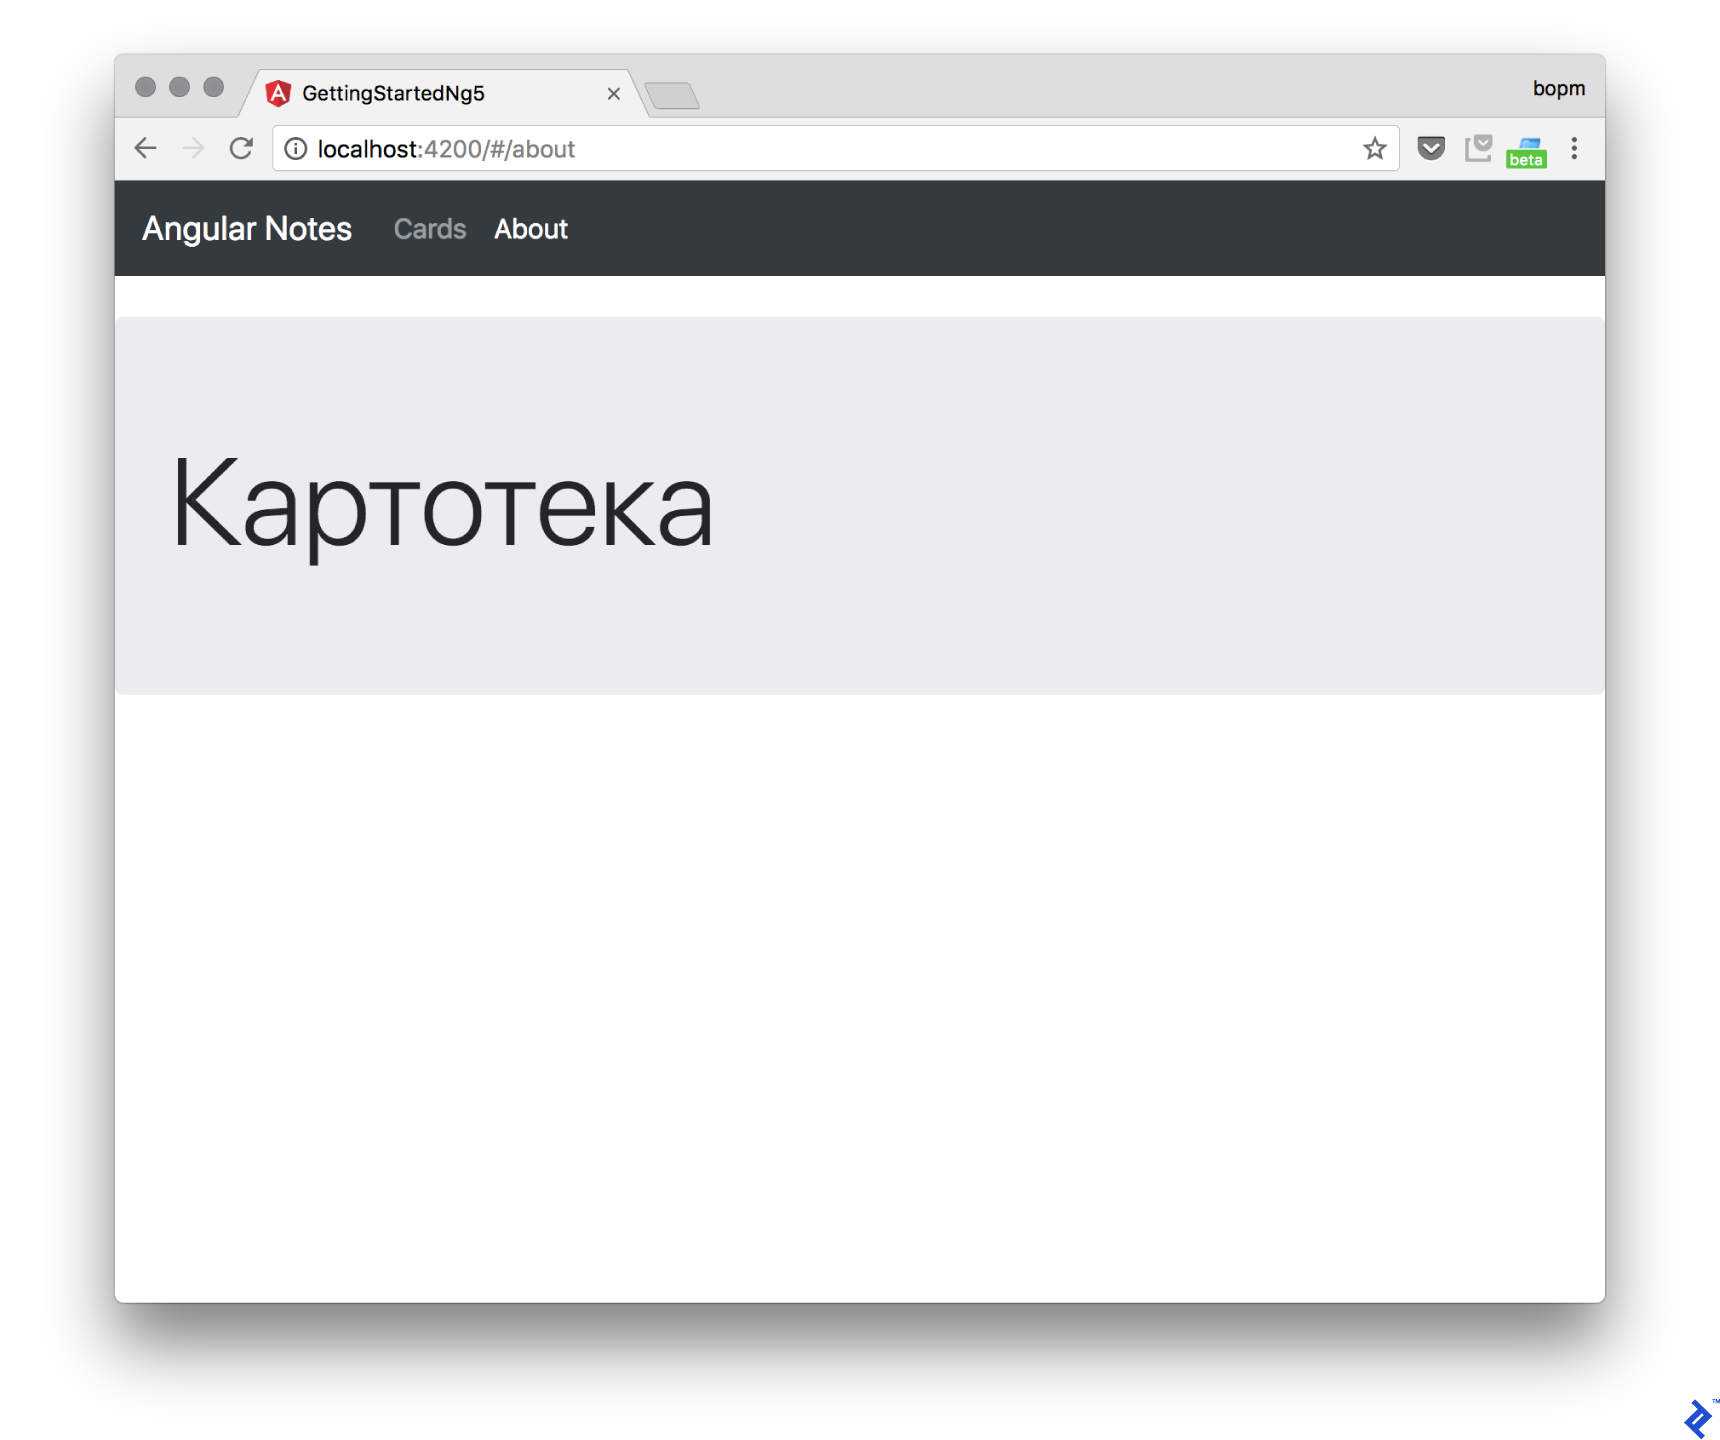
所以我们有一个翻译文件,将我们的消息映射到它们在源代码中的实际位置。现在,我们可以将文件交给Phrase。或者,我们可以手动添加我们的翻译。为此,让我们在 src 中创建一个新文件messages.ru.xlf:
<?xml version="1.0" encoding="UTF-8"?>
<xliff xmlns="urn:oasis:names:tc:xliff:document:1.2" version="1.2">
  <file original="ng2.template" datatype="plaintext" source-language="en" target-language="ru">
    <body>
      <trans-unit id="80dcbb43f590ee82c132b8c725df2b7b433dc10e">
        <source xml:lang="en">Cards App</source>
        <target xml:lang="ru">Картотека</target>
      </trans-unit>
  </body>
  </file>
</xliff>
我们现在可以通过运行此命令来提供我们的应用程序(例如俄语)ng serve --aot --locale=ru --i18n-file=src/messages.ru.xlf。让我们看看它是否有效:
现在,让我们自动化我们的构建脚本,以便我们可以在每个生产构建中以两种语言构建我们的应用程序,并调用其相应的目录 en 或 ru。为此,让我们将 build-i18n 命令添加到scripts我们的部分package.json:
"build-i18n": "for lang in en ru; do yarn run ng build --output-path=dist/$lang --aot -prod --bh /$lang/ --i18n-file=src/messages.$lang.xlf --i18n-format=xlf --locale=$lang --missing-translation=warning; done"
Angular 5用法教程:Docker
现在让我们打包我们的应用程序以供生产使用,并为此使用 Docker。让我们开始Dockerfile:
#### STAGE 1: Build ###
## We label our stage as 'builder'
FROM node:8.6-alpine as builder

ENV APP_PATH /app
MAINTAINER Sergey Moiseev <sergey.moiseev@toptal.com>

COPY package.json .
COPY yarn.lock .

### Storing node modules on a separate layer will prevent unnecessary npm installs at each build
RUN yarn install --production && yarn global add gulp && mkdir $APP_PATH && cp -R ./node_modules .$APP_PATH

WORKDIR $APP_PATH

COPY . .

### Build the angular app in production mode and store the artifacts in dist folder
RUN yarn remove node-sass && yarn add node-sass && yarn run build-i18n && yarn run gulp compress

#### STAGE 2: Setup ###
FROM nginx:1.13.3-alpine

ENV APP_PATH /app
MAINTAINER Sergey Moiseev <sergey.moiseev@toptal.com>

### Copy our default nginx config
RUN rm -rf /etc/nginx/conf.d/*
COPY nginx/default.conf /etc/nginx/conf.d/

### Remove default nginx website
RUN rm -rf /usr/share/nginx/html/*

EXPOSE 80

### From 'builder' stage copy over the artifacts in dist folder to default nginx public folder
COPY --from=builder $APP_PATH/dist/ /usr/share/nginx/html/

CMD ["nginx", "-g", "daemon off;"]
因此,我们使用基于 Node 的镜像为我们的应用程序使用多阶段构建,然后我们使用基于 Nginx 的镜像构建服务器包。我们还使用 Gulp 来压缩我们的工件,因为 Angular CLI不再为我们压缩。我觉得这很奇怪,但好吧,让我们添加 Gulp 和压缩脚本。
yarn add gulp@3.9.1 gulp-zip@4.1.0 --dev
[...]
success Saved 2 new dependencies.
├─ gulp-zip@4.1.0
└─ gulp@3.9.1
✨  Done in 10.48s.
让我们gulpfile.js在我们的应用根目录中添加:
const gulp = require('gulp');
const zip = require('gulp-gzip');

gulp.task('compress', function() {
    for (var lang in ['en', 'ru']) {
        gulp.src([`./dist/${lang}/*.js`, `./dist/${lang}/*.css`])
        .pipe(zip())
        .pipe(gulp.dest(`./dist/${lang}/`));
    }
});
现在我们只需要我们的 Nginx 配置来构建我们的容器。让我们将其添加到nginx/default.conf:
server {
  listen 80;

  sendfile on;

  default_type application/octet-stream;

  client_max_body_size  16m;

  gzip on;
  gzip_disable "msie6";

  gzip_vary on;
  gzip_proxied any;
  gzip_comp_level 6;
  gzip_buffers 16 8k;
  gzip_http_version 1.0; # This allow us to gzip on nginx2nginx upstream.
  gzip_min_length 256;
  gzip_types text/plain text/css application/json application/x-javascript text/xml application/xml application/xml+rss text/javascript application/vnd.ms-fontobject application/x-font-ttf font/opentype image/svg+xml image/x-icon;

  root /usr/share/nginx/html;

  location ~* \.(js|css)$ {
    gzip_static on;
    expires max;
    add_header Cache-Control public;
  }

  location ~ ^/(en|ru)/ {
    try_files $uri $uri/ /index.html =404;
  }

  location = / {
     return 301 /en/;
   }
}
所以我们从目录en或ru默认情况下为我们的构建应用程序提供服务,我们从根 URL 重定向到/en/.
现在我们可以使用以下docker build -t app .命令构建我们的应用程序:
docker build -t app .
Sending build context to Docker daemon    347MB
Step 1/17 : FROM node:8.6-alpine as builder
 ---> b7e15c83cdaf
Step 2/17 : ENV APP_PATH /app
[...]
Removing intermediate container 1ef1d5b8d86b
Successfully built db57c0948f1e
Successfully tagged app:latest
然后我们可以在本地机器上运行 Docker 来为它提供服务docker run -it -p 80:80 app。它正在工作:
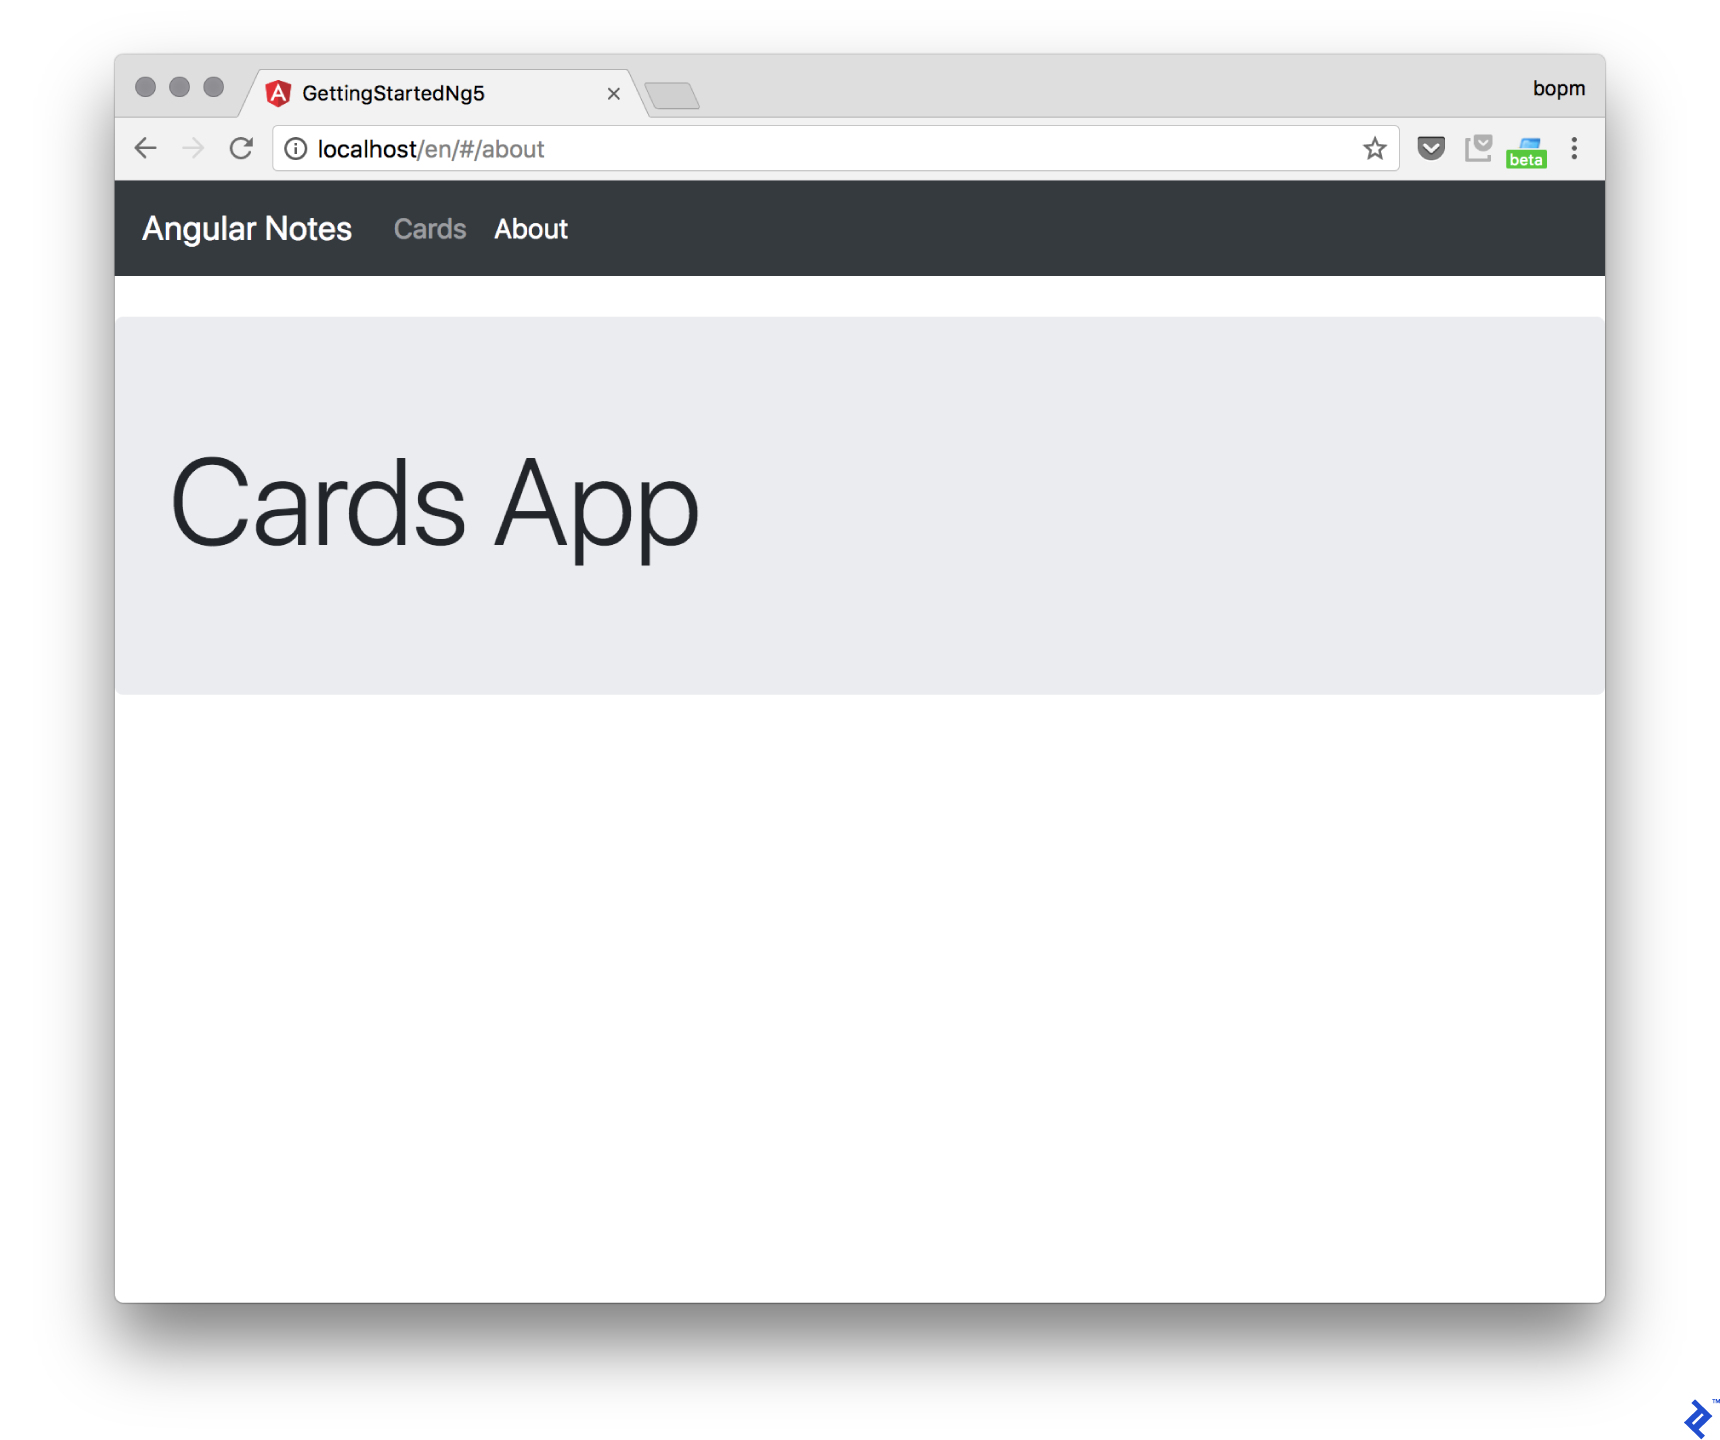
请注意/en/网址。
Angular 5项目示例指南概括
恭喜你完成本教程。你现在可以加入其他Angular 开发人员的行列。你刚刚创建了你的第一个 Angular 应用程序,使用 Firebase 作为后端,并通过 Docker 容器中的 Nginx 为其提供服务。
与任何新框架一样,掌握它的唯一方法就是不断练习。希望你已经了解 Angular 有多么强大。当你准备好继续时,Angular 文档是一个很好的资源,其中有一整节介绍高级技术。

